Hello everyone, I hope you all are doing great. In today's post, I am going to share a Final Year Project in detail, named as Real Time Security Control System using XBee and GSM. I will give you all the details so that you can easily design it on your own. I've given the Proteus Simulation to download below. In that zip file, you will get both the Arduino codes and Proteus Simulations.
I have divided this whole project design into four parts. If you got into any trouble in your project, then ask in comments and I will try my best to resolve them. So, today we are gonna have a look at the basics of this Security project. There are a lot of systems introduced in the market these days that are used to transfer sensor data from one node to another ei ...
Hello Geeks, I hope you all are doing great and enjoying your festive seasons. This time, we have come up with a new project which will make your festival a bit brighter so here comes a Christmas tree.
It is said that Christmas is the center of all the celebrations. Did you guys know the scientist who discovered the light bulb, Thomas Edison and his friends were the first to put up the light bulbs on the Christmas tree, and here we are going to keep that tradition forward? Well, it’s time to gear up for the next season of Christmas being tech-savvy. Hence we have decided to brighten up a Christmas tree with the usage of Arduino Uno and LEDs in real life.
Software to Install:
To make our festival a little safer, we will first make our Christmas tree in the simulation and for that, we will ...
Hello friends, hope you all are fine and having fun with your lives. In today's post we are gonna have a look at How to use Temperature Sensor 18B20 in Proteus ISIS. I will use Arduino board as a microcontroller and will connect the temperature sensor with it and then will display the code on LCD. I have already posted the same tutorial in which I have done Interfacing of Temperature Sensor 18B20 with Arduino but in that project I have used the real components and designed the hardware. But today, I will just show you the simulation so that you could test the simulation first and then design it in hardware.
Temperature Sensor 18B20 is the most commonly used temperature sensor. Its a one wire sensor means it sends data through a single wire and we ...
Hi Guys! Hope you’re well today. I welcome you on board. Happy to see you around. In this post today, I’ll detail the Introduction to Arduino Sensor Shield.
Arduino Sensor Shield is a board compatible with the Arduino Boards and comes with the standard header layout. It is used to connect sensors, servos, LCD with the Arduino board without soldering. This board is connected with the Arduino Board using the jumper wires.
I suggest you read this post all the way through as I’ll be discussing the complete Introduction to Arduino Sensor Shield.
Let’s get started.
Introduction to Arduino Sensor Shield
Arduino Sensor Shield is a board used to connect sensors, servos, LCD with the Arduino Board without the requirement of soldering.
Using Arduino ...
Hello friends, hope you all are fine and having fun with your lives. Today, I am going to share a new project in which we are gonna do Arduino Bluetooth communication. The Bluetooth module I have used for this project is HC-05, which is a serial Bluetooth module. We can quite easily perform the Bluetooth communication with this module using Arduino board. I have worked on many projects in which I have to send the data from sensors to my computer via Bluetooth. So, in such projects I normally use this Bluetooth module which is connected with the sensors and then Arduino gets the data from these sensors and then send this data to computer via Bluetooth module. In this project, I have used Arduino board but you can use PIC Microcontroller or 8051 Mic ...
Hello friends, hope you all are fine and enjoying life. Today's post is about removing a small error named as Recognition Failed in EasyVR, which I encountered while working with EasyVR shield with Arduino UNO. I have posted a complete project on EasyVR shield around a year ago in which I haven't mentioned this error because at that time I didn't encountered it. But today while working with EasyVR shield, I encountered this problem so I thought to share it with you guys.
EasyVR shield is a voice recognition module which is used for recognizing voices and operating accordingly. Using this module, one ca quite easily control anything using voice. In the previous project, I have controlled a robot using voice commands like when I say Forward then it ...
Hello geeks, welcome to our new project. In this project, we are going to make a very useful and interesting electronics tool that we as engineers or tinkers need in everyday life. We use the capacitor in most of our projects for various purposes such as filters or power supplies. Most of the time, we do not have a provision to measure the capacitor value in our digital multimeter. So, this time we came up with the solution. Hence, we will make our own capacitance measurement tool using Arduino.
Rather than investing in new electronic equipment, we will use an Arduino board and some basic components to measure the capacitance. To make this project, we should have some working knowledge about the capacitor. Here, we will not discuss the in-depth wo ...
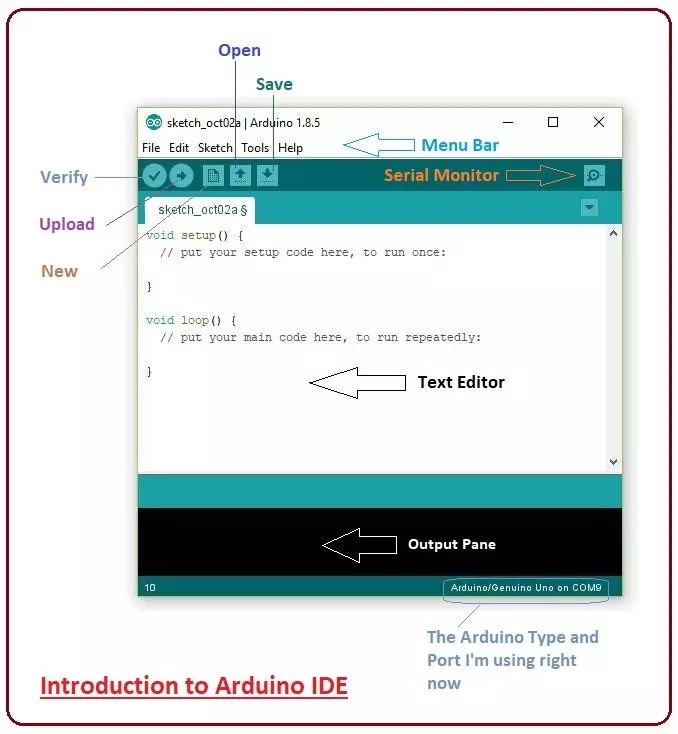
Hey Guys! Hope you are doing well. Today, I'll discuss the detailed Introduction to Arduino IDE, where IDE stands for Integrated Development Environment - An official software introduced by Arduino.cc, that is mainly used for writing, compiling and uploading the code in almost all Arduino modules/boards. Arduino IDE is open-source software and is easily available to download & install from Arduino's Official Site.
In this post, I'll take you through the brief Introduction of the Software, how you can install it, and make it ready for your required Arduino module. Let's dive in and get down to the nitty-gritty of this Software.
Introduction to Arduino IDE
Arduino IDE is an open-source software, designed by Arduino.cc and mainly used for wri ...
Hello friends, I hope you all are fine and enjoying. I have been working on a project these days and one portion of my current project includes the NRF24L01 Arduino Interfacing. So, I thought why not share this knowledge with you people, I hope you will learn something new and more interesting. If you don't know much about it, then you should have a look at Introduction to NRF24L01.
Few days ago, I have also posted a tutorial on XBee Arduino Interfacing, in which we have seen how to make wireless communication between two XBee Modules which is also an RF module. So, now we are gonna have a look at How to make Wireless Communication between two NRF24L01 modules. I hope you are gonna enjoy this nrf24l01 arduino Interfacing. Here's the video demonstr ...
Hi Friends! Hope you are doing great. Today, I am going to give you a detailed Introduction to Arduino Uno. It is a microcontroller board developed by Arduino.cc and is based on Atmega328 Microcontroller. The first Arduino project was started in Interaction Design Institute Ivrea in 2003 by David Cuartielles and Massimo Banzi with the intention of providing a cheap and flexible way for students and professionals to learn embedded programming.
Arduino UNO is a very valuable addition in electronics that consists of a USB interface, 14 digital I/O pins(of which 6 Pins are used for PWM), 6 analog pins and an Atmega328 microcontroller. It also supports 3 communication protocols named Serial, I2C and SPI protocol. You should also have a look at this vid ...