Hello friends, hope you all are fine and having fun with your lives. Today, I am going to share a tutorial on DC Motor Speed Control using Arduino in Proteus ISIS. In my previous post, we have seen How to design a DC Motor Direction Control Project using Arduino in Proteus ISIS and if you haven't checked it out then I would recommend you to have a look at it first. Because, in today's tutorial, I am gonna extend that tutorial and will add the DC Motor Speed Control in it. So, today, we will control both the direction as well as speed of the DC Motor. Moreover, you should also have a look at How to use Arduino PWM Pins if you are not much familiar with PWM control. In the previous tutorial, we have seen How to control the direction of a DC Motor, which is important when you are working on s ...
Hello friends, hope you all are fine and having fun with life. Today, I am going to share DC Motor Direction Control with Arduino. I have designed a complete simulation in Proteus, which will help you in understanding the controlling of DC motor. I would recommend you to first read How to Control relay in Proteus ISIS which will help you in understanding the functionality of relays because in today's tutorial, I have used relays to do the DC Motor Direction Control. I have already posted a tutorial on DC Motor Drive Circuit in Proteus ISIS . Libraries Libraries used in this tutorial Arduino Library for Proteus: V1.0 (2015, used in this tutorial) · latest version: V4.0 (October 2026) Helping Tools Serial Monitor Advance : a serial terminal window for the UART of your board Serial Monitor Ex ...
Hello friends, hope you all are fine and having fun with your lives. Today, I am going to share a new Genuino Library for Proteus. Genuino boards are just the same as Arduino boards but with slight difference of color and shape. I have already posted a tutorial on Arduino Library for Proteus in which I have explained how to download the Arduino Library and use it in Proteus. Today, I am going to post a similar library but for Genuino boards. Their functionality is exactly the same as the Arduino Library but they have better look and Genuino Color. Updates Arduino Library for Proteus Latest version: Arduino Library for Proteus V4.0 (October 2026): six boards with working LEDs, a RESET button and a built-in serial monitor Earlier versions: V3.0 (2023) · V2.0 (2021) · V1.0 (2015) · Genuino bo ...
Hello friends, hope you all are fine and having fun with your lives. Today, I am going to share a new project in which we are gonna do Arduino Bluetooth communication. The Bluetooth module I have used for this project is HC-05, which is a serial Bluetooth module. We can quite easily perform the Bluetooth communication with this module using Arduino board. I have worked on many projects in which I have to send the data from sensors to my computer via Bluetooth. So, in such projects I normally use this Bluetooth module which is connected with the sensors and then Arduino gets the data from these sensors and then send this data to computer via Bluetooth module. In this project, I have used Arduino board but you can use PIC Microcontroller or 8051 Microcontroller as well. Because they both hav ...
Hello friends! In this tutorial, we will configure an Arduino Yún to connect to a known Wi-Fi network and understand how it should recover when that network temporarily disappears. We will separate one-time configuration from ordinary connection monitoring so that the board does not repeatedly restart its own network. The original Yún combines an ATmega32U4 with an Atheros AR9331 running a Linux-based system. The Linux side manages Wi-Fi, while an Arduino sketch can communicate with it through the Bridge library. That arrangement is different from an ordinary sketch controlling a Wi-Fi shield directly. We will first save the intended network profile, then inspect connection status from the Arduino side. Along the way, we will correct several misunderstandings in the earlier example, includ ...
Hello friends! In this tutorial, we will study an electronic quiz project with the 8051 microcontroller. The project combines a keypad, a character LCD and serial communication to create a small question-and-answer game. You can play alone or compete with a second player who enters answers through a computer terminal. We will begin with the game rules, because the circuit only becomes useful when its behavior is clearly defined. Then we will follow the connections, organize the firmware and examine question selection, scoring and input handling. These are useful skills for menu systems, classroom projects and other embedded applications that accept input from more than one source. The original project used an AT89C51, a 20x4 LCD and a 4x4 keypad in Proteus. Its screenshots and demonstratio ...
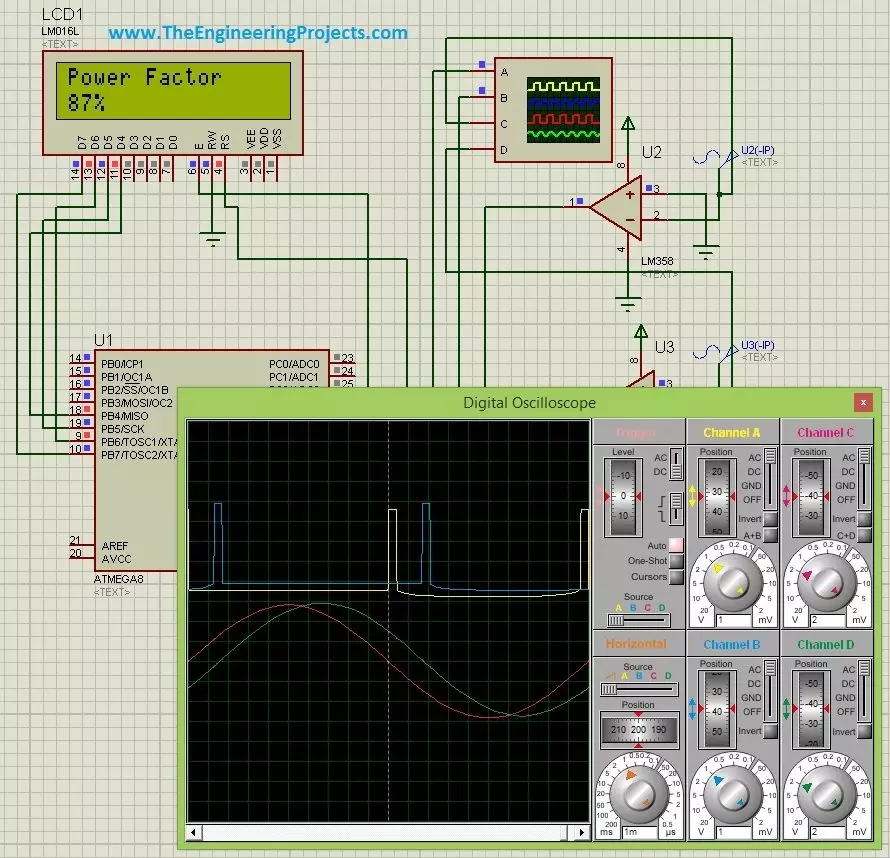
Hello friends! Today, we are going to discuss power factor measurement using a microcontroller in Proteus. We will use the ATmega8 project to understand how the timing difference between voltage and current can be converted into a phase angle, and then into a power factor reading on an LCD. I will start with the electrical meaning of power factor, because a correct calculation is useful only when we understand what it measures. After that, we will examine the zero-crossing stages, choose a timer resolution, work through numerical examples and discuss the changes needed for reliable firmware. The circuit is an educational simulation using separate signals to represent voltage and current. Its timing method is appropriate for sinusoidal waveforms. When a load draws distorted current, we need ...
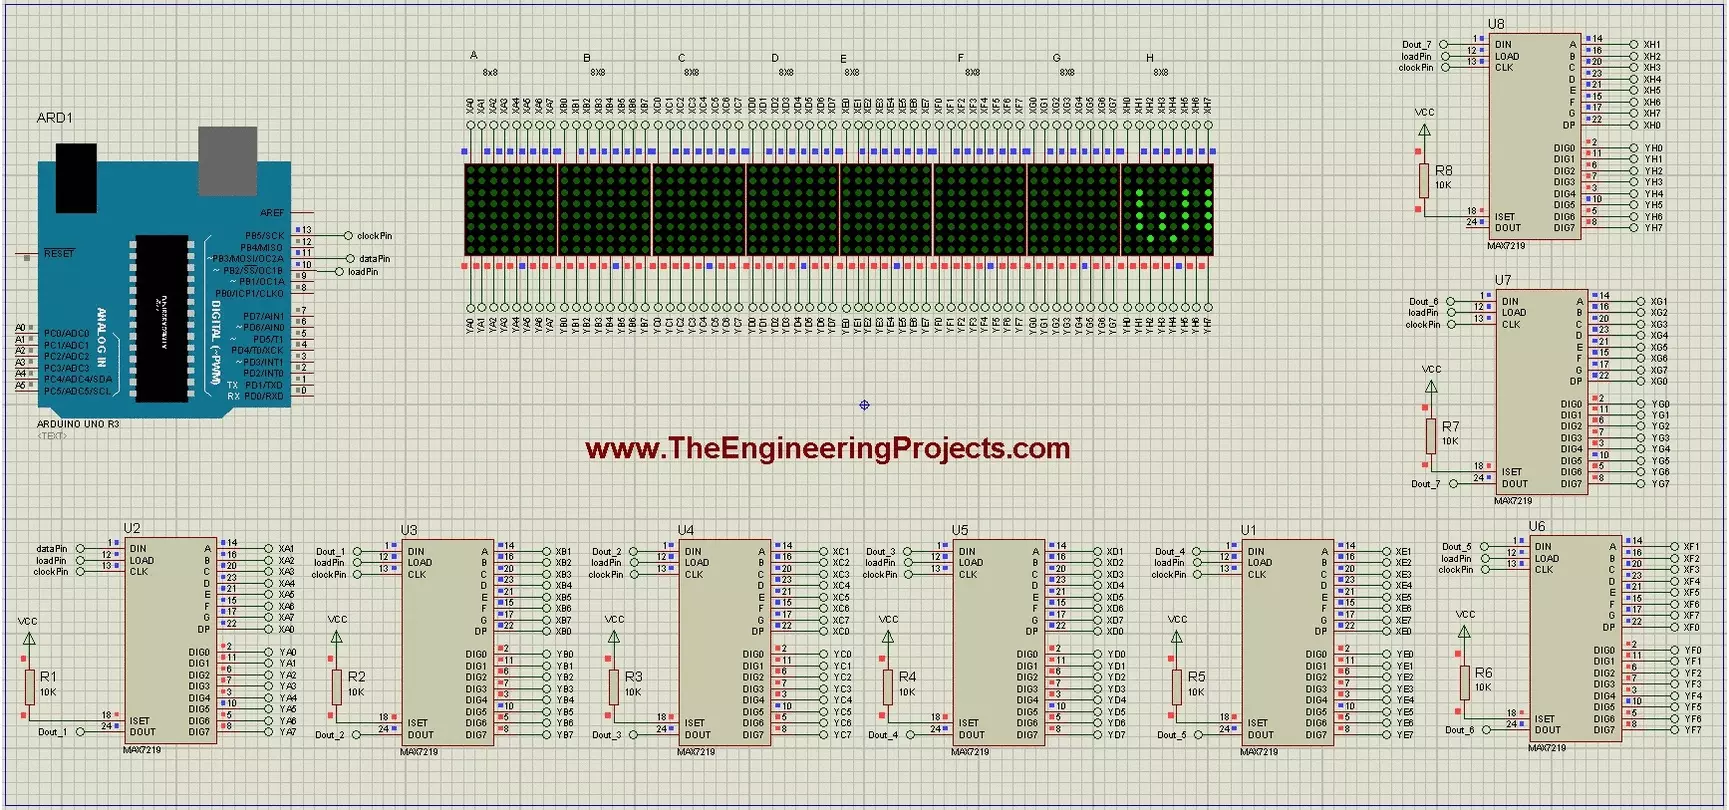
Hello friends! Today we will build a scrolling-text display using Arduino and eight 8x8 LED matrices. Each matrix has its own MAX7219 driver, and the drivers share a serial connection so Arduino can control the complete display through three signal lines. The original project demonstrates the text in Proteus and includes a useful circuit drawing and animation. We will retain those illustrations while explaining the driver correctly, checking the matrix orientation and using a current text-animation library interface. Our display is eight pixels high and sixty-four pixels wide. We will first understand one module, then connect the chain, display a short message and adjust the scroll timing. Power distribution and hardware mapping matter just as much as the sketch when moving from a simulato ...
Hello friends! In this tutorial, we will interface a matrix keypad with Arduino Uno and show each pressed key on a 20x4 LCD in Proteus. We will begin with the keypad's internal connections, then build the circuit and write a sketch that keeps the displayed text within a defined area. A keypad is useful when a project needs several related buttons, such as digits for a calculator or commands for a menu. A matrix arrangement reduces the number of controller connections compared with giving every button its own dedicated input. Our example uses twelve keys arranged in four rows and three columns. We will preserve the original circuit's pin assignments, explain how the Keypad library scans them, and check common mistakes such as reversed connector order, repeated characters and LCD overflow. F ...
Hello friends! Our Pixy camera is connected and PixyMon is working, so we can now teach the camera which colour we want it to detect. In this tutorial, we will select a blue region on a globe, store it as a signature and refine the detection when other parts of the scene also match. We are using the original Pixy CMUcam5 and its matching PixyMon software. The screenshots belong to that setup. If you have Pixy2, use its corresponding software and instructions rather than assuming that every menu and parameter is identical. The most useful idea to understand before starting is that we are teaching a colour signature. We are not teaching the camera the meaning of a globe or asking it to recognize every globe regardless of colour. Once that distinction is clear, the results and their limitatio ...