Hello friends, hope you all are fine and having fun with your lives. In today's post, I am gonna share How to get Hex File from Arduino. It's quite a simple post and I have already explained it many times in my posts but still, I am getting a lot of messages regarding it that's why I thought to write a separate post for it. First of all, let's have a little introduction about it. If you have worked on PIC Microcontrollers or Atmel etc then you have seen that you always get hex files from their compilers and then you burn that hex file in the respective Microcontroller using their programmer or burner. But that's not the case with Arduino. In Arduino boards, you simply plug it with your computer and you hit the Upload button and the code automatica ...
Hello geeks, welcome to our new project. Here, we are going to make a very useful project which we can use for ourselves or we can use this as a product as well on an industry level.
In this project, we are going to make a water level indicator. We all know it is one of the most essential products because there are many water tanks in every house or office, and most of them are not easily accessible to check the level of water in it and I think most of us faced the problem such as shortage of water as we do not have anything to monitor the exact amount of water available in the tank and this causes many problems on our daily lives.
Software to install
As we are going to make this project in the simulation first, for that, we will use the Proteus ...
Buy This Project
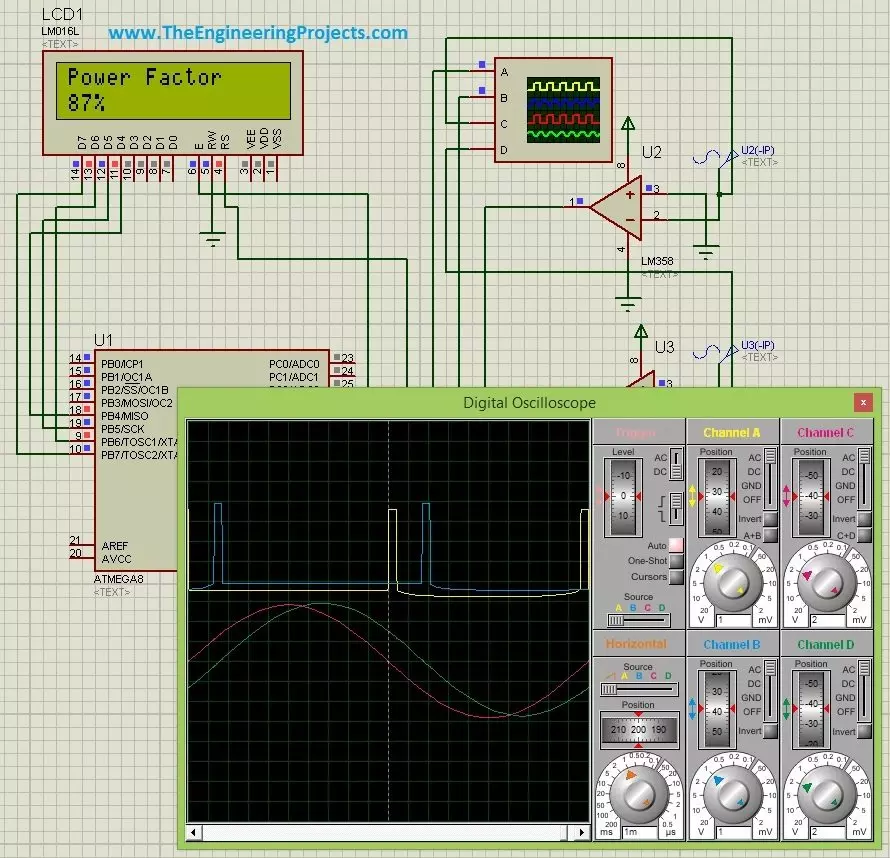
Hello friends, hope you all are fine and having fun. Today's post is about Power Factor Measurement using Microcontroller in Proteus ISIS. As usual, I have this project simulation in which I have to simulate a power factor measuring project using atmega microcontroller. So, I use atmega8 microcontroller and the used Proteus ISIS as the simulating software. Power Factor Measurement isn't that difficult but its a quite tricky and in today's post we are gonna cover it in full detail.
There are many ways for power factor measurement and today's the method we are gonna use is called zero crossing detection. We will first detect the zero crossing of our signal and then we are gonna do the power factor measurement based on the detectio ...
XBee modules have become a cornerstone for wireless communication in today's electronics and embedded systems projects. Whether you are building a home automation system, an industrial control network, or simple point-to-point communication between devices, XBee offers a reliable and easy-to-use solution. In this comprehensive introduction, we will explore what the XBee module is, how it works, its core features, and how you can integrate it into microcontroller-based projects.
In future tutorials, we’ll delve deeper into specific interfacing guides, including how to interface the XBee module with a computer and connecting XBee to an Arduino. While Arduino will be our primary focus due to its popularity and accessibility, you can also connect XBee modules to other microcontrollers such as ...
In this tutorial, we will walk through the process of interfacing a pH sensor with an Arduino UNO in Proteus. To make the project more practical and user-friendly, an LCD is included so that both the sensor’s voltage output and the calculated pH value can be displayed clearly in real time. This allows the user to easily monitor the readings without needing additional software or serial monitoring tools.
The term pH, short for “potential of Hydrogen,” indicates the concentration of hydrogen ions (H⁺) in a solution and is used to determine whether it is acidic, neutral, or alkaline. A pH of 7 represents neutrality, values below 7 indicate acidity, and values above 7 represent alkalinity. Monitoring pH is essential in several fields—such as water quality testing, agriculture, food processing ...
Hello everyone! I hope you all will be absolutely fine and having fun. Today, I am going to elaborate you, how to make Arduino Projects for beginners. Before gong into the detail of this tutorial first of all I would like to explain you a bit about Arduino. Arduino is an open source micro controller. A lot of help is available online so its user friendly hardware. Most of the students prefer to do work on this device.
Arduino is a low cost high performance device. Due to its cost effectiveness and open source feature it is commonly available in the market these days. An amazing thing about Arduino is that students can take help online with a lot of examples regarding any of the task. There are thousands of Arduino projects are available online f ...
Hello everyone! hope you all will be fine. In this article I am going to share the knowledge about displaying Scrolling Text on LCD with Arduino. A Liquid Crystal Display is usually known as LCD in the market. It is a display unit made up of liquid crystal. When we want to made electronics based projects, we need a device on which we can show the system’s output and the desired messages. There are a lot of such devices which are helpful to display the output messages and the most common is a seven segment display.
Alternate good option is LCD, which are now available in different size having different qualities. 16×2 LCD Module is a most frequently used device for the electronic projects out of all the other types of LCD’s available in the marke ...
Hello friends, hope you all are fine. In today's project, we are gonna design Electronic Quiz Project with 8051 Microcontroller. I have done this project recently in which we need to design a quiz project game using 8051 Microcontroller. It was quite a big project and we have to work quite hard to make it done. In this project we have used many components on which I have already post tutorials so that you guys first get introduction to those components. So, first of all you should read Interfacing of LCD with 8051 Microcontroller, after that you must check Interfacing of Keypad with 8051 Microcontroller and finally get your hands on Serial communication with 8051 Microcontroller. These tutorial are must to read because these are all gonna use in t ...
Hello friends, hope you all are fine and having fun with your lives. Today, I am going to share a new Genuino Library for Proteus. Genuino boards are just the same as Arduino boards but with slight difference of color and shape. I have already posted a tutorial on Arduino Library for Proteus in which I have explained how to download the Arduino Library and use it in Proteus. Today, I am going to post a similar library but for Genuino boards. Their functionality is exactly the same as the Arduino Library but they have better look and Genuino Color.
II hope you are gonna like this library as well. Other bloggers are welcome to share this library with their reader but do mention our link in creator section, we will be really obliged. Now, let's start ...
Hello friends, today's post is, as the name suggests, about the Voice Recognition using EasyVR Shield. Voice recognition is quite a difficult task and usually done on software like MATLAB, but what if someone needs a stand alone project, a kind of autonomous voice recognition project, which doesn't use computer.
EasyVR is the solution for such projects. I recently did one project on this module named as Voice Recognition using EasyVR Shield and it worked really cool so I thought to share this new technology with you guys. I couldn't write the next part of Proteus tutorial, actually firstly I was busy in this project and then I thought to share this one as its quite exciting one. After completing this project, I will come back to Proteus tutorial.
...