Hello friends, hope you all are fine and having fun with your lives. Today, I am going to share a new Genuino Library for Proteus. Genuino boards are just the same as Arduino boards but with slight difference of color and shape. I have already posted a tutorial on Arduino Library for Proteus in which I have explained how to download the Arduino Library and use it in Proteus. Today, I am going to post a similar library but for Genuino boards. Their functionality is exactly the same as the Arduino Library but they have better look and Genuino Color.
II hope you are gonna like this library as well. Other bloggers are welcome to share this library with their reader but do mention our link in creator section, we will be really obliged. Now, let's start ...
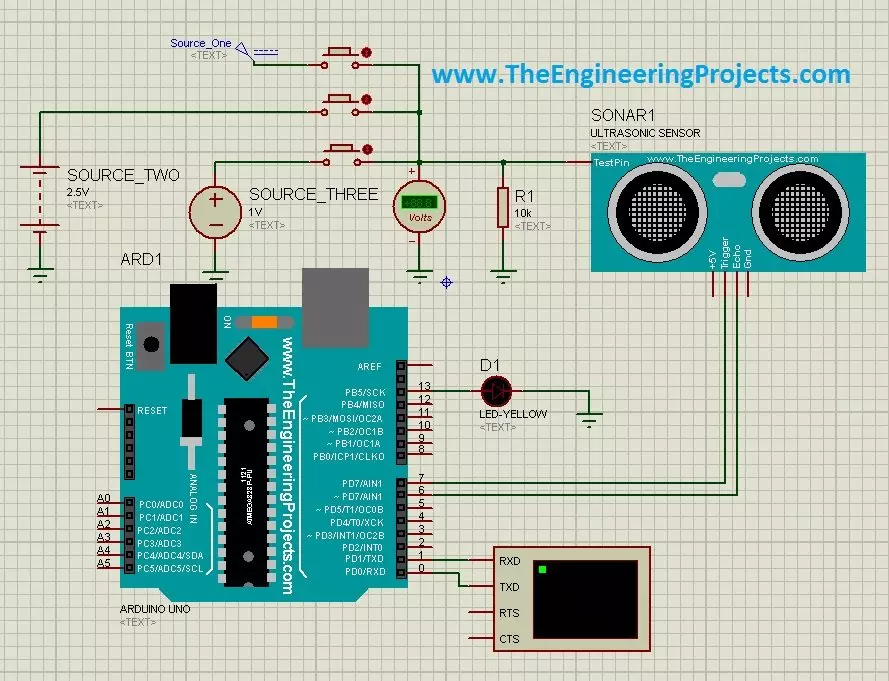
Hello friends, a few days ago I posted an Ultrasonic Sensor Library for Proteus, using which one can easily simulate ultrasonic sensor in Proteus. The post was highly praised by the reader and I have received quite good feedback from the followers. So, I thought of sharing some more examples related to it so that users can get a complete understanding of how to use Ultrasonic sensors in Proteus. Today, we are gonna have a look on different Ultrasonic Sensor Simulation in Proteus. If you haven't read the previous post then first have a look at it because without the installation of Ultrasonic Sensor Library in Proteus, you won't be able to use these examples. Ultrasonic Sensor is used widely in Embedded Systems.Today, I am gonna share three examples of Ultrasonic Sensor Simulation in Proteu ...
Hi Geeks, welcome to our new project. Our new project is one of the most common issues you’ve seen in your cities. In this project, we are going to make a car parking system with automatic billing. In the entire world, there are an estimated 1.4 billion cars on the road, which is absolutely great news if we are considering the development of the Automobile industry. But the most serious issue is that the number of cars exceeds the number of available parking places, resulting in traffic congestion. Damaged cars due to this lack of space, fewer parking locations, lack of parking signage, informal parking, and overcharging for parking are just a few of the issues.
People are still choosing manual parking methods, which have a number of drawbacks, suc ...
Hello everyone, today I am going to share a complete project which is DS1307 Arduino based digital Clock in Proteus ISIS. In this project, I have designed a digital clock using Arduino UNO and DS1307 RTC Module. So, first of all, if you haven't yet installed then, you should install Arduino Library for Proteus using which you will be able to easily simulate Arduino baords in Proteus. Along with Arduino Library you will also need to install DS1307 Library for Proteus, which I have shared in my previous post as we are gonna use this RTC Module DS1307 for designing our digital clock.
So, now I hope that you have installed both these libraries successfully and are ready to design this DS1307 Arduino based Digital Clock. I have given the Simulation and ...
Hi Guys! Hope you are getting along with life pretty well. I always strive to keep you updated with most valuable information related to engineering and technology. Today, I'll discuss the detailed Introduction to Arduino Leonardo. It is a microcontroller board based on the ATmega32U4 and comes with 23 digital input/output pins. It is developed by Arduino.cc, aiming to provide easy to use interface with the ability to perform a number of functions on a single chip.
It incorporates everything required to drive the automation in the relevant project. Simply connect this device with the USB cable or power it up using DC adapter and start playing with it
In this post, I'll try to cover each and everything related to Arduino Leonardo, so you don't n ...
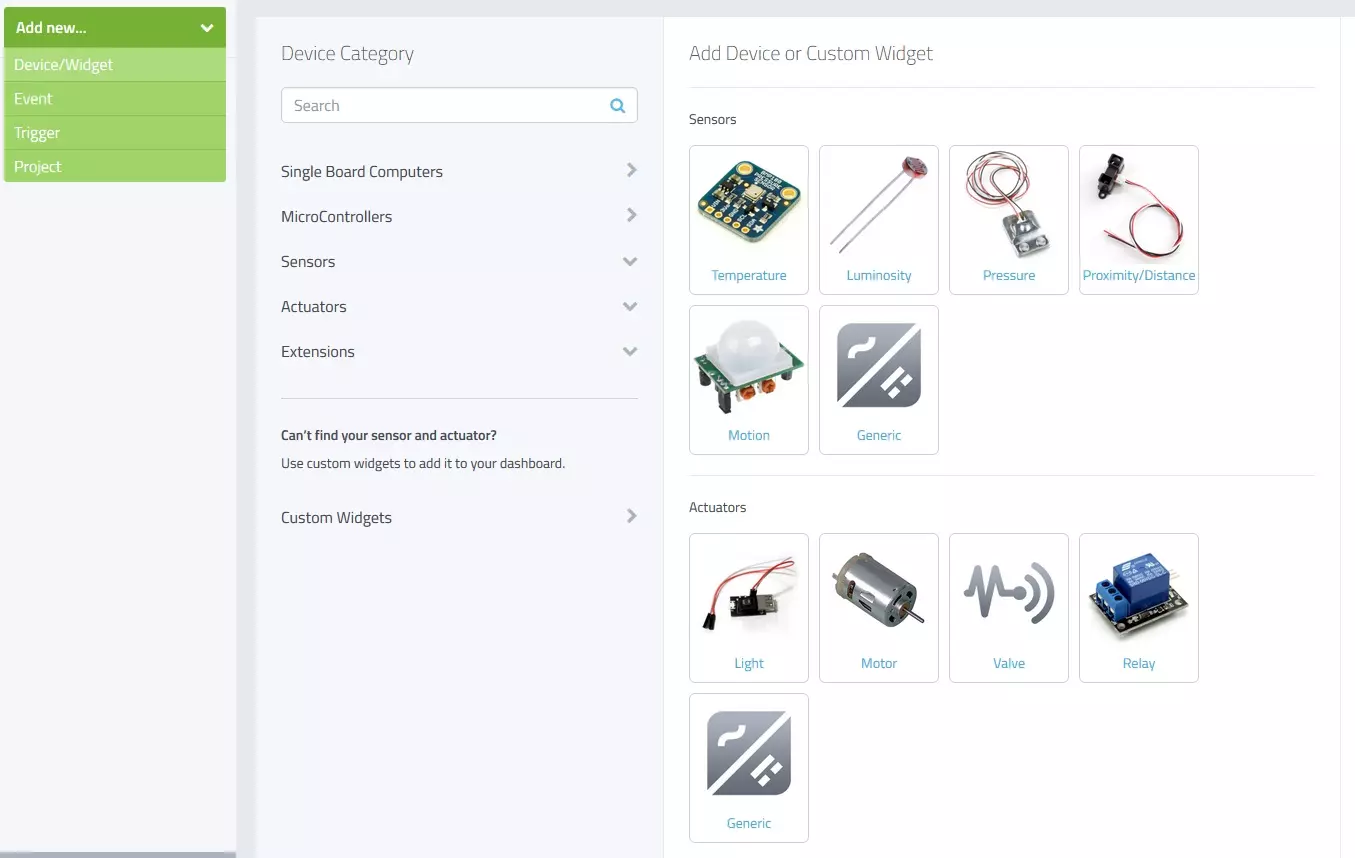
Hello friends, I hope you all are fine and having fun with your lives. Today, I am going to share a new and very exciting service with you guys which is named as myDevices Cayenne, we will have a look at getting started with Cayenne. Its really an awesome platform for students and hobbyist who wants to work on embedded systems but are afraid of programming codes.
Cayenne is an online project building platform using drag and drop. Currently it supports Arduino and Raspberry Pi. In simple words, you can design any of your Arduino or Raspberry Pi project simply by drag and drop different components. You don't need to write any code, you just need to place your blocks and upload it to your Arduino board. Its also known as the Graphical coding.
I came ...
Hello everyone, I hope you all are fine and having fun with your lives. Today, I am going to share the next tutorial in this series of basic Arduino tutorials and it's named How to use Arduino Serial Write. In this tutorial, I have given an overview of How to use the Arduino Serial Write Command. In the previous tutorial, we have seen How to use Arduino Serial Read? in which we have read the data coming from the serial port.
While today we will have a look at how to send the data through a serial port in Arduino and for that, I am going to use the Arduino Serial Write command. It's also going to be a very simple and basic Arduino tutorial but if you are new to Arduino then you must read it completely as it will gonna help you out. I have also desig ...
Hey Fellas! Hope you are getting along with life pretty well. This post is another addition in this Arduino Tutorial for Beginners series. Today, I'll discuss How to use analogWrite in Arduino? The analogWrite is mainly used to update the status of analog pins and is also used to map the analog values on the PWM (Pulse Width Modulation) pins.
You can check the article that I have posted previously on How to use analogRead in the Arduino - this command addresses the analog pins on the board and reads its status, while today's one does the exact opposite.
In this post, I'll try to break down each and everything related to analogWrite in simple steps, so you can grab the main idea pretty well. Let's jump right in.
How to use analogWrite in Arduino?
...
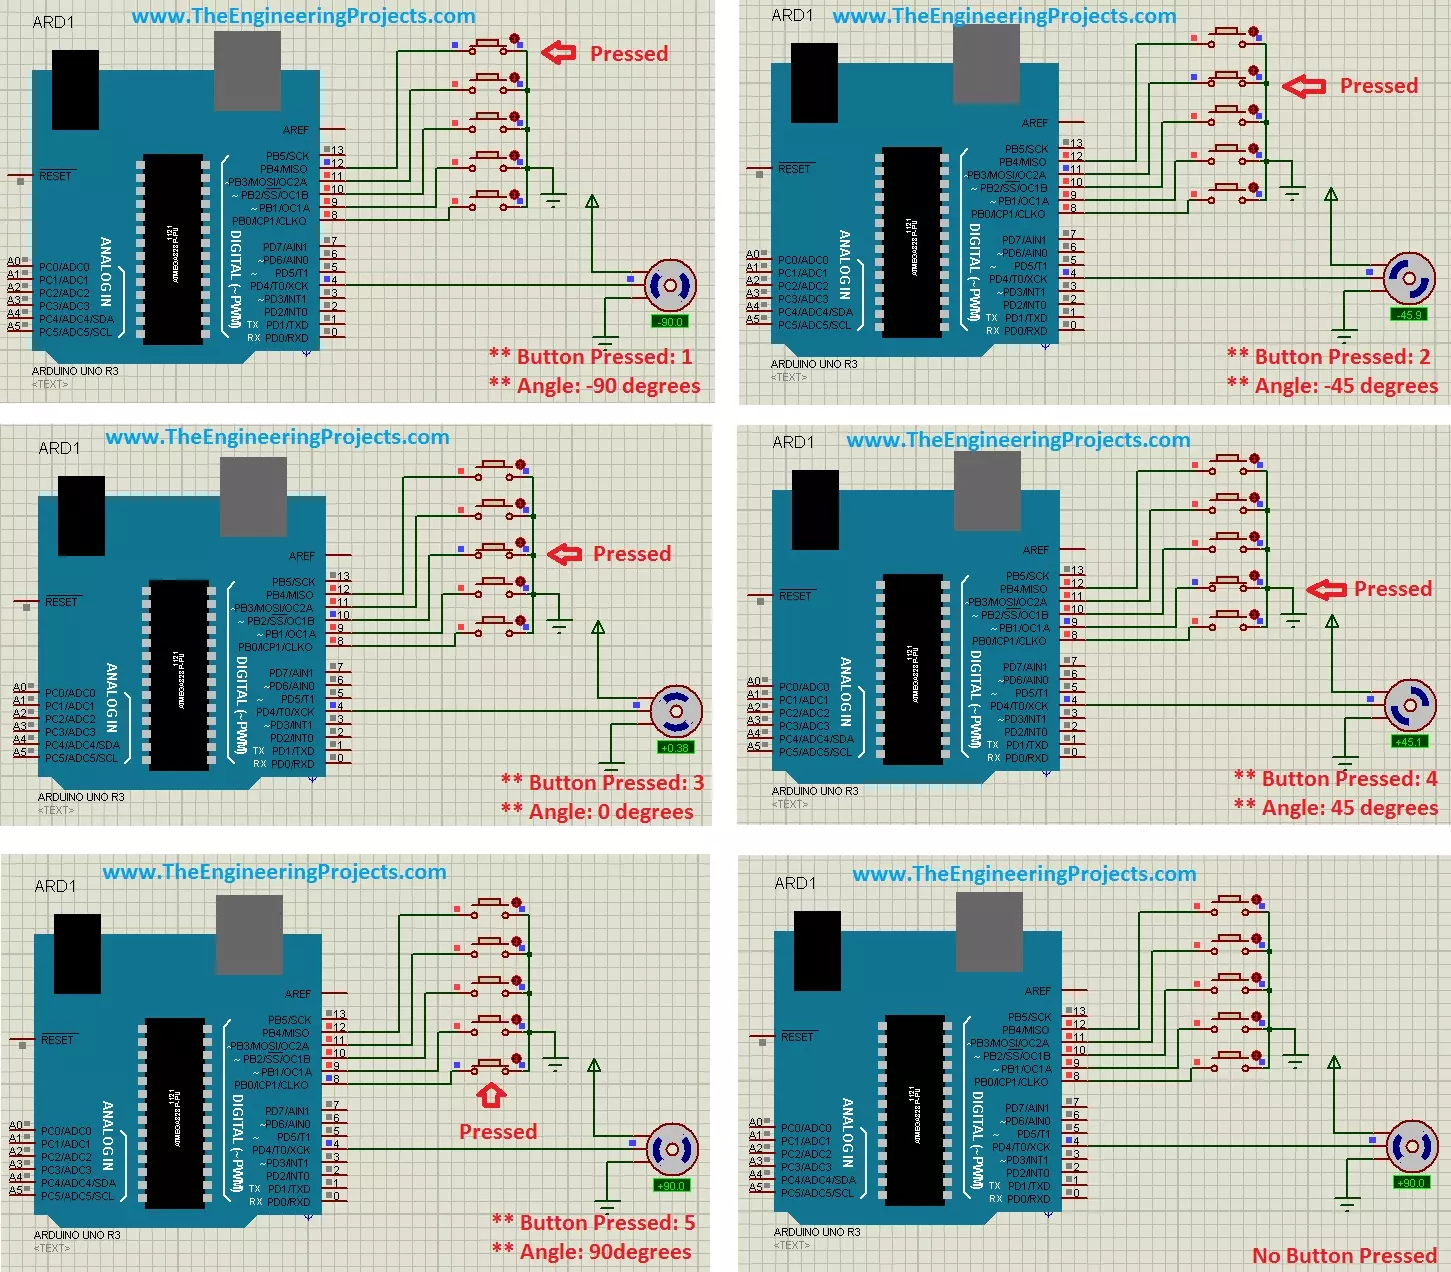
Hello friends, hope you all are fine and having fun with your lives. Today's post is about the Controlling of Servo Motor with Arduino in Proteus ISIS. Servo Motor is a common motor used in engineering projects for precise circular motion. We can move the servo motor at any desired angle, which is not possible in the case of other motors i.e. Stepper or DC.
For example, suppose I want to move an antenna at a precise angle of 47.5 degrees then if I use DC Motor, I have to use an encoder. So, in such cases instead of using a DC motor, I will prefer Servo Motor.
I have already posted Angle Control of Servo Motor using 555 Timer in which I have controlled servo motor using 555 timer and another tutorial about Controlling of Servo Motor using PIC Micro ...
Hello friends, I hope you all are doing great and having fun in your lives. In today's tutorial, we are gonna design a Heart Beat Monitor using Arduino in Proteus ISIS. You should download this Heart Beat Sensor Library V2.0 for Proteus because we are gonna use that to detect heart beat in Proteus.
I have also used a 20x4 LCD which will display our heart rate value. You should download this New LCD Library for Proteus. I have counted the heart beat for ten seconds and then I have multiplied it with 6 to get the heartbeat per minute which is abbreviated as bpm (beats per minute). So, let's get started with Heart Beat Monitor using Arduino in Proteus ISIS.
Heart Beat Monitor using Arduino in Proteus
First of all, click the below button to downloa ...