Hello friends, hope you all are fine and having fun with your lives. Today's post is about interfacing of RFID module RC522 with Arduino. RC522 is very simple yet effective module. It is an RFID module and is used for scanning RFID cards. Its a new technology and is expanding day by day. Now-a-days it is extensively used in offices where employees are issued an RFID card and their attendance is marked when they touch their card to rfid reader. We have seen it in many movies that when someone places ones card over some machine then door opens or closes. In short, its a new emerging technology which is quite useful.
I recently get a chance to work on a project in which I have to use RFID reader to scan cards. In this project I have used it for for s ...
Hello friends, I hope you all are fine and having fun with your lives. Today, I am going to share a complete Arduino Tutorial for Beginners because I was having a lot of requests about it. Reader were asking the same question that they are new to Arduino and how should they start so if you are beginner to Arduino and you don't have any idea How to learn it then you should read the below tutorials.
I have posted all the basic Arduino Tutorial for Beginners already so in today's tutorial I am just gonna arrange them and must ask you to read them one by one from top to bottom and at then end you will really be able to design any kind of project on Arduino. So, let's get started with Arduino Tutorial for Beginners:
Arduino Tutorial for Beginners
Befor ...
Hello geeks, welcome to our new project. Here, we are going to make a very useful project which we can use for ourselves or we can use this as a product as well on an industry level.
In this project, we are going to make a water level indicator. We all know it is one of the most essential products because there are many water tanks in every house or office, and most of them are not easily accessible to check the level of water in it and I think most of us faced the problem such as shortage of water as we do not have anything to monitor the exact amount of water available in the tank and this causes many problems on our daily lives.
Software to install
As we are going to make this project in the simulation first, for that, we will use the Proteus ...
In this tutorial, we will walk through the process of interfacing a pH sensor with an Arduino UNO in Proteus. To make the project more practical and user-friendly, an LCD is included so that both the sensor’s voltage output and the calculated pH value can be displayed clearly in real time. This allows the user to easily monitor the readings without needing additional software or serial monitoring tools.
The term pH, short for “potential of Hydrogen,” indicates the concentration of hydrogen ions (H⁺) in a solution and is used to determine whether it is acidic, neutral, or alkaline. A pH of 7 represents neutrality, values below 7 indicate acidity, and values above 7 represent alkalinity. Monitoring pH is essential in several fields—such as water quality testing, agriculture, food processing ...
Hey Fellas! Hope you are getting along with life pretty well. This post is another addition in this Arduino Tutorial for Beginners series. Today, I'll discuss How to use analogWrite in Arduino? The analogWrite is mainly used to update the status of analog pins and is also used to map the analog values on the PWM (Pulse Width Modulation) pins.
You can check the article that I have posted previously on How to use analogRead in the Arduino - this command addresses the analog pins on the board and reads its status, while today's one does the exact opposite.
In this post, I'll try to break down each and everything related to analogWrite in simple steps, so you can grab the main idea pretty well. Let's jump right in.
How to use analogWrite in Arduino?
...
Hello friends, hope you all are fine and having fun with your lives. Today, I am going to share a new project in which we are gonna do Arduino Bluetooth communication. The Bluetooth module I have used for this project is HC-05, which is a serial Bluetooth module. We can quite easily perform the Bluetooth communication with this module using Arduino board. I have worked on many projects in which I have to send the data from sensors to my computer via Bluetooth. So, in such projects I normally use this Bluetooth module which is connected with the sensors and then Arduino gets the data from these sensors and then send this data to computer via Bluetooth module. In this project, I have used Arduino board but you can use PIC Microcontroller or 8051 Mic ...
Hello friends, I hope you all are doing great. Today, I am going to share Circuit Designing of LCD with Arduino in Proteus ISIS. In my previous tutorial, I have posted a tutorial on How to use Arduino Library in Proteus. Using that library, we can easily test Arduino code in Proteus to check whether its working or not. If you haven't read that post then before starting it, first read it, as without adding the arduino library we can't use Arduino in Proteus.
Coming to today's post, as we have done adding the Arduino Library in Proteus, so I thought to do some projects on it and the first one I chose is quite simple one i.e. Circuit Designing of LCD with Arduino in Proteus ISIS. So we will have a look on how to show some characters on LCD using Ardu ...
Hello friends, I hope you all are doing great. In today's tutorial, I am going to show you How to Interface Arduino with 74HC595 & 74HC165. I have already interfaced these shift registers separately with Arduino. In the first tutorial we have seen Arduino 74HC595 Interfacing in which I have discussed How to increase the output pins of Arduino using 74HC595. After that in second tutorial we have seen Arduino 74HC165 Interfacing where we have increased the input pins of Arduino.
So, now we are gonna interface both of these shift registers with Arduino UNO and will increase both input and output pins of Arduino. I have also given the Proteus simulations for download at the end of this tutorial along with Arduino code. So, lets get started with In ...
Hello Everyone! Hope you’re well today. I welcome you on board. In this post today, I’ll walk you through the Introduction to Arduino USB Host Shields.
With Arduino USB host shield you can interface the USB device to your Arduino board. This USB host shield is based on MAX3421E which is mainly known as the USB host controller that contains the analog circuitry and digital logic required to apply the USB full speed peripheral to USB specifications rev. 2.0.
Moreover, this shield is compatible with TinkerKit which projects you can plug this TinkerKit module with the Arduino Boards.
Introduction to Arduino USB Host Shields
Arduino USB host shield is used to connect a USB device with the Arduino Board. Simply put, USB host shields provide the USB ...
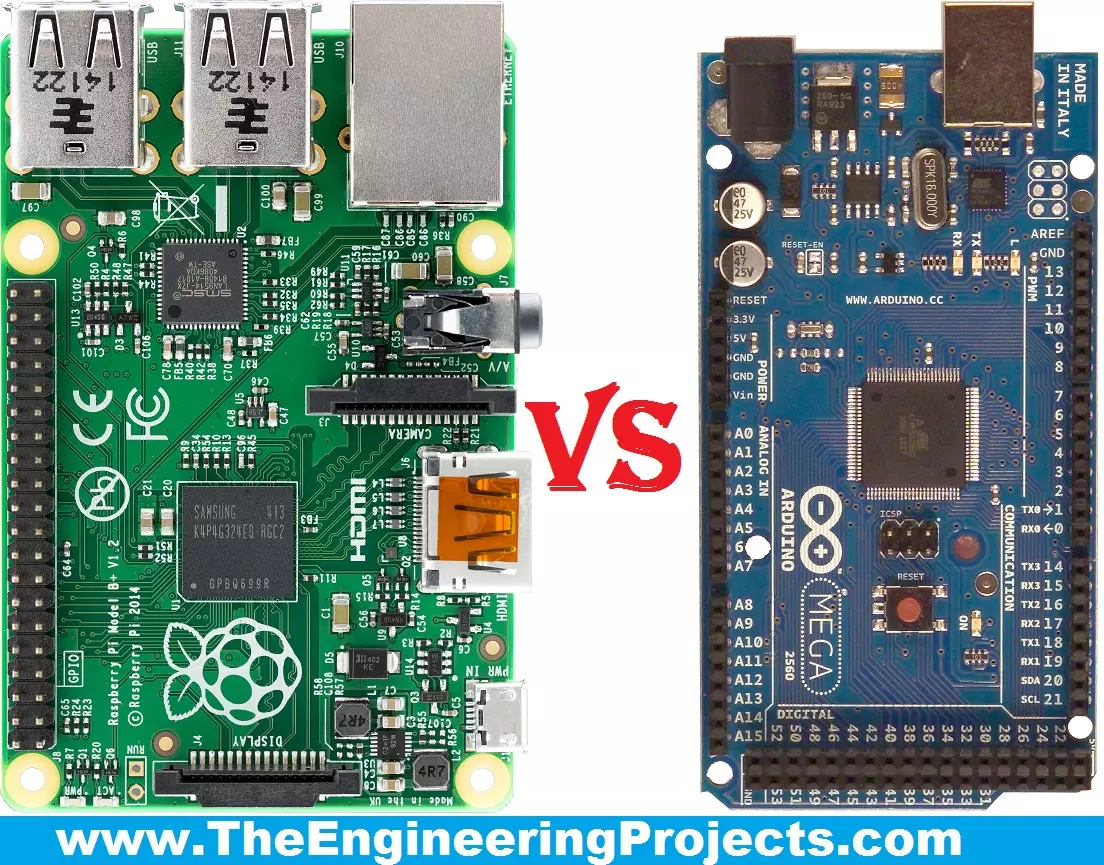
Hello friends, I hope you all are fine and enjoying your lives. Today, I am going to share a comparison titled Arduino Vs Raspberry Pi. Actually, I have been receiving a lot of emails and comments from new engineering students that "we are new in embedded and we want to start our project so please tell us which one is better Arduino or Raspberry Pi?" So, I thought to write a post on Arduino Vs Raspberry Pi and in this post, I am going to make a detailed comparison between the two and will let you know, which one you should use in your project and why?
So, I hope that you are all aware of or at least have heard about these two boards, which are Arduino and Raspberry Pi. If you haven't heard yet then you must have a look at Arduino Official Site and ...