Hey Guys! Hope you are doing well. I am back to give you valuable information as per your technical needs and requirements. Today, I’ll unlock the detailed Introduction to PIC16F877.
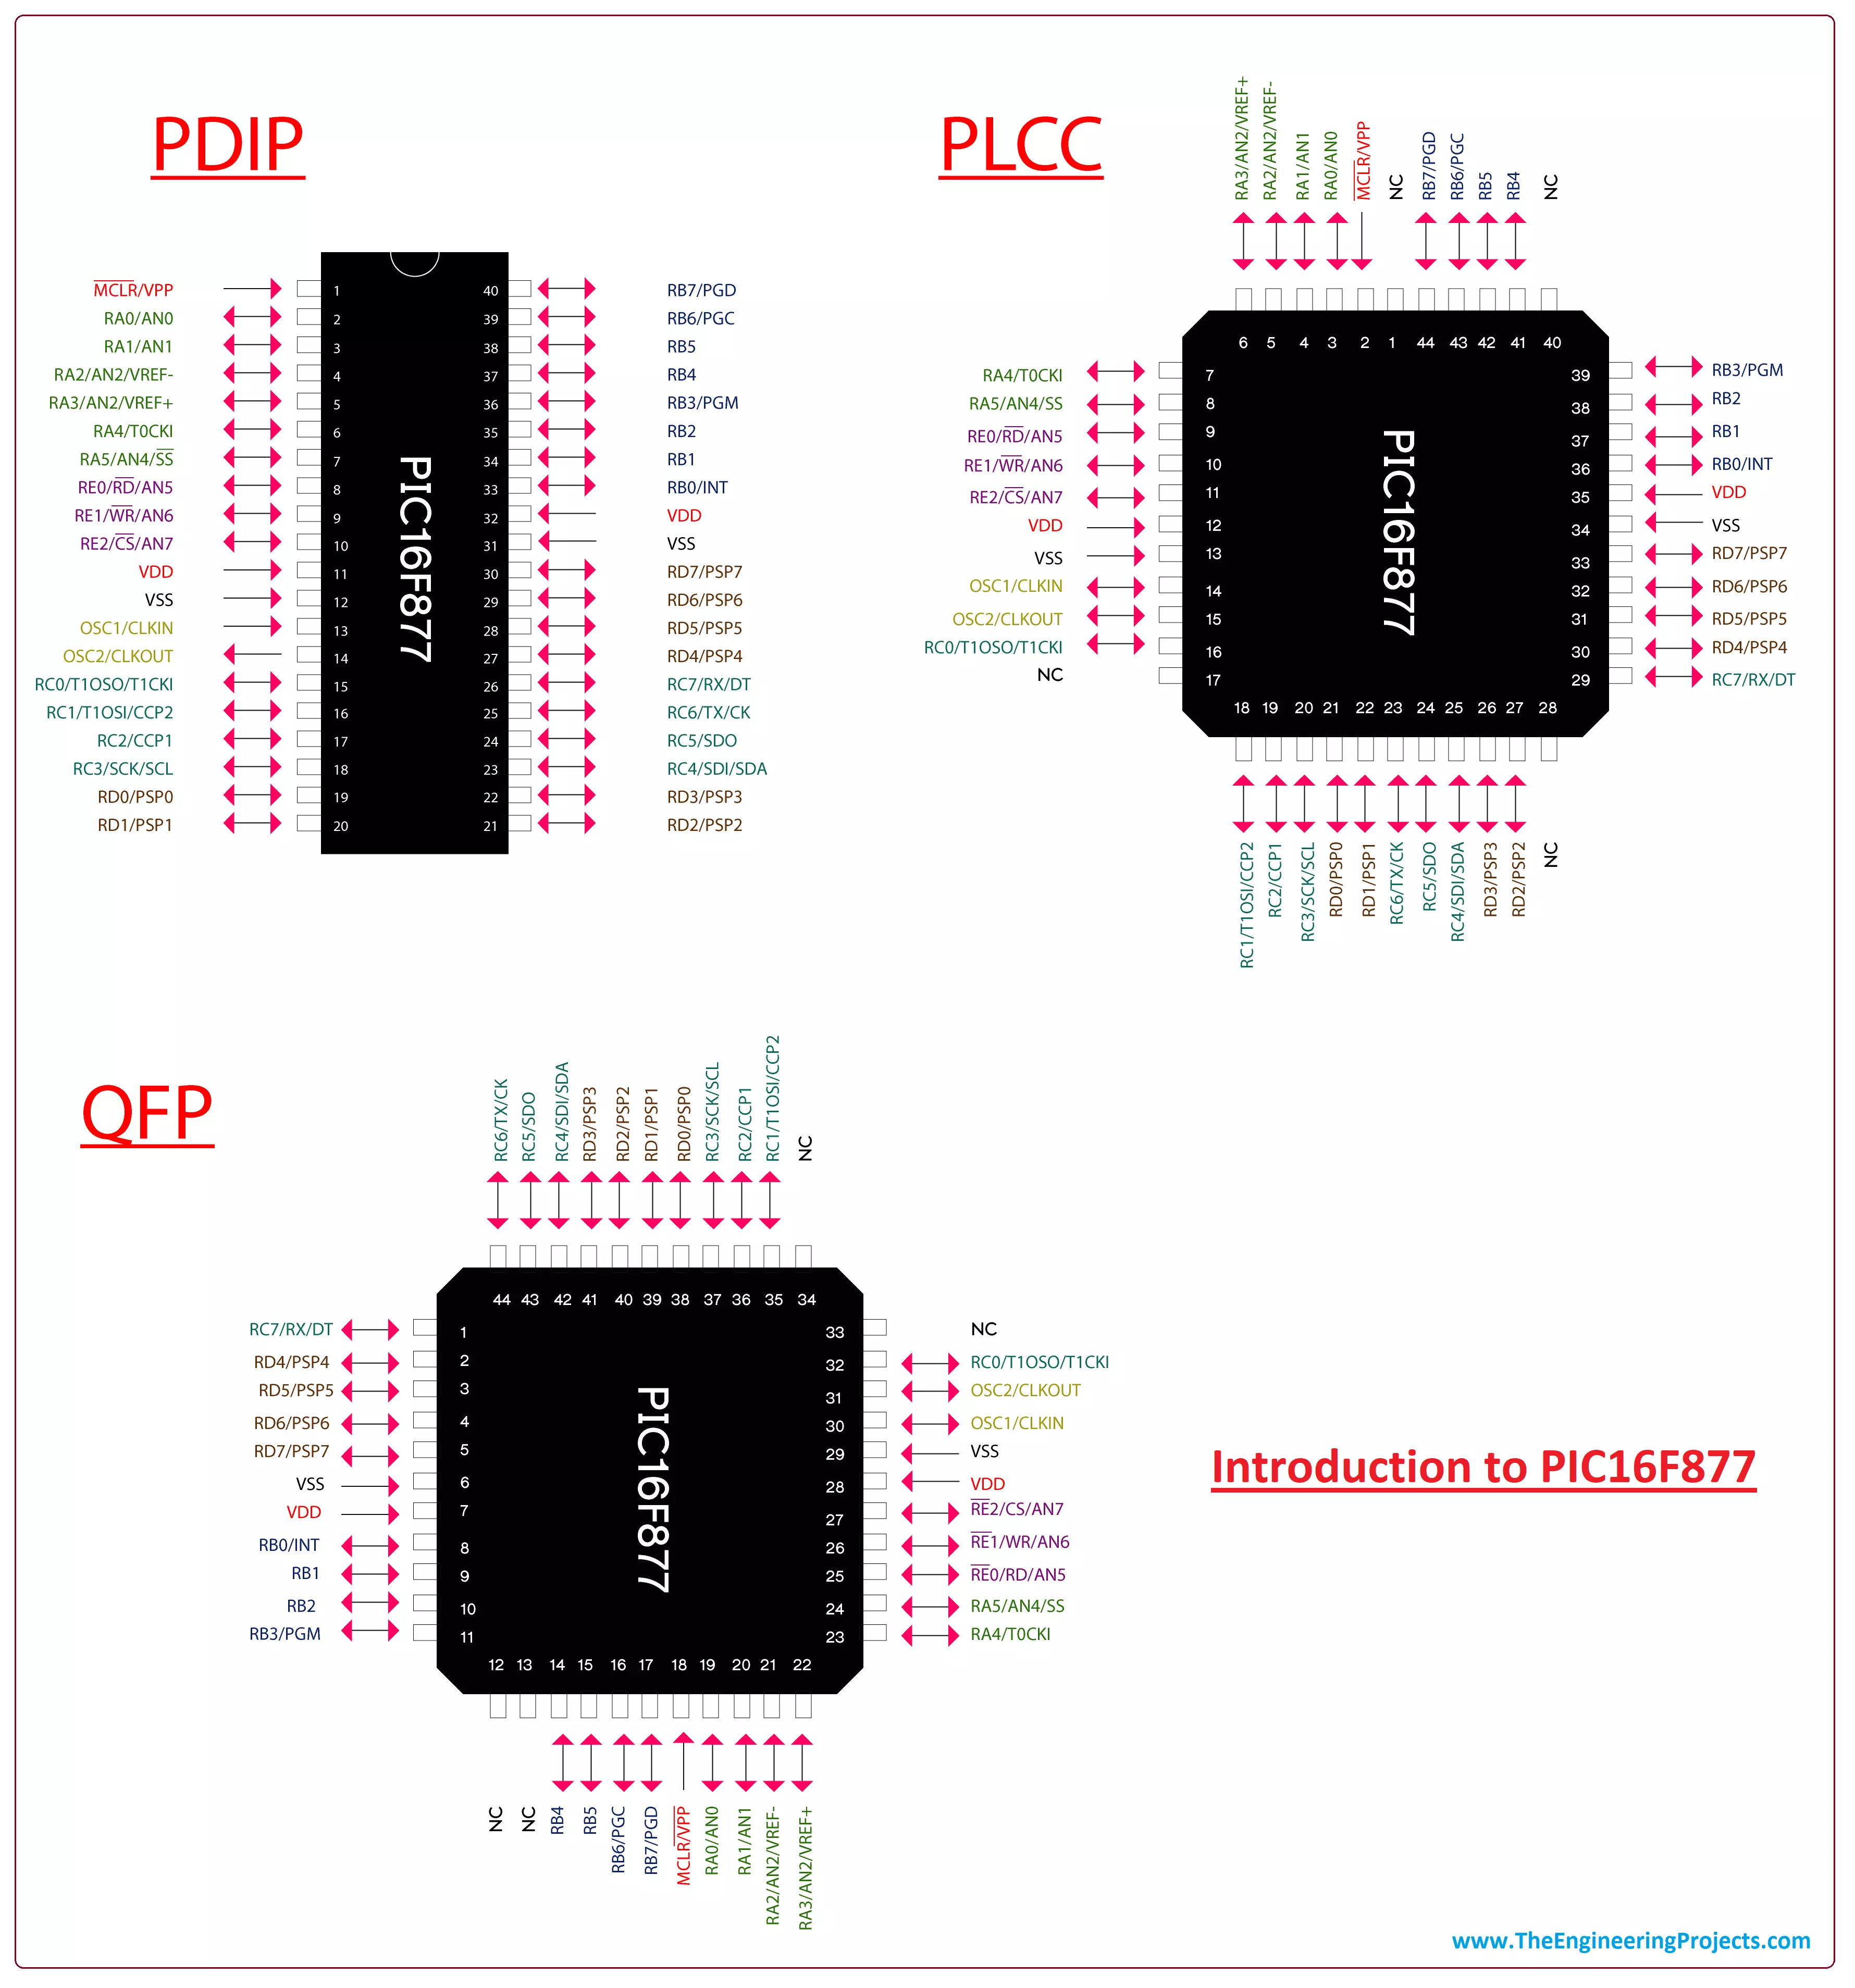
It is an 8-bit PIC microcontroller that comes with 40-pin interface (PDIP). It is based on Flash type memory. The High-Performance RISC CPU is incorporated inside the device that comes with only 35 single-word instructions, targeting mainly two types of instructions: single cycle and double-cycle.
In this post, I'll cover each and everything related to PIC16F877: its features, pinout and pin description, main functions, memory interface, compiler and burner used and applications. Let's dive right in and get down to the nitty-gritty of this tiny device.
Introduction ...
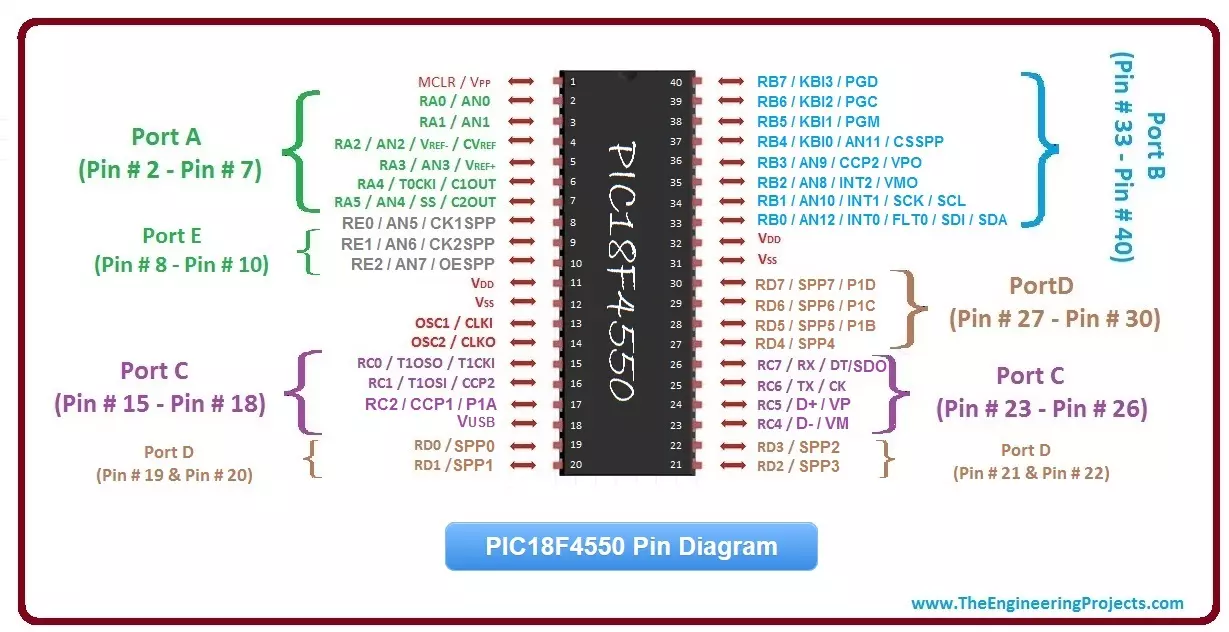
Hello friends I hope you all are doing great. Today, I am going to give you a detailed Introduction to PIC18F4550. Its one of the most renowned PIC Microcontroller and is used in almost every field. You should also have a look at my previous tutorial Introduction to PIC16F877a, as it will also be helpful. PIC18F4550 also has 40 Pins and is quite similar to PIC16F877a with some additional features.
In today's post we will get the general overview of this microcontroller, which is very essential if you wanna start working on it. If you have any problem in any part of it then ask your questions in comments and I will try my best to resolve them out. So, now let's get started with Introduction to PIC18F4550:
Introduction to PIC18F4550
PIC18F4550 is a ...
Hi Friends! Hope you are doing well. We welcome you on board. Today, I'll highlight and explain the details on the Introduction to PIC16F84a. It is an 18-pin PIC microcontroller, introduced by Microchip Technology, that comes with serial programming algorithm. It contains one 8-bit timer and 13 I/O bidirectional pins.
Microcontrollers have always been a great choice for experts since their inception long while ago. They are widely used for the embedded system, industrial automation, and robotics as they contain an onboard chip that requires no external components for making it work like an automatic system and reduces the space required for the development of the project.
In this tutorial, I'll discuss each and everything related to PIC16F84a, s ...
Hello everyone, today I am going to share Stepper Motor Control using PIC Microcontroller. We are all quite well aware of stepper motor but if you don't have much of the idea about this motor then you should give it a google search. :P Stepper motor is used in such projects where precise movement is required. Projects where we need to move the object at some particular angle. Stepper Motor works on electromagnetic phenomena. Electromagnets are present in the stepper motor and when we supply voltage across them, these electromagnets got polarized and produce a magnetic field and in order to depolarize them, what we need to do is simply depolarize these electromagnets. We all know that in motors, we have rotor and stater so in stepper motor these el ...
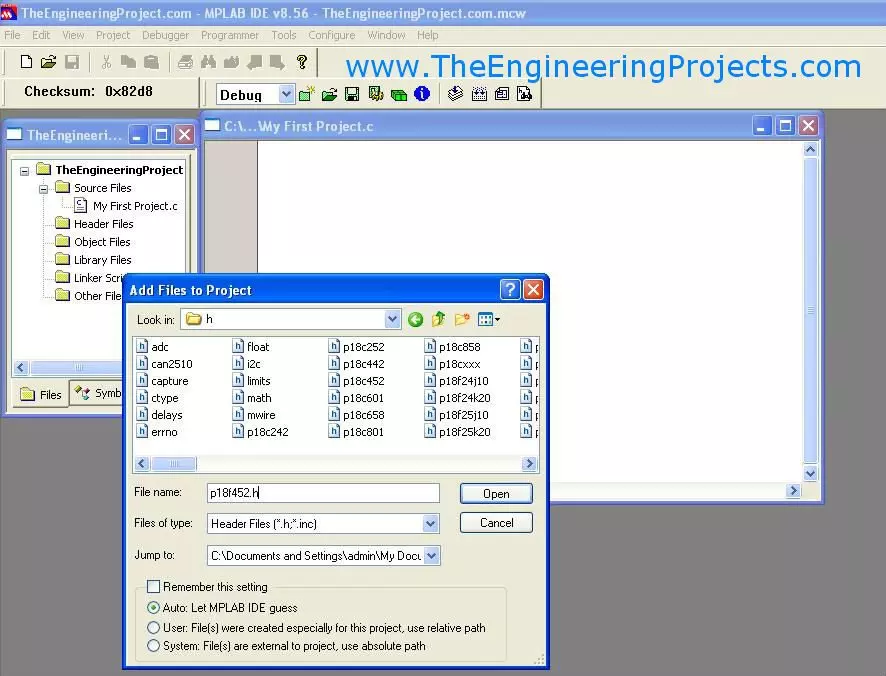
Hello friends, I hope you all are doing great. In today's tutorial, I am going to give you a detailed Introduction to MPLAB Compiler. MPLAB is used for PIC programming both in assembly and C languages. In my previous posts, I have completely explain how to install MPLAB software and also the C compiler for MPLAB.Today I am going to explain getting started with MPLAB. This chapter doesn't belong to programming but the initials required for programming. Setting a project in MPLAB is not much difficult but obviously beginners don't know much about it and they think that its a crap and very difficult. Although its not and i think its the best programming compiler for PIC Microcontroller. Easy and fully controllable. In the coming tutorial we are gonna ...
Hello friends , I hope you all are fine and enjoying good health. In today's tutorial, I am going to design an LED Blinking Project using PIC16F877a. In the previous chapters, we have seen all the basics of PIC Microcontroller and now we are ready to design our first project on PIC Microcontroller.
Its a very simple project so the programming level is very basic. We will just add some LEDs on all pins of PortB of PIC16F877a and then we will program it in such a way that these LEDs will blink in different pattern, we can also change the speed of blinking by adding a delay.
I will explain the whole code but if you got any problem may ask in comments.I will recommend you guys to do this project, I know a beginner can't make this project work in firs ...
Hello friends, I hope you all are fine and having fun with your lives. Today, I am going to share a new project which is Receive SMS with Sim900 & PIC Microcontroller using AT Commands. I have already posted this same project on Arduino named as Receive SMS with AT Commands using Sim900 & Arduino. In that project, I have interfaced SIM900 module with Arduino but today I am gonna interface it with PIC Microcontroller.
I have also designed a GSM Library for Proteus using which you can easily now simulate your SIM900D module in Proteus. Sim900 Module is used to send and receive SMS and it is widely used in automation and security projects. I have also posted another Project in which I have designed the Proteus simulation of GSM based Home Sec ...
No.
Proteus Tutorials
Give Your Suggestions !!!
1.
Getting Started With Microcontrollers
2.
Getting Started with PIC Microcontrollers
3.
Functions Available in PIC18F452
4.
How to Install MPLAB Software
5.
How to Install MPLAB C18 Compiler
6.
Getting Started with MPLAB
7.
LED Blinking Project on PIC Microcontroller
Hey guys hope you all are fine and healthy. Today I am going to start a new tutorial, about PIC Microcontrollers. I will start from the very basics of PIC Microcontroller so that the beginner can also learn from it and can easily work on their projects and I will also post some projects in which I will use PIC Microcontroller and will control different modules using it.
The only thing I hate about PIC Microcon ...
Hello everyone! I hope you all will be absolutely fine and having fun. Today, I am going to share my knowledge about Introduction to PIC12C508. PIC 12C-508 belongs to the family of high performance and cost effective micro controllers. It is a fully static eight (8) bit device. PIC 12C 508 micro controller is Complementary Metal Oxide Semiconductor (CMOS) which is based on EEPROM, EPROM and ROM.
PIC 12C-508 Microcontroller has Reduced Instruction Set Computing (RISC) having thirty three (33) instructions based on single words. Except program branches all of the instructions are single cycled i.e. 1 millisecond. Whereas two cycles are taken by the program branches. PIC 12C 508 has a lot amazing features e.g. eight (8) bit real time clock, power o ...
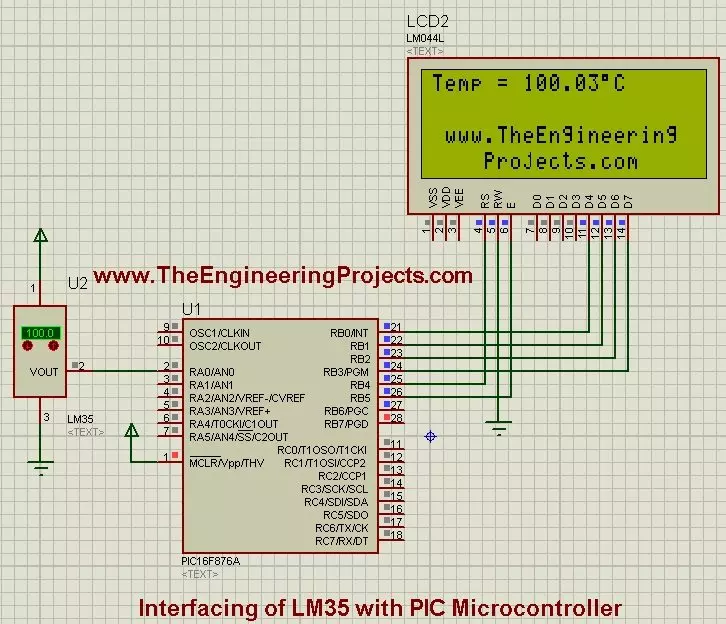
Hello friends, I hope you all are fine and having fun with your lives. In today's post, I am going to share How to interface LM35 with PIC Microcontroller. I have already shared Interfacing of LM35 with Arduino so now we are gonna interface this same temperature sensor with PIC Microcontroller. Interfacing LM35 with PIC isn't much difficult as its a simple sensor which gives us analog output and we just need to read this output and convert it into temperature format. Before going into details, you should first read the Interfacing of LM35 with Arduino as I have given the basic details of this LM35 sensor in that post. You should also have a look at How to use 18B20 in Proteus.
So, today I am not gonna go into the details of this temperature sensor ...