Hello everyone! I hope you all will be absolutely fine and having fun. Today, I will share the details discussion on Introduction to LM311. LM 311 is basically a voltage comparator having high speed. It can operate over wide ranges of voltage i.e. from -15V to15V, in case of operational amplifier. LM-311 can also operate on 5V for the logic systems.
LM-311 output levels has the compatibility with Transistor Transistor Logic (TTL) levels circuits. At 50mA and at 50V too, LM-311 can operate lamps and relays. LM 311 can operate from 0 degree Celsius to 70 degree Celsius. LM-311 has several different features. These features include fast response time, strobe capability, wide voltage supply ranges, maximum input current, operating at single 5V power ...
Hello geeks, welcome to our new project. In this project, we are going to make a very useful and interesting electronics tool that we as engineers or tinkers need in everyday life. We use the capacitor in most of our projects for various purposes such as filters or power supplies. Most of the time, we do not have a provision to measure the capacitor value in our digital multimeter. So, this time we came up with the solution. Hence, we will make our own capacitance measurement tool using Arduino.
Rather than investing in new electronic equipment, we will use an Arduino board and some basic components to measure the capacitance. To make this project, we should have some working knowledge about the capacitor. Here, we will not discuss the in-depth wo ...
Hi Mentees! Welcome to another electronic tutorial about the 555 Timers. We are working on Proteus and in the present experiment, we'll design the circuit of Pure Sine Wave Inverter. Inverters are the opposite devices to rectifiers. We'll show you the meaning of this sentence in action Yet, before experimentation, we have to learn some predominant concepts about the experiment. So, We'll go through the following topics:
Introduction to Pure Sine Wave Inverter.
Components used in the circuit of Pure Sine Wave Inverter.
Working of the circuit of sine wave inverter.
Circuit simulation of pure sine wave inverter in Proteus.
Introduction to Pure Sine Wave Inverter
In electronics, we examine the output of devices in the form of waves. Basicall ...
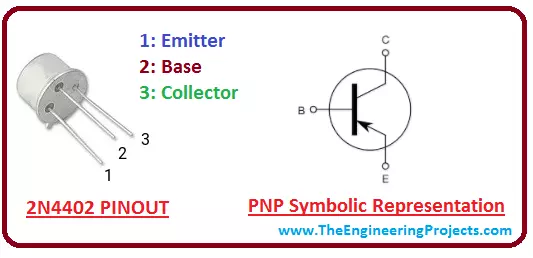
Hey guys! I aspire you a prosperous life filled with joy and happiness. Today, I am going to uncover the details on the Introduction to 2n4402. It is basically a PNP (Positive-Negative-Positive) silicon transistor where N doped layer lies between the two P doped layer. It consists of three terminals i.e. emitter, base, collector. Here N represents the base of the transistor and two P layers represents the emitter and collector respectively. I'm going to cover all aspects related to this transistor. Let's hop on the board and dive in the details of this silicon transistor.
Introduction to 2n4402
2n4402 is a bipolar silicon transistor, where one layer of N doped semiconductor is sand-witched between the two layers of P doped semiconductor.
It w ...
Hey Fellas! Hope you are doing well. Today, I am going to unlock the details on the Introduction to Arduino Mega 2560. It is a microcontroller board based on Atmega 2560 microcontroller. Arduino Boards have revitalized the automation industry with their easy-to-use platform where everyone with little or no technical background can get started with learning some basic skills to program and run the board.
I have updated articles previously on Arduino Uno, Arduino Nano, and Arduino Pro Mini. All these boards function similarly in one way or the other. There are some basic features like PCB layout design, size, number of analog pins and breadboard friendly nature that make them different from each other. In terms of coding, all these boards are progra ...
Hi Friends! Hope you are doing well. We always strive to give you valuable information as per your needs and requirements so you keep coming back for what we have to offer. Today, I'll uncover the details on the Introduction to ATmega168. It is an 8-bit AVR microcontroller that comes with 32-pin interface and is mainly based on RISC CMOS technology. The Program memory is 16K, based on Flash, and incorporates read-write capabilities.
The module comes with a wide temperature range from -40 to 85 ºC while operating voltage ranges from 1.8 to 5.5 V. If you are working on project that is related to automation and embedded systems, you can not write off the importance of this module that comes with an ability of performing a number of functions at once ...
Hi Fellas! Hope you are getting along with life pretty well. I am back to give you a daily dose of useful information. Today, I'll unlock the details on the Introduction to CR1220. It is known as a lithium coin battery that comes with a high voltage around 3V and encompasses an ultra-compact design, helping you gid rid of the hassle of buying two or three extra traditional batteries, saving both cost and space required to adjust these cells in the relevant devices.
In this post, I'll try to cover each and everything related to CR1220, breaking down its details in simple steps you can get a hold what is this about and how it is used for. Let's dive in and explore everything you need to know about this battery.
Introduction to CR1220
CR1220 is a ...
Hello everyone! I hope you all will be absolutely fine and having fun. Today, I am going to give you an elaboration on Introduction to LM2575. LM2575 is specially designed to simply the design of switching power supplies. It can be done by providing all the necessary active functions required in Integrated Circuit (IC) for step down regulators. LM-2575 can deliver load current of around 1A along with the good line regulation as well as load regulation. LM 2575 has different builtin functions e.g. frequency compensation, cycle by cycle current limiting, oscillator with the fixed frequency and a lot more.
LM-2575 has many amazing features i.e. it can reduce the heat sink size due to its higher efficiency parameter. In some cases even heat sink is ...
Hey Guys! Hope you are doing great. Transistors are the fundamental parts of the recent electronic devices. They are available in two types i.e. NPN and PNP transistors. Based on the technical aspect and utilization, both types come with different benefits and advantages. Today, I am going to discuss the details on the Introduction to 2n3792. It is a PNP (positive-negative-positive) silicon bipolar power transistor mainly used for amplification and medium speed switching. It is manufactured using epitaxial planer process and comes in TO-3 casing.
I'll cover each and everything related to this transistor so you don't need to go anywhere and find all information in one place. Let's explore what is this about, its main applications and everything yo ...
Hello Everyone! I always love to keep your stomach filled with useful information so you can excel and grow in your relevant field. Today, I am going to reveal the details on the Introduction to 1n914. It is a small signal diode that allows the current to flow in one direction and blocks the current in other direction. It features operating junction temperature of 175 ºC and forward surge current of 4A. It is widely used for industrial and power management applications. I'll give you a brief details about this diode, so you don't have to go anywhere else for finding the information regarding this small signal diode. Let's get started.
Introduction to 1n914
1n914 is a small signal diode that is widely used in portable devices.
It exhibits zero ...