Hey Fellas! Hope you are doing fine. Microcontrollers play an important role in the development of embedded systems. They are used where automation is an integral part of the system. Today, I am going to unlock the details on the Introduction to Atmega16.
It is a 40-pin low power 8-bit microcontroller which is developed using CMOS technology and based on AVR architecture. This is the most commonly used AVR microcontroller which belongs to Atmel Mega family.
You must have a look at microcontroller called Atmega328 that also belongs to the mega family.
Other microcontrollers that are readily available and fall under AVR category are Atmega 8 and Atmega 32. All these controllers perform similar tasks, however, they are only different in terms of ...
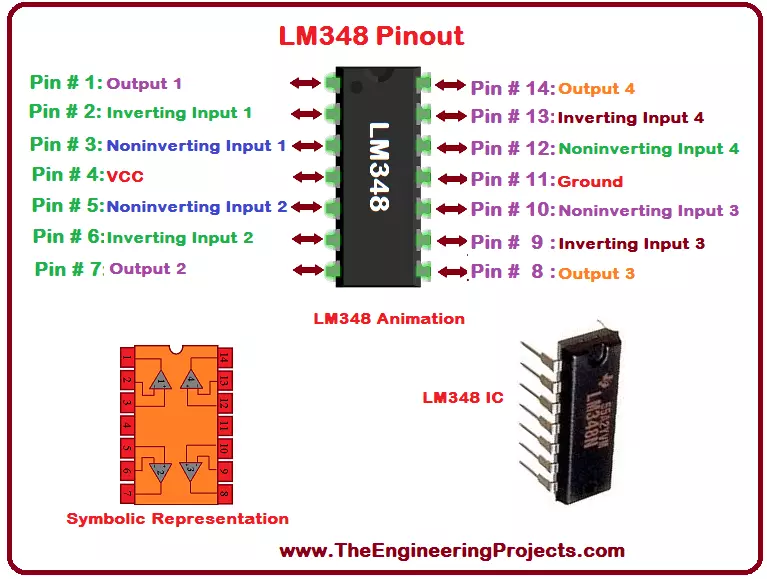
Hello everyone! I hope you all will be absolutely fine and having fun. Today, I am going to share my knowledge on Introduction to LM348. LM-348 i basically a General Purpose (GP) Operational Amplifier. It is an independent and quadruple operational amplifier. LM 348 has similar characteristics in comparison to uA741. It is an internally compensated amplifier having high gain.
LM-348 has four internal amplifiers. We can achieve isolation between these amplifiers by biasing each of the amplifier independently. This isolation can be done using different techniques e.g. layout technique. It can be used at several different places where amplifier matching is needed. LM 348 has very low supply current drain as compared to the standard 741. Moreover, I ...
Hello everyone, I hope you all are fine and having fun with your lives. In today's post, I am going to share all about Arduino Data Types. Arduino Data Types play an important role in Arduino Programming and I have discussed them a little in my tutorial on How to do Arduino Programming. But today, we are gonna discuss it in more detail. I hope you guys are gonna enjoy from them and are gonna get benefit using them.
Before going any further I think you must have a llok at Arduino Basic Tutorials in which I have explained everything in a very easy way. Anyways, Till now I hopeo that you have the basic know how of Arduino Programming and you ahave also worked on Arduino LED Example. So, let's get started with Arduino Data Types:
What are Data Types ...
Hello friends, I hope you all are doing great and having fun with your lives. In today's tutorial, I am going to share How to interface Arduino with GLCD. I am gonna design a Proteus Simulation in which I will interface Arduino GLCD together. GLCD is also called Graphical LCD so today we are gonna do some designing on the LCD. The GLCD I am going to use is ks0108 and its model in Proteus is LGM12641BS1R and I have shared the complete Simulation along with Arduino Code below for download. But I would suggest you to design it on your own so that you could get the most out of it. If you haven't worked on the LCD before then I would suggest you to read How to Interface Simple LCD with Arduino.
Moreover, I am quite happy to announce that we have starte ...
Hello geeks, welcome to our new project. In this project, we are going to make a very interesting project which is an Up-Down counter. Most of us who have an electronics background or studied digital electronics must know the counter. Counter is a simple device which counts numbers. As per the digital electronics, there are two types of counter, the Up counter which counts in increasing order and another is Down counter which counts in decreasing order. And every counter has a reset limit, on which the counter resets to its initial value and starts the counting again. The limit of every counter depends on the bits of counter. For example, we have a 8 bit Up counter which means it will count upto 255 and afterwards it will reset and will start agai ...
Hello everyone! I hope you all will be absolutely fine and having fun. Today, I am going to provide the detailed discussion on PIR Sensor Arduino Interfacing. PIR basically stands for Passive Infrared Sensor. Basically PIR is an electronic equipment which is often used to measure the infrared light radiating from the different objects in their field of view. It detects the infrared energy released from animals as well as from human beings, when this energy is higher than the certain threshold level PIR sensor shows an indication correspondingly. The energy detected by PIR sensor is usually in the form of heat i.e. emitted by humans as well as from animals.
We can also test and verify our results in Proteus using PIR sensor. I have already shared ...
Hey Guys! Hope you’re well today. Happy to see you around. In this post today, I’ll detail the Introduction to 1n4734a.The 1n4734a is a Zener diode used as a low-current voltage regulator. It is composed of silicon material and is employed as a shunt regulator in many applications. This Zener diode conducts the current in both directions in contrast to a normal diode that conducts in one direction only i.e. conducts in forward biased condition only.
I suggest you read this post all the way through, as I’ll be discussing the datasheet, pinout, features, and applications of 1n4734a. Let’s jump right in.
Introduction to 1n4734A
The 1n4734a is a Zener diode used in clipping circuits with a high power rating.
It comes in the DO-41 package and is used as a low-current voltage regulat ...
Hi Guys! Hope you’re well. In this post today, we’ll cover What is IGBT? We’ll also discuss IGBT Full Form, Pinout, Meaning, Symbol & Working.BJT (bipolar junction transistor) and MOSFETs (metal-oxide-semiconductor field-effect transistor) are commonly used electronic switches that we’ve already studied in detail. These devices are useful when you deal with low-current applications, however, when it comes to high-current applications, these devices don’t work as expected. This is where the IGBT transistor comes in handy. This device is a combination of both BJT and MOSFET and stands fit for high-current applications.
In this post, we’ll cover What is IGBT in detail.
Let’s get started:1. What is IGBT?
IGBT is a three-pin device made of semiconductor material and is used for fast- ...
Hello Friends, hope you all are fine and having fun. In today tutorial i am going to elaborate How to Automatically Connect with Wifi SSID using Arduino YUN. If you recall one of my previous tutorials named Getting started with Arduino YUN , in which i gave a brief introduction about Arduino YUN, its working and features. In that tutorial, I have explained How to connect Arduino YUN with Wifi manually. A little problem encounters while connecting Arduino manually to available wifi networks that if wifi connection drops then, then Arduino will also disconnect automatically and if wifi connection is energized again, it will still remain disconnected unless you reconnect it by yourself. This thing has very serious drawbacks in industrial projects, wh ...
Hi Guys! Hope you’re well today. I welcome you on board. Happy to see you around. In this post today, I’ll detail the Introduction to TL084.
TL084 is a JFET input Op-Amp that carries low offset current and high input impedance. Available with better offset characteristics and high noise immunity, TL084 comes with a suitable offset voltage that makes it an ideal pick for amplifier applications.
I suggest you read this post all the way through as I’ll walk you through the complete Introduction to TL084 covering datasheet, pinout, features, and applications.
Without further ado, let’s get started.
Introduction to TL084
The TL084 is available in Quad Package which means it comes with four separate op-amps that can operate independently.
This o ...