Hello friends, I hope you all are doing great. In today's tutorial, we are gonna have a look at detailed Introduction to TIP41. It is an NPN power transistor. It exists in (TO-220) malleable suite which marks this expedient appropriate for acoustic, power rectilinear and swapping submissions. Its corresponding transistor is TIP42. It is intended by joining three (3) components of semiconductor material by doping with different materials. It's center portion is base which is tinny and the other two outer parts are prominently doped than the base.
Several transistors can strengthen a trivial current which will then be leading adequate to effort attention or other greater current maneuvers. These discretion are proficient to notice a shift in voltage ...
Hello everyone I hope you all will be absolutely fine and having fun. Today, I am going to share my knowledge on Introduction to TL494. It supports all of the functions that are necessary for the Pulse Width Modulation (PWM) control circuits. Power supply control is the basic purpose of the TL494 device. It has an output control circuit, a flipflop, dead time comparator, two different error amplifiers, 5V reference voltage, oscillator and a PWM comparator. TL 494 operates properly between the frequency of 1kHz to 300kHz.
The Dead Time Comparator (DTC) provides around 5% of dead time. Both of the error amplifiers display a common-mode voltage from -0.3V to (Vcc-2)V. If we provide a sawtooth wave at the CT terminal and terminate RT to the referenc ...
Hi Friends! Hope you are doing well. In this post, I'll uncover the details on How to use pinMode Arduino Command. The pinMode defines the Arduino Pins, if they are used as an input or output. The INPUT_PULLUP is another option achieved by pinMode, that is mainly used to place a virtual pull-up resistor to the input pins.
We have started Arduino Tutorials for Beginners quite a while now for the newbies, who are really interested to get a hands-on experience with Arduino. Generally, Arduino is known as a Microcontroller, but it is a step ahead of it. The PIC microcontrollers require some basic circuit to start with but Arduino brings revolution in the automation industry by removing the need of developing any basic circuit. Although Atmega328 is th ...
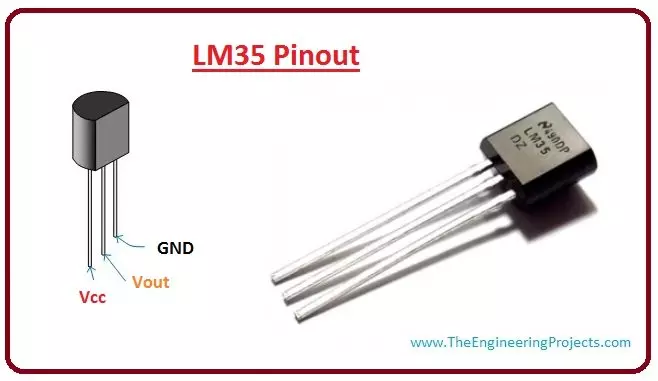
Hello friends, I hope you all are doing great. In today's tutorial, we are gonna have a look at a detailed Introduction to LM35. LM35 is a type of commonly used temperature sensor, that can be used to measure temperature with an electrical output compared to the temperature in (°C). In can measure temperature in a better way than a thermistor.
LM35 is used in industries and commercial buildings where high accuracy of temperature measuring is needed. I will give you a detailed overview of this temperature sensor in today’s post where we will have a look its pinout, working, protocol, etc. I will also share some links of projects where I have interfaced it with Arduino or other microcontrollers. If you have any questions please ask in the comments, I will resolve your queries and will gu ...
Hello friends, I hope you all are doing great. In today's tutorial, we are gonna have a look at detailed Introduction to TIP31. The TIP31 is a typical NPN transistor which is frequently cast-off for intermediate power submissions. This (BJT) is a three (3) points expedient which works for intensification or swapping submissions. It is designed by linking three units of semiconductors with alternatively dissimilar doping. The central unit which is (base) is thin and the other two external areas (emitter and collector) are greatly doped.
Some transistors can intensify a minor current which will then be dominant sufficient to work a spotlight or other higher current expedients. These diplomacies are also capable to notice an alteration in voltage an ...
Hello everyone! I hope you all will be absolutely fine and having fun. Today, we will have a look at the DHT11 Arduino Interfacing. DHT11 is an embedded sensor, used to measure both temperature and humidity of the surroundings. It is made up of two different parts i.e. capacitive humidity sensor and a thermistor. DHT11 is a slow sensor but is quite efficient for the applications where we need to do some basic analog data exchange. There is a small chip inside this sensor which performs the function of analog to digital to analog conversion and gives the results for temperature as well as for humidity in digital form. This digital signal can be read easily through any micro-controller.
LM335 is another temperature sensor and to understand today's p ...
In the previous post we have seen the project description of Voice Recognition Project using EasyVR shield. Today we will have a look at Getting started with EasyVR commander. EasyVR shield is a module which is used for voice recognition. First of all, we save our commands in the EasyVR shield and then we use these commands to control anything. In this project, I need to control the robot with voice commands like when someone says FORWARD then the robot start moving in forward direction.
Now first of all what I need to do is to save this FORWARD voice in the shield, which we will see today how to save the command in the shield and after that I will show you the Interfacing of EasyVR shield with Arduino UNO. So that when I say Forward the motor sta ...
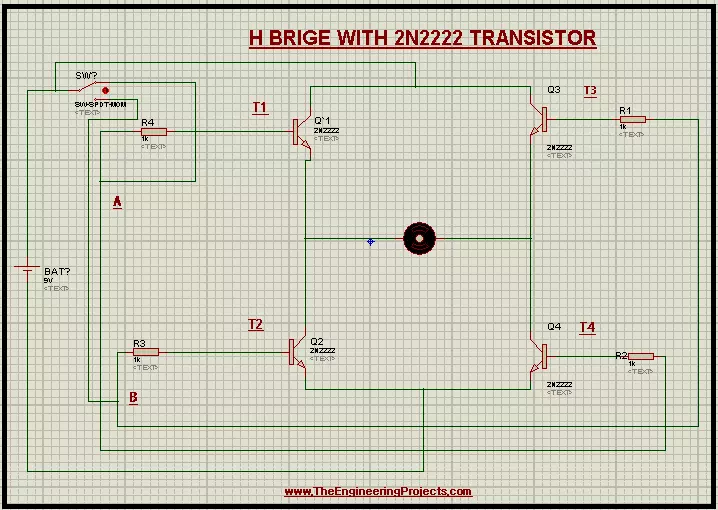
Hey Learners! Welcome to The Engineering Projects. We hope you are doing great. Our team is working on transistors and today, we'll design a circuit for using the 2N2222 Transistor. In this chapter you will learn:
What is H Bridge with 2N2222 Transistor?
How do the 2N2222 Transistor works?
What is the working of H Bridge?
How can we run the circuit of H Bridge in Proteus using 2N2222 Transistor?
By the same token, you will also learn important information about the topic in DID YOU KNOW Sections.
Introduction to H-Bridge
In electronic circuits, the direction of quantities like the flow of current, EMF, Electric field lines matter a lot. The H Bridge is used to control such motors through its specialized circuitry. The H Bridge is defined ...
Hello friends, I hope you all are doing great. In today's tutorial, we are gonna design a project named DC Motor Control using XBee & Arduino in Proteus ISIS. I have shared the complete code and have also explained it in detail. You can also download the complete working Proteus Simulation given at the end of this tutorial. In this project, I have designed two Proteus Simulations.
The first Simulation is of Remote control in which I have used a keypad. The second simulation contains our two DC Motors and I am controlling the direction of those DC Motors with my Remote Control. XBee Module is used for sending wireless data. The code will also work on hardware as I have tested it myself. So, let's get started with DC Motor Control using XBee &am ...
Hi learner! I hope you are doing great. Today, I am sharing version 3.0 of the PIR sensor library for Proteus. We have already shared V1.0 and V2.0 of the PIR Sensor Library. PIR Sensor V1.0 Library for Proteus adds a digital PIR Sensor in Proteus, while the PIR Sensor V2.0 Library adds an analog PIR Sensor to simulate. These libraries were loved by the users and this motivated us to work more on it. PIR V3.0 is analog in nature, has an error-free structure and the Pinout structure is better organized. Moreover, the design is improved a little bit and we have omitted the website link from the sensor to make it look professional.
Same as the previous version, this PIR has four pins and the details of each of them will be discussed in detail later. Therefore, don’t worry if you have no expe ...