Hello everyone! I hope you all will be absolutely fine and having fun. Today, I am going to provide a detailed discussion on Flame Sensor Arduino Interfacing. Flame sensor is an electronic device which is capable of sensing/detection of fire or a high temperature zone. It gives an indication through an LED attached at its top, just after sensing the fire. These type of sensors are usually used for short ranges. They are able to detect the fire up to 3 feet. Flame sensors is the most common device available in the market these days due to its good results and cost efficiency. You should also have a look at Flame Sensor Library for Proteus.
Flame sensors are available in the market in two types one having three pins and the other having four pins ...
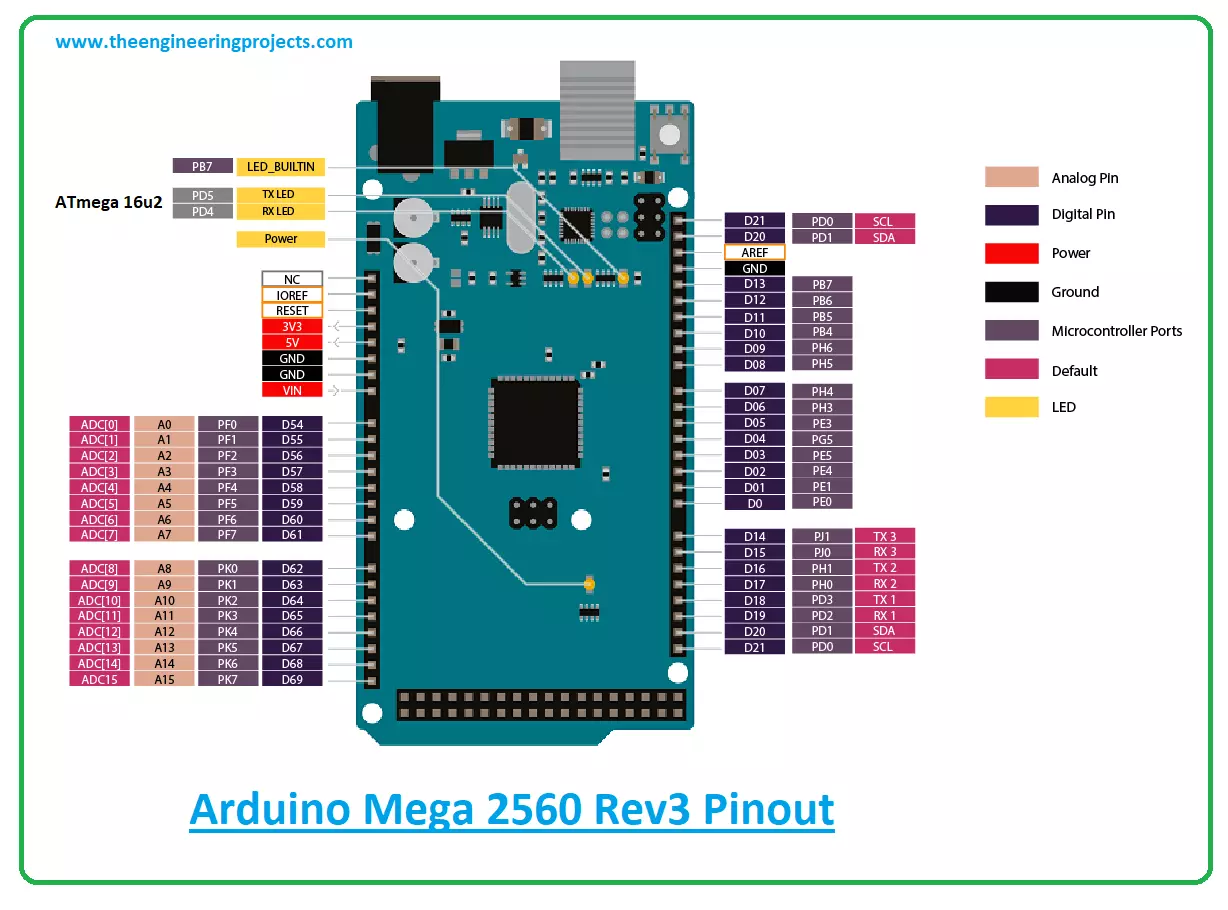
Hi Friends! Hope you’re well today. In this post today, I’ll walk you through the detailed Introduction to Arduino Mega 2560 Rev3.The Arduino Mega 2560 Rev3 is a microcontroller board that is based on the ATmega2560 microcontroller.
The Arduino boards are widely used in the automation industry and embedded projects. Other boards like Arduino Uno, Arduino Nano, Arduino Every, Arduino Beetle all seem a good pick for the projects that require little memory to store the program. However, when the nature of projects becomes complex, requiring more memory and a rich set of I/O interfaces, the Arduino Mega 2560 Rev3 comes into play. In order to power up these Arduino boards, we need to use a Power supply for electronics or we can also use the USB port on ...
3D printing is one of the most promising technologies in recent breakthroughs. One of the most inherent benefits of 3D printing is additive innovation; it opens up an entirely new way of creating products and provides numerous benefits over traditional fabrication techniques.
Nowadays, more businesses across many industrial sectors adopt 3D printing as a viable alternative to subtractive manufacturing (acquiring machined parts online) and injection molding. We'll look at the benefits of 3D printing and how you can use this production method to benefit your company. Is it worthwhile to use 3D printing for your project?
Affordability
One of the best aspects of 3d printing is the reduced labor costs. Operating costs heavily influence the quantity of ...
Hello everyone! I hope you all will be absolutely fine and having fun. Today, I am going to provide a detailed discussion on 2 Relay Module Interfacing with Arduino. First of all I would like to explain you that what is relay and how to use it and then we will move forward towards 2 relay module interfacing with Arduino. I have already controlled relay with 555 timers. 2 relay module consists of two relays. Relay is basically an electronic device or a switch which is used to open and close the circuits electronically.
A relay controls an electric circuit by opening and closing contacts in another circuit. When the relay contact is normally open (NO), there will be an open connection when the relay is not energized. When the relay contact is norm ...
Hello everyone! I hope you all will be absolutely fine and having fun. Today, I am going to share my knowledge about Introduction to 74HC245. 74HC 245 is a eight (8) bit transceiver. It has three (3) output states. 74HC-245 is designed for a-synchronous transfer of data between different data buses. The external timing requirement can be reduced by the implementation of control function. You should also have a look at Introduction to 74HC595.
There are two internal amplifiers in 74HS 245. They are named as A and B. Data is transferred from A amplifier to B amplifier and vice versa. Hence two way communication is done in 74HC-245. This communication depends upon the logic level on the direction control input (DIR). Out enable pin (OE) is used to ...
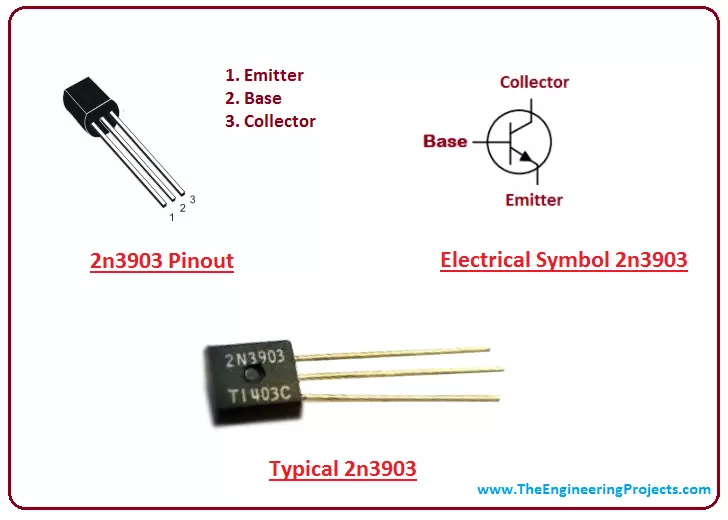
Hi Friends! Hope you are doing great. I am back to give you a daily dose of valuable information so you can excel and grow in your relevant field. Transistors are the fundamental parts of most of the electronic circuits. Today, I am going to unlock the details on the Introduction to 2n3903. It is an NPN transistor main used for general purpose amplification and switching applications.
Transistor comes in two types i.e. NPN and PNP transistors. This transistor falls under the category of NPN transistor. This is a bipolar junctions transistor where conduction is carried out by movement of both charge carriers i.e. electrons and holes. However, electrons are major charge carriers in case of NPN transistors. If you are unsure how these bipolar transi ...
Hello friends, hope you all are fine and having fun with your lives. In today's tutorial, I am gonna share another awesome library designed by our team for Proteus, which is GPS Library for Proteus. It's my second library for Proteus, the first one was Arduino Library for Proteus which I have already shared. I am really enjoying designing these modules in Proteus because its a new and quite challenging thing. I haven't found even a single website who has designed these modules in Proteus already. So, now for the first time, you can have the GPS Library for Proteus using which you can easily simulate your GPS module in Proteus and can design your code for Arduino, PIC Microcontroller or 8051 Microcontroller.
Other bloggers are welcome to share this ...
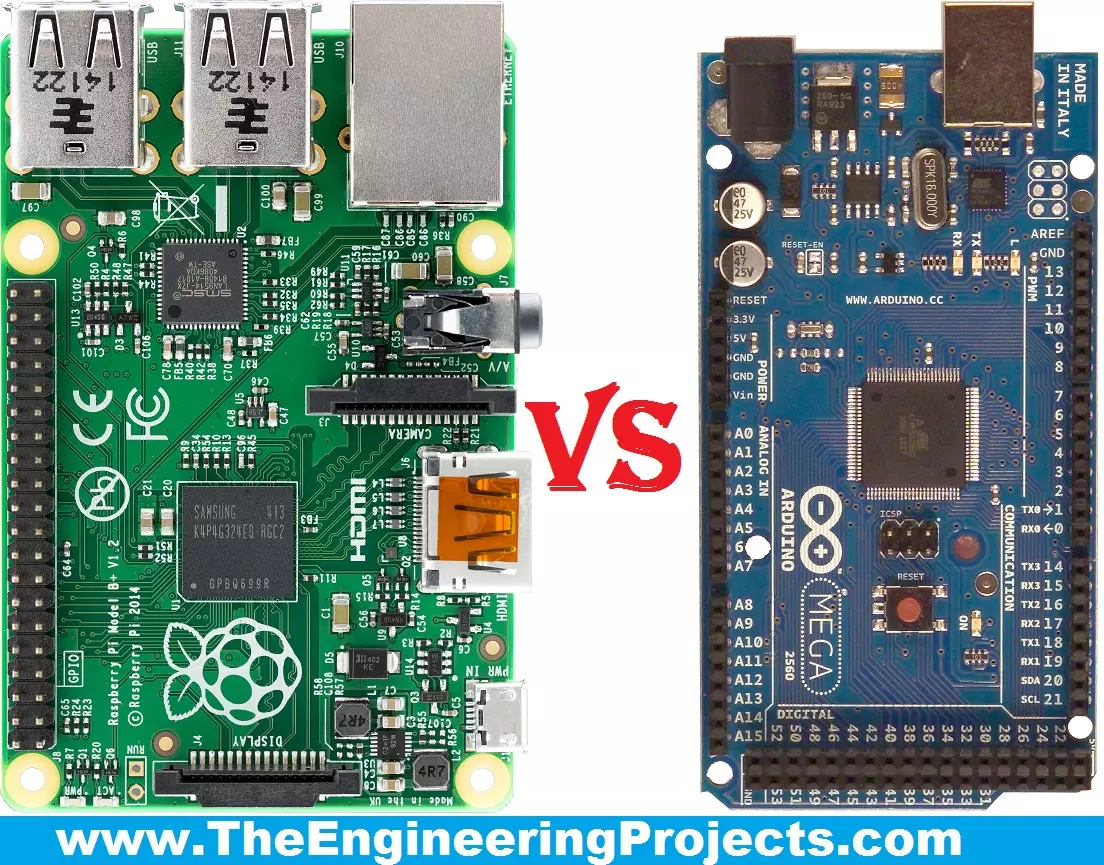
Hello friends, I hope you all are fine and enjoying your lives. Today, I am going to share a comparison titled Arduino Vs Raspberry Pi. Actually, I have been receiving a lot of emails and comments from new engineering students that "we are new in embedded and we want to start our project so please tell us which one is better Arduino or Raspberry Pi?" So, I thought to write a post on Arduino Vs Raspberry Pi and in this post, I am going to make a detailed comparison between the two and will let you know, which one you should use in your project and why?
So, I hope that you are all aware of or at least have heard about these two boards, which are Arduino and Raspberry Pi. If you haven't heard yet then you must have a look at Arduino Official Site and ...
Today, we are gonna have a look on How to Interface Ultrasonic Sensor with Arduino. Few days ago, I have posted a complete tutorial on How to Use Ultrasonic Sensor Library in Proteus and later I have posted different examples on How to Simulate Ultrasonic Sensor in Proteus. Those posts were about Proteus Simulations and weren't about hardware interfacing, so I thought today let's interface it in hardware.
Simulation is a good starting point for projects but they are really far away from real world. It happened to me a lot of times that my simulations are working perfectly fine but when I design the same circuit in hardware then it says no I am not gonna work. :) So, the bottom line is never trust simulations, unless you properly test it on hardwar ...
Hello friends! I hope you will be absolutely fine and having fun. Today, I am going to give you an elaboration about Introduction to 50N06. 50-N-06 is a device having three terminals named as gate, drain and source respectively. It is made up of silicon and is capable of current conduction up to 50A. I have already shared basic knowledge about different electronic devices in my previous articles like Introduction to MC34063, MMBD914, MSP430, NE555, NE556 and LM2902. Before going into the details of this article you must go through my previous tutorials for the better understanding.
50-N-06 provides fast switching speed. 50N06 is an N-channel power Metal Oxide Field Effect Transistor (MOSFET) specially designed to handle particular power levels. ...