In the previous tutorial, we have discussed the basics of ESP8266 modules and have also had a look at the different WiFi modules based on ESP8266. In today's tutorial, we are going to set up Arduino Environment for NodeMCU Programming. Today we will prepare the development environment and build code to blink an LED and report status on the Serial Port (to validate the configuration). We will use the Arduino IDE for coding and the NodeMCU board (a module that works with an ESP8266). Simple integration. Zero hardware complexity.
The ESP8266 is an extremely robust and versatile microcontroller, which has proven to be a powerful tool in building Internet of Things solutions. What makes the ESP8266 such a popular tool is the perfect integration between ...
The Internet of Things (IoT) and the Industry 4.0. Distinct technological revolutions but with a common goal: To integrate equipment (digital or analog) to a computer network.
And to be part of this revolution, the developer goes out of its way to include wired ethernet modules or WIFI modules in its circuits. Which increases complexity, circuit size and development cost.
What if I told you that already has a built-in WIFI microcontroller? And that it fits in the palm of your hand? For just 1 US dollar?
Today I’m going to introduce you to the ESP8266 microcontroller, from Espressif. And for those of you who already program in 8Bit microcontrollers like the Atmega328 (one of the most common on Arduino) and struggle to build your code in the modic SR ...
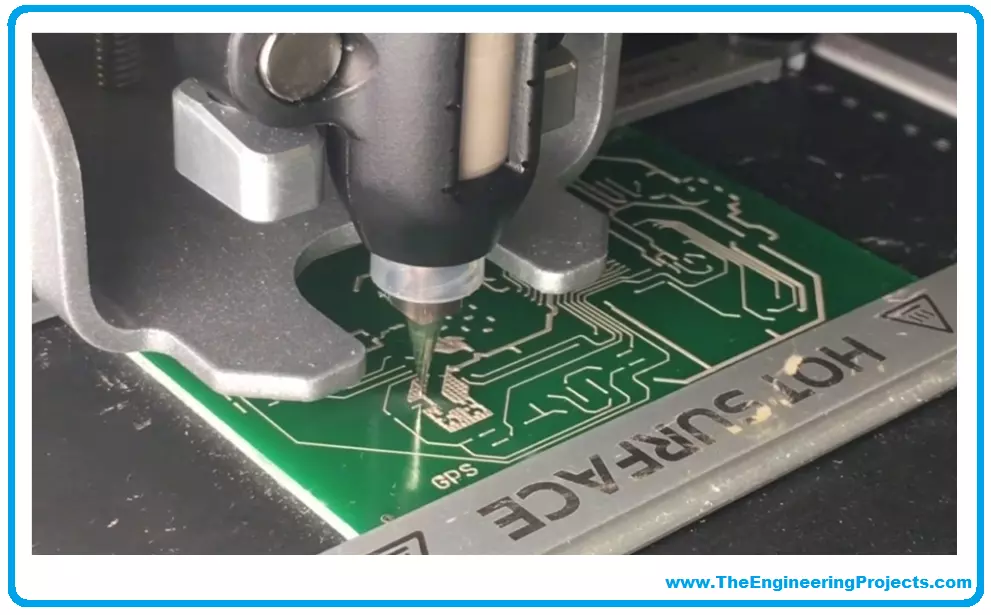
Hi friends, I hope you are enjoying yourself a lot and having a great deal of fun. Our mission is to help you by providing quality content that meets your expectations so now today we will discuss all quick turn PCB prototyping services. We will discuss what is quick-turn PCB? What is a PCB prototype? What is a quick-turn PCB prototyping service? Quick turn PCB general Capabilities provided by companies. Benefits, applications and importance of quick turn prototyping service. Online Quick-turn PCB service providers and time measurements. So, let's get started:
Overview
First of all, before starting the discussion we have to know about the meanings of the words used in our topic heading.
We have to make grip on the meanings of quick turn, PCB, prototype, and service. After understandi ...
Introduction
When the subject is ESP8266, it is normal that our attention is on the Wifi module. We've already discussed some applications in previous articles, and there's still a lot of cool stuff to see in the future. We've looked at how the ESP8266 communicates with the world via wifi, and now we'll look at how it does it through its pins.
We will make a decision here. The ESP8266 is found in several modules. Each module with its pin provision. ESP-12 modules provide the most features. To make better use of these features and have a more protoboard-friendly module at hand, we will analyze the NodeMCU module with the ESP-12E.
Overview and Electrical Data
The NodeMCU pins are available in two rows with a spacing that allows them to fit on a breadboard (in particular, I find the pins a ...
In previous articles, we connected the ESP8266 to a pre-existing WIFI network. It is the commonly used method in projects, especially when there is interest in internet access.
For these cases, the ESP8266 operates as a “station” on the network. But we can find scenarios where there is no WIFI network to connect. Can we still use the ESP8266 in these cases? Yes, we can!
ESP8266 Operational Modes
The ESP8266 WiFi module can operate in 2 different modes:
STA (the module operates as a station and is available to connect to an Access Point).
AP (the module creates a network with customizable SSID and Password. We will discuss how each mode works, its limitations, and how to use
STA Mode
We use the STA mode to connect the ESP8266 to a pre-exist ...
Hello friends, I hope you all are doing great. Today, we will create a web server with ESP8266 microcontroller to control the activation of an LED. The goal is to understand how the ESP8266 connects to a WiFi network, how it sets up a web server, and how it is possible to exchange information between the browser and the esp8266.
Components Required
1x Computer/notebook with Arduino
1x Mini-USB cable.
1x NodeMCU (ESP8266 Breakout Board)
Internet Browser (Chrome, Firefox, IE…)
ESP8266 Libraries for Arduino IDE
For this project, we will use two libraries:
ESP8266WiFi: This library carries all the functions necessary for the ESP8266 to connect to a wifi network.
ESPAsyncWebServer: This library carries the functions needed to create an ...
In this guide, we will explain step by step to start programming on the STMicroelectronics (STM) platform, especially the STM32 family.
The term, "STM32" refers to a family of 32-bit microcontroller integrated circuits based on the ARM® Cortex®M processor. The architecture of these CPUs (Central Processing Unit) is ARM (Advanced Risk Machine) which is a particular family of Reduced Instruction Set Computing (RISC). RISC architecture differs from Complex Instruction Set Computing (CISC) for its simplicity that allows you to create processors capable of executing instruction sets with shorter times. Why use STM32? The advantages are many, and now we will list a part of them:
ST offers a wide portfolio of solutions depending on the developer's nee ...
Hello friends, I hope you all are doing great. In today's tutorial, we will have a look at How to Create Web Server with ESP8266 using SPIFFS.
We've already seen how to create a web server and how to provide an HTML page on our ESP8266. We use the PROGMEM command to store an HTML code in FLASH memory. For a simple page, this works fine, but what if we have a more complex webpage? With a better style? What if we want to include images?
Today we will learn how to use SPIFFS with ESP8266 to store files (regardless of type) in FLASH memory.
What is SPIFFS?
SPIFFS (SPI Flash File System) is a system designed for managing SPI flash memory in embedded devices. Its main goal is to use minimal RAM to access files. It's very useful when using pen drives ...
Hello friends, I hope you all are doing great. Today, we will create a wifi temperature monitoring system. For reading, we will use the DS18B20 sensor. For data processing and webpage creation, we will use our already known ESP8266.
The project will be built as follows:
Circuit assembly
Code for reading the DS18B20 sensor (we will use Serial for tests).
Creation of the webpage (we will use SPIFFS to store in FLASH).
But first, let's know a little about the sensor and the communication model it uses.
Materials
For this project, we will need the following items: For this project, we will need the following items:
1 x ESP8266
1x DS18B20 Sensor
1x Breadboard
1x 4k7 Ohms resistor
DS18B20
DS18B20 is a digital temperature sensor with good precision, good customization, pr ...
Today we will talk about an extremely powerful tool in the use of microcontrollers. The Serial communication, specifically the USART (Universal Synchronous Asynchronous Receiver Transmitter) standard.
The system works using two wires. RX (Receiver) and TX (Transmitter), connecting two devices. The RX of one is connected to the TX of the other. If the choice is for a synchronous connection, it may be necessary to add one or two more pins to operate as a “traffic light”. But most current microcontrollers can operate asynchronously, which saves us the expense of pins. Data is sent, as the name implies, in a series of bits.
ESP8266 provides us with two ports, one of them converted to USB in the NodeMCU module.
Applications
The range of uses of se ...