This article is a review of Gtech’s AirRam Mk2, including new features, innovations, options, prices and Gtech voucher codes! What is the Gtech AirRam Mk2? The Gtech AirRam vacuum came into the market in 2012. At the time, there was nothing like it. The Daily Mail called it the Swiss Knife of vacuum cleaners. The cleaning appliance bore the physical profile of an upright cylinder vacuum cleaner. And yet, it was also cordless and very portable, like a stick vacuum. At that time, it sold at £149 and thanks to 10% off Gtech coupon it was considerably cheaper than Dyson’s equivalent. Today, we have the Gtech AirRam Mk2, a profound improvement on its ground breaking Gtech AirRam sibling. Among the upgrades on this unit is a better bin, an improved suction system, and headlights. But like its pr ...
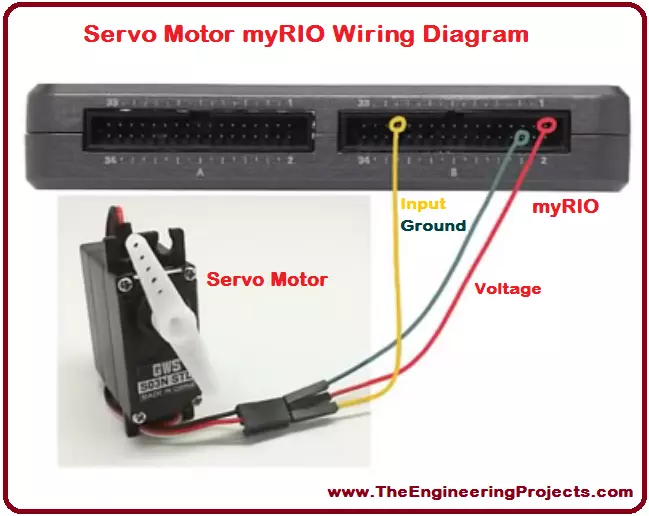
Hello everyone! I hope you all will be absolutely fine and having fun. Today, I would like to provide a complete discussion on Servo Motor Control using myRIO. In this tutorial I will tell you about the control of a servo motor using NI myRIO. First of all, I will give you a brief introduction on servo motors and then we will proceed towards their interfacing with myRIO. Servo motor is an electronic device with a small output shaft. This shaft can be adjusted at different angles for the different purposes. We can adjust this shaft by sending a signal usually known as servo coded signal. Servo motor is able maintain a particular angle as long as it has the servo coded signal at its input. Servo motor changes the angular position of its shaft with every change in the servo coded signal appli ...
Hello everyone! I hope you all will be absolutely fine and having fun. Today, I would like to provide a complete discussion on Introduction to C945. You will see a detailed description on the basics of the transistor C-945 and its different parameters. I have already shared Introduction to MMBD914 , 74HC245 , NE556 , LM348 and PIC18F4550 . So, must go through these tutorials in order to have better understanding about different IC's. C-945 transistor is basically a Negative Positive Negative (NPN) bipolar junction transistor. C945 is usually used in the electronic circuits where there is a need of high speed transistor and a low current. C-945 has three semiconductor regions named as emitter, base and collector respectively. Since C-945 is a bipolar junction transistor, its base is doped w ...
Hello everyone! I hope you all will be absolutely fine and having fun. Today, I would like to provide a complete discussion on introduction to GPS and myRIO as well as myRIO GPS Interfacing as the most related part. First of all I would like to tell you about GPS, from what it is abbreviated, at which principle it works and how it plays its role in our daily life. GPS is basically derived from the word Global Positioning System. GPS is a complete network of satellites which are continuously rotating in their orbits and send information to earth about their accurate position in space. GPS receivers are used to receive the signals, and the received signals help us to estimate the precise time, position and speed of anything moving around. I have share GPS Library for Proteus in my previous t ...
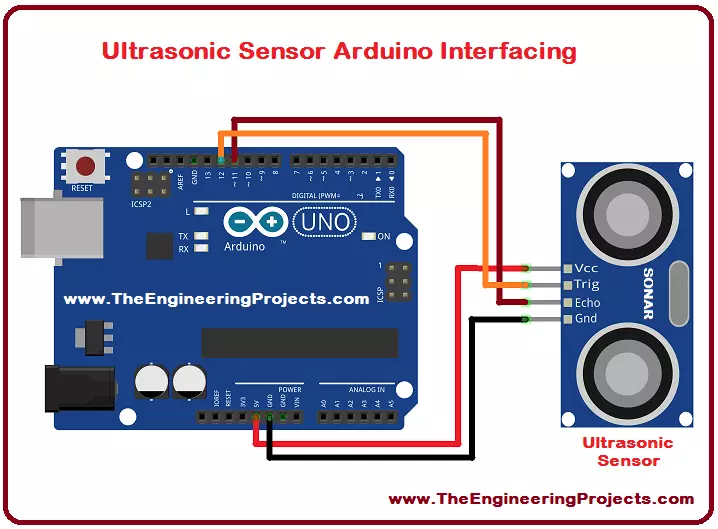
Hello everyone! I hope you all will be absolutely fine and having fun. Today, I would like to provide a complete discussion on Ultrasonic Sensor Arduino Interfacing . I would like to tell you some detail about ultrasonic sensor, after that we will move towards ultrasonic sensor Arduino interfacing. Ultrasonic sensor is also known as SONAR sensor. SONAR basically stands for Sound Navigation and Ranging. Ultrasonic is mostly used for the distance measurements. It can also be used for measuring the depth of the sea. I have already shared Ultrasonic Sensor Library for Proteus . Ultrasonic/SONAR sensor is an electronic device used to estimate the distance of an object by continuously transmitting sound waves at a particular frequency and listens to that transmitted sound wave to bounce back. It ...
Hello everyone! I hope you all will be absolutely fine and having fun. Today, I would like to give a detailed discussion on Introduction to myRIO . myRIO is basically a sort of micro controller introduced by National Instrument (NI), that is why it is sometimes known as NI myRIO. First of all I would like to tell you a bit about this device then we will move further. After listening its name i.e. myRIO, the first question comes in mind that what is this RIO. So, RIO is basically abbreviated from Re-configurable Input/Output. myRIO is a portable device and students can easily use it for the design and control of robots and may other systems quite efficiently. It operates on the frequency 667 MHz. myRIO has dual core ARM cortex A9 programmable processor. It has a Xilinx Field Programmable Ga ...
Hello everyone! I hope you all will be absolutely fine and having fun. Today, I am going to provide a detailed discussion on 2 Relay Module Interfacing with Arduino. First of all I would like to explain you that what is relay and how to use it and then we will move forward towards 2 relay module interfacing with Arduino. I have already controlled relay with 555 timer s. 2 relay module consists of two relays. Relay is basically an electronic device or a switch which is used to open and close the circuits electronically. A relay controls an electric circuit by opening and closing contacts in another circuit. When the relay contact is normally open (NO), there will be an open connection when the relay is not energized. When the relay contact is normally closed, there will be a closed connecti ...
Hello everyone! I hope you all will be absolutely fine and having fun. Today, I am going to give you an elaboration about Introduction to Pixy Camera. It is basically is an electronic device or sensor having fast vision. It is also known as fast vision sensor most of the time. Using this device we can teach to find objects in a very less time duration. It is an image sensor having a very powerful processor. Pixy is easy to interface with the micro-controllers e.g. Arduino. We can make different programs only to send the desired data from the device to micro-controller. In this way micro-controller can not overwhelm. Pixy camera is able to communicate with the micro-controller in several different ways e.g. serial communication, I2C protocol, digital out, analog out and SPI communication te ...
Hello everyone! I hope you all will be absolutely fine and having fun. Today, I am going to provide the detailed discussion on PIR Sensor Arduino Interfacing. PIR basically stands for Passive Infrared Sensor. Basically PIR is an electronic equipment which is often used to measure the infrared light radiating from the different objects in their field of view. It detects the infrared energy released from animals as well as from human beings, when this energy is higher than the certain threshold level PIR sensor shows an indication correspondingly. The energy detected by PIR sensor is usually in the form of heat i.e. emitted by humans as well as from animals. We can also test and verify our results in Proteus using PIR sensor. I have already shared PIR Sensor Library for Proteus . PIR sensor ...
Hello everyone! I hope you all will be absolutely fine and having fun. Today, we will have a look at the DHT11 Arduino Interfacing. DHT11 is an embedded sensor, used to measure both temperature and humidity of the surroundings. It is made up of two different parts i.e. capacitive humidity sensor and a thermistor. DHT11 is a slow sensor but is quite efficient for the applications where we need to do some basic analog data exchange. There is a small chip inside this sensor which performs the function of analog to digital to analog conversion and gives the results for temperature as well as for humidity in digital form. This digital signal can be read easily through any micro-controller. LM335 is another temperature sensor and to understand today's post more properly, you should also go throu ...