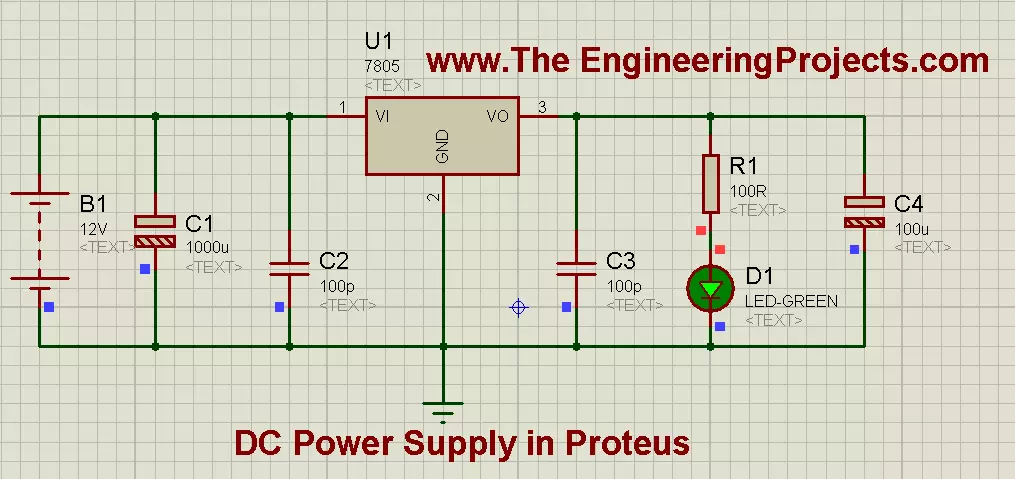
Hello friends, hope you all are fine and enjoying in your life. In the previous post, we have seen How to use Oscilloscope in Proteus ISIS, today I am going share a new and a very important Tutorial which is How to Design a 5V Power Supply in Proteus? This project is very simple and of basic level but importance of this project is that it is used as a base in almost all large electronics project, designed now-a-days. When I start working on any project then the first thing, I need to design is this DC power supply, because without powering up the components, we can't use them. :)
While designing a 5V Power Supply in Proteus ISIS, we will be using Voltage Regulator IC, which is commonly known as 7805. This voltage regulator is used to regulate or c ...
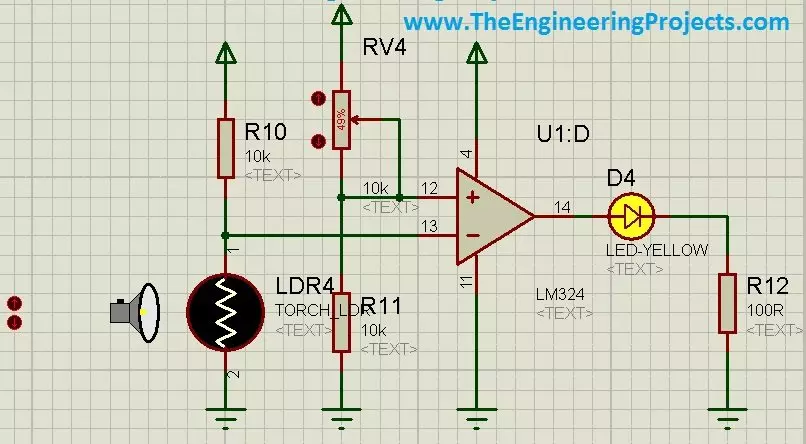
In today's post, I am gonna share how to use LDR sensor in Proteus. Proteus, as we all know, is a very handy software and is used for circuit and PCB designing. It is also used for circuit and programming testing. It is normally used by engineers in their projects and contains a vast list of built-in components. I have posted a lot of tutorials on Proteus and I have got quite a positive feedback from the reader about these tutorials. So, I thought to share another component in Proteus which is quite hidden and I haven't seen much posts on it available online.
So, in today's post, first I am gonna explain what is LDR sensor? and we will see where it is used and how it is used. After that I will design a simple circuit in Proteus in which I will tur ...
Hello friends, hope you all are fine and having fun with your lives. Today's post, as the name suggests, is about Arduino UNO PCB Design in Proteus ARES. I have already posted Arduino Library for Proteus on my blog using which one can quite easily run Arduino simulation in Proteus.but what if you wanna do the Arduino UNO PCB design in Proteus, then you are lucky that you are reading this post. :)
In one of my projects, I have to design the PCB for Arduino in Proteus so I thought to also post it here so that others can download it as well. Normally PCB design is not required for Arduino and I usually get Atmega328 out of Arduino and use it separately but sometimes, depending on the requirements of your project, you may also need to place Arduino it ...
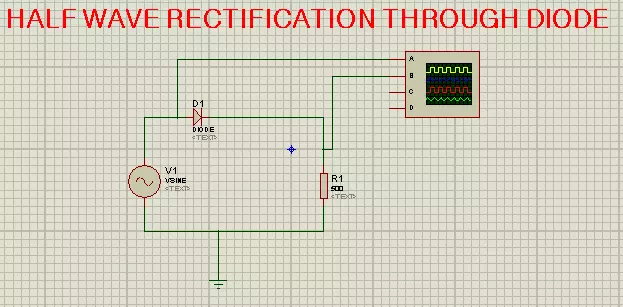
Hello friends, I hope you all are doing great. In today's tutorial, I will show you how to perform Simplest Half Wave Rectification in Proteus. In this tutorial, we will design a simple Proteus simulation, where we will use a diode for half-wave rectification.
Before designing the Proteus simulation, we will first have a theoretical overview of Half Wave Rectification as it's always the best approach to read theory before practical (Proteus Simulation). So, let's get started:
What is Rectification ???
Rectification is an electrical process, used to convert Alternating(AC) Voltage into Direct(DC) Voltage using a circuit called rectifier.
The Rectification process is always carried out using diodes, as we know diodes allow the current to flow in one direction only, thus t ...
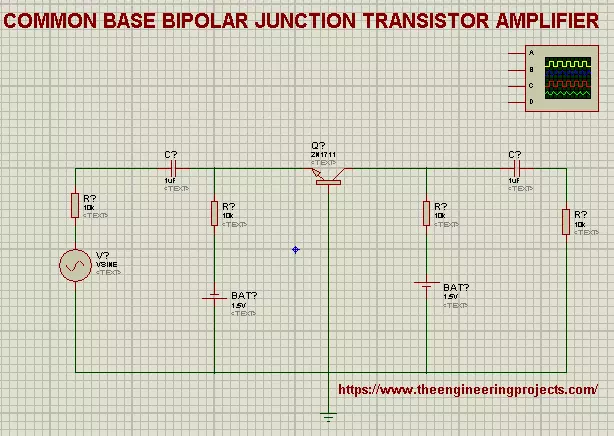
Hi mentees, Welcome to The Engineering Projects. If you are seeking for the Practical Implementation of Common Base bipolar Junction Transistor amplifier then you clicked at the best website because we'll cover the basic concepts and the procedure step by step.
So, Lets start the learning.
What is Common Base BJT Amplifier?
The precise definition of the Common Base BJT Amplifier is:
"The type of Bipolar Junction Transistor Amplifiers in which Base is Common to both emitter and Collector and Current gain is taken from the Base is called Common Base bipolar Junction Transistor Amplifiers."
Recall that a transistor has three regions i.e, Base, Collector and Emitter. Hence we design our Circuit in such a way that we get the output of current from ...
Hello friends, today I am going to post the next lecture of Proteus Tutorial. I am receiving quite a positive response about this Proteus tutorial. In the previous post, we have seen How to use Virtual Terminal in Proteus and today I am going to explain How to use Oscilloscope in Proteus ISIS. This oscilloscope is just the same which you have seen in your electronic or electrical labs. Oscilloscope is basically used to monitor signals or waveforms. Particularly when you are not much aware of the circuit and you need a little debugging then you use oscilloscope.
In oscilloscopes, we can visualize the electrical properties of waveforms, like we can check whats the frequency of electrical signal, what's its voltage or current. Digital oscillosco ...
Hello friends, hope you all are having fun and enjoying life. Today's post is quite a simple one and is about designing of circuit diagram of buzzer in Proteus ISIS. Buzzer is quite a common electrical component which is used in almost every Embedded Systems project. For example, you have seen a simple UPS, it gives a beep each time the light goes off or it has depleted its battery. Buzzer is normally used for given some indication and normally this indication is kind of a warning.
Proteus has a builtin component for buzzer and its an animated component means it gives a sound (beep) when its turned ON. So, I am gonna use that one and will give you an actual beep on it. So, it won't be much difficult and quite a simple procedure. In this post, I am ...
Bonjour trainees!!! Welcome to the Engineering projects, We hope you are doing great. In our previous lecture, we discussed the first type of clippers in detail i.e. Series Clippers. Today, we are going to discuss the next two types of Clippers i.e. Shunt Clippers and Dual Clippers. Here are the types of Clippers from the last lecture:
So, today, we are going to cover the below concepts:
what is a Shunt Clipper?
Types of Shunt Clippers
Implementation of shunt Clippers in Proteus ISIS.
Dual Clippers basics.
Implementation of Dual Clippers in Proteus ISIS.
So, let's get started:
What is a Shunt Clipper?
In Shunt Clippers(Parallel Clippers), the diode is connected in Shunt(Parallel) to the input signal source & the load resi ...
Hello friends, I hope you all are doing great. In today's tutorial, we will have a look at How to use Voltmeter & Ammeter in Proteus ISIS. It's our 4th tutorial in Proteus series. While designing an electronics project, voltage & current measurements are essential debugging features, as they help in understanding circuit behavior.
Proteus has builtin instruments for voltage & current measurement. We have have their probes and today we will discuss them in detail. First have a look at Voltmeter in Proteus ISIS:
How to use Voltmeter in Proteus ISIS
DC Voltmeter is used to measure the voltage difference across any DC component.
In order to use DC Voltmeter, we need to click on Virtual Instrum ...
Hello everyone, I hope you all are fine and having fun. Today, I am not going to share a project. Instead, I am gonna share a tutorial in which I will teach you How to download Proteus and install it. It's going to be a quick tutorial because there's not much in it to say. You know Proteus is a Paid software and you must pay the company because they have put really great effort into designing this software. So, if you can afford then you must buy the latest version of Proteus software from their Official Website.
In today's post, I am going to share the Full version of Proteus software and it is Proteus 7 Professional, I am sharing it for engineering students. I hope you are going to enjoy this software its not only free but also complete and the ...