Hello readers, hope you all are doing great. In this tutorial, we are going to discuss a mechanism that allows users to update the ESP32 with a new program wirelessly or over the air (without using a USB cable to upload a new program).
Over-The-Air (OTA) programming
Fig. 1 ESP32 OTA
OTA programming is the mean by which a product manufacturer or product service provider can update the features or functionality of the device wirelessly or over the air, after the device has been deployed in the field where connecting a cable or uploading the code serially is difficult.
One key advantage of OTA is that a single central node can send an update to multiple ESPs on the same network.
The device must have a provisioning client capable of receivin ...
Hello friends, hope you all are fine and having fun with your lives. Today, I am going to share a new exciting post on Send SMS with SIM900D in Proteus ISIS. In my previous post, I have shared the new GSM Library for Proteus, which is the first ever designed library for Proteus, and I am quite excited while sharing its features. So, today, we will use this GSM Lirbary for Proteus and we are gonna send sms with Sim900D module available in that library. We are gonna design this whole project in Proteus ISIS.
If you wanna implement it on hardware then you must have a look at Send SMS with SIM900D module with Arduino which is designed in real hardware but today we are gonna just do the simulation part. Iam not gonna use any Microcontroller today. Inst ...
Hello friends, I hope you all are doing great. Today, I am going to share the Raspberry Pi 4 Library for Proteus. In our previous tutorial, we shared the Raspberry Pi 3 Library for Proteus and as we mentioned in that tutorial, these Raspberry Pi libraries will have dummy modules i.e. We have just designed the exterior but these boards won't be able to read the Python code. Although just for fun, we have added the Arduino firmware in these boards, so we can upload the Arduino code in it. As the legends say, something is better than nothing. We have given these boards an unofficial name "Arduino Pi".You can use these Pi boards to design your circuit diagram or can also use it in your presentation/demonstration of your projects. I hope you will enjoy these simulated Raspberry Pi boards. Befor ...
Hello Learner! Welcome to another exciting experiment at The Engineering Projects. We hope you are having a great day. In this lecture, we'll seek information about the Boost Converter Circuit from scratch to result in quick and easy steps. So, if you don't know about the experiment then don't worry because every Expert was once a Beginner. We'll talk about the following topics:
What is IRFZ44N MOSFET Boost Converter?
What is the brief introduction of components of circuit?
How can we implement the IRFZ44N MOSFET to design circuit of Boost Converter?
You will know some useful information about the topic in the DID YOU KNOW sections.
IRFZ44N MOSFET Boost Converter
During the experimentation of electronic circuits, we often face the situation ...
XBee modules have become a cornerstone for wireless communication in today's electronics and embedded systems projects. Whether you are building a home automation system, an industrial control network, or simple point-to-point communication between devices, XBee offers a reliable and easy-to-use solution. In this comprehensive introduction, we will explore what the XBee module is, how it works, its core features, and how you can integrate it into microcontroller-based projects.
In future tutorials, we’ll delve deeper into specific interfacing guides, including how to interface the XBee module with a computer and connecting XBee to an Arduino. While Arduino will be our primary focus due to its popularity and accessibility, you can also connect XBee modules to other microcontrollers such as ...
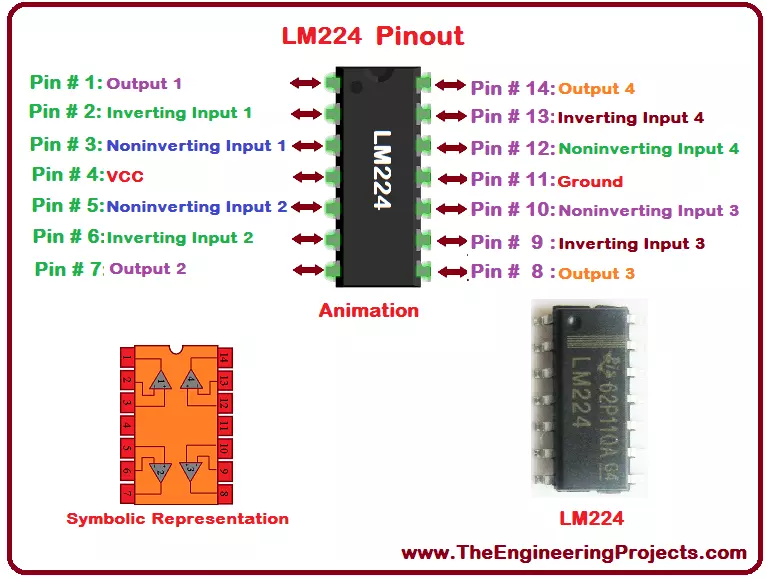
Hello everyone! I hope you all will be absolutely fine and having fun. Today, I will provide you document on detailed discussion about Introduction to LM224. LM-224 has four internal builtin operational amplifiers. These amplifiers are frequency compensated. The basic purpose to design these type of device is to operate it from a single power supply sources. Moreover, they are also able to perform different tasks using split power supplies. Magnitude of power supply and the current current drain both are independent of each other.
LM-224 has a very wide range of application areas which include DC gain blocks, transducer amplifiers etc. LM 224 has a large number of amazing features include wide power supply ranges, large bandwidth, low input offs ...
Hello friends, I hope you all are doing great. In today's tutorial, we are gonna have a look at detailed Introduction to TIP41. It is an NPN power transistor. It exists in (TO-220) malleable suite which marks this expedient appropriate for acoustic, power rectilinear and swapping submissions. Its corresponding transistor is TIP42. It is intended by joining three (3) components of semiconductor material by doping with different materials. It's center portion is base which is tinny and the other two outer parts are prominently doped than the base.
Several transistors can strengthen a trivial current which will then be leading adequate to effort attention or other greater current maneuvers. These discretion are proficient to notice a shift in voltage ...
Hey everyone! Hope you all are doing great. Today, I am going to give you the details on the Introduction to 2n4391. It is a simple N type JFET (Junction field effect transistor) which consists of three terminals called drain, source and gate and are denoted by D, S and G receptively. It is mostly used in analog switches and current limiters. I am going to give you a brief details on this transistor. Let's get started.
Introduction to 2n4391
2n4391 is a field effect transistor that consists of three terminals known as drain, source and gate.
It is called field effect transistors because static field performs as important part in the operation of this transistor.
Unlike normal transistors, it is a voltage controlled device as it doesn't requ ...
Hello friends, I hope you all are doing great and having fun in your lives. In today's tutorial, we are gonna design a Heart Beat Monitor using Arduino in Proteus ISIS. You should download this Heart Beat Sensor Library V2.0 for Proteus because we are gonna use that to detect heart beat in Proteus.
I have also used a 20x4 LCD which will display our heart rate value. You should download this New LCD Library for Proteus. I have counted the heart beat for ten seconds and then I have multiplied it with 6 to get the heartbeat per minute which is abbreviated as bpm (beats per minute). So, let's get started with Heart Beat Monitor using Arduino in Proteus ISIS.
Heart Beat Monitor using Arduino in Proteus
First of all, click the below button to downloa ...
Hey Fellas! I hope you are enjoying your life with love, care and passion. Today I'm going to give you the details on the Introduction to 1n4733a. It is a Zener Diode which works similar to normal diode with only exception, it can also conduct in reverse biased condition. Zener diodes are considered as a basic building components for many electronic circuits. I will try my best to give you the details on almost every feature of this zener diode so you don't need to go anywhere for finding the information regarding this zener diode. Let's get started.
Introduction to 1n4733a
1n4733a is a normal p-n junction diode which allows the current to flow in both directions i.e. forward direction and reverse direction.
In other words, it conducts in bot ...