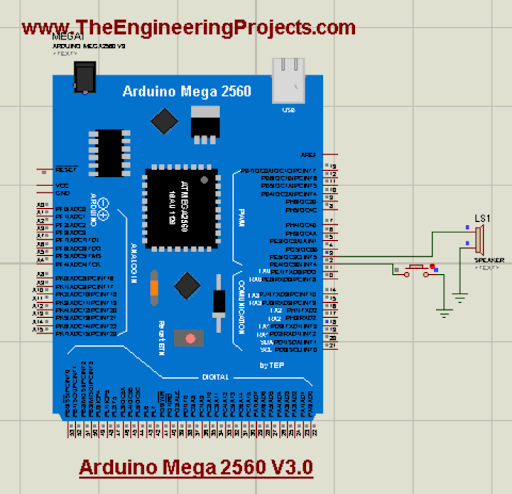
Hello readers! I hope you are doing great. Today, we are discussing the latest library for proteus. In the tutorial, we will look at the Arduino Mega 2560 library for Porteus V 3.0, which is one of the most versatile and useful microcontrollers from the Arduino family. We have shared the previous versions with you before this; these were the Arduino Mega 2560 library for Proteus and the Arduino Mega 2560 library for Proteus V2.0. The current version is better in structure and does not have a link to the website so you may use it in your projects easily.
Here, I will discuss the detailed specifications of this microcontroller. After that, I will show you the procedure to download and install this library in the Proteus and in the end, we’ll create a mini project using this microcontroller ...
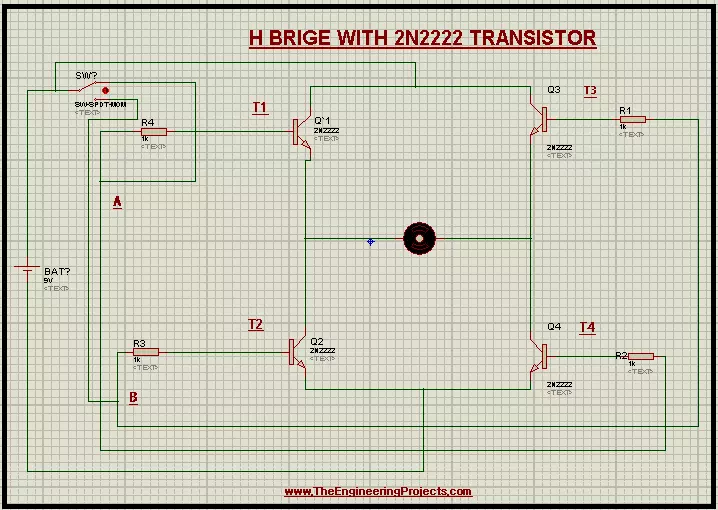
Hey Learners! Welcome to The Engineering Projects. We hope you are doing great. Our team is working on transistors and today, we'll design a circuit for using the 2N2222 Transistor. In this chapter you will learn:
What is H Bridge with 2N2222 Transistor?
How do the 2N2222 Transistor works?
What is the working of H Bridge?
How can we run the circuit of H Bridge in Proteus using 2N2222 Transistor?
By the same token, you will also learn important information about the topic in DID YOU KNOW Sections.
Introduction to H-Bridge
In electronic circuits, the direction of quantities like the flow of current, EMF, Electric field lines matter a lot. The H Bridge is used to control such motors through its specialized circuitry. The H Bridge is defined ...
Hello everyone! I hope you all will be absolutely fine and having fun. Today, I am going to share my knowledge about Introduction to LM335. LM 335 is basically an Integrated Circuit (IC) for precise temperature sensor. LM-335 operates on a current range 400uA-5mA having resistance less than 1 ohm. At 10mV/K, its absolute temperature becomes directly proportional to the breakdown voltage.
LM-335 operates as two terminal zener diode. At the temperature ranging from -40 degree Celsius to 100 degree Celsius, LM 335 can be used for each type of temperature sensing purposes. This device is available in different dimensions and in different sizes. LM-335 is most commonly available in the market due to its unique features including e.g. large temperatur ...
Hello friends, I hope you all are doing great. In today's tutorial, we are gonna have a look at detailed Introduction to HC-06. HC-06 is a class 2 slave Bluetooth module designed for serial communication. Once it is paired to a master Bluetooth device such as PC, smartphones, and tablet, its operations become easier to the user. It sends and receives data in a bidirectional manner.
HC-06 is used in different devices which works on Bluetooth for sending and receiving data. In today's post, we will have look at its pinout, working, circuit diagram, protocol, etc. I will also share some links of projects where I have interfaced it with Arduino and some other microcontroller. Friends if you have any questions please ask in comments I will try my bes ...
Hello friends, hope you all are fine and having fun with your lives. Today's post is about interfacing of RFID module RC522 with Arduino. RC522 is very simple yet effective module. It is an RFID module and is used for scanning RFID cards. Its a new technology and is expanding day by day. Now-a-days it is extensively used in offices where employees are issued an RFID card and their attendance is marked when they touch their card to rfid reader. We have seen it in many movies that when someone places ones card over some machine then door opens or closes. In short, its a new emerging technology which is quite useful.
I recently get a chance to work on a project in which I have to use RFID reader to scan cards. In this project I have used it for for s ...
Hello friends, hope you all are fine and having fun with your lives. Today, I am going to share a tutorial on DC Motor Speed Control using Arduino in Proteus ISIS. In my previous post, we have seen How to design a DC Motor Direction Control Project using Arduino in Proteus ISIS and if you haven't checked it out then I would recommend you to have a look at it first. Because, in today's tutorial, I am gonna extend that tutorial and will add the DC Motor Speed Control in it. So, today, we will control both the direction as well as speed of the DC Motor. Moreover, you should also have a look at How to use Arduino PWM Pins if you are not much familiar with PWM control.
In the previous tutorial, we have seen How to control the direction of a DC Motor, w ...
Hey Guys! Hope you are doing well. I always strive to keep your technical needs and requirements quite in line with valuable information that helps you excel and thrive in engineering and technology. Today, I'll unlock the detailed Introduction to S8050 that is an NPN Epitaxial Silicon Transistor mainly used for push-pull amplification and general purpose switching applications.
It is a low voltage and high current transistor, featuring collector current up to 700 mA and Collector-Emitter voltage around 25 V.
I'll try to cover each and everything related to S8050, so you don't have to scratch your head browsing the whole internet and find all the information in one place. Let's dive in and kick off the nitty-gritty of this transistor.
Introductio ...
Hello friends, I hope you all are doing great. In today's tutorial, I am going to show you How to use Arduino PWM Pins. It's the next tutorial in our new Arduino Tutorial for Beginners series. We will design a small code in which we will be controlling a dc motor's speed using the Arduino PWM Pins but before going into the details, let me first give you an introduction to Arduino PWM Pins because without understanding the PWM, which is the abbreviation of Pulse Width Modulation, you won't be able to understand How to use Arduino PWM Pins. In our previous tutorial, we have seen How to use analogWrite in Arduino and I have told you in that tutorial that we use this command for PWM as well. So, today we will have a look at How to do that.
PWM is an a ...
Hello everyone! I hope you all will be absolutely fine and having fun. In the tutorial Interfacing Temperature & Humidity Sensor with Arduino I will tell you that how can you interface temperature and humidity sensor named as DHT11 with Arduino and how can you observe the temperature and humidity level using this sensor. This sensor has usually three pins but some of its types has four pins but only the three pins are of importance for us e.g. VCC, GND and the third pin for reading the data from the sensor.
In the tutorial Interfacing Temperature & Humidity Sensor with Arduino, I will make a simple Arduino program which will estimate the level of temperature and humidity continuously and will display the value of both temperature and hum ...
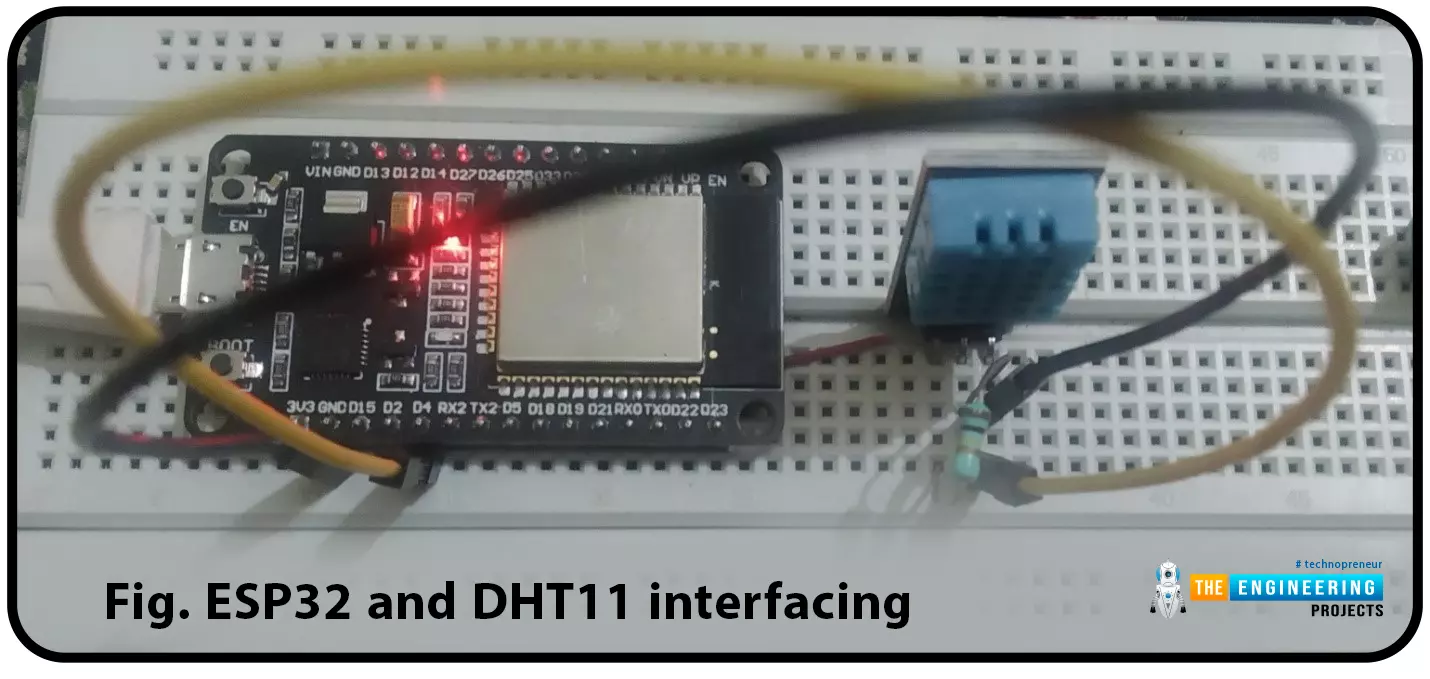
ESP32 module comes with multiple inbuilt features and peripheral interfacing capability is one of those features. ESP32 module also consists of an inbuilt temperature sensor, but that can only measure the temperature of the ESP32 core not the temperature of the surrounding environment. So it is required to use a peripheral sensor to measure the temperature of the surrounding environment like home, garden, office etc.
Hello readers. I hope you all are doing great. In this tutorial, we will learn how to interface DHT11 (temperature and humidity sensor) with the ESP32. Later in this tutorial, we will discuss how to share the sensor readings obtained from the DHT11 sensor to a web server.
Before moving towards the interfacing and programming part, let’s have a short introduction to the DHT11 ...