Hey Fellas! I hope you are doing great and having fun. We love when you keep coming back again and again for what we have to offer that resonates with your needs and requirements. I am back to give you a daily dose of useful information so you can excel and grow in your relevant field without much effort. Today, I am going to unlock the details on the Introduction to 2n4400. It is an NPN (negative-positive-negative) bipolar transistor which is mainly designed for general purpose amplification and switching applications. I'll cover each and everything related to this transistor, so you get all information in one place without roaming around on the internet. Let's get started.
Introduction to 2n4400
2n4400 is an NPN general purpose bipolar juncti ...
Hi Friends! Hope you’re well today. I welcome you on board. Today, I’ll walk you through the Introduction to INA219.The INA219 is a current sensor module that incorporates the I2C protocol for submitting the data obtained through sensing current, voltage, and power. It is a bi-directional zero drift current/ power sensing module mainly used in digital multimeters and power profilers.
I suggest you read this post all the way through as I’ll detail the complete Introduction to INA219 covering datasheet, pinout, features, and applications.
Let’s get started.
Introduction to INA219
INA219 is a current/power sensor module mainly employed to sense the power, voltage or current where up to 128 samples can be averaged together to get filtering in noisy environments. This data is then s ...
Hello friends, hope you all are fine and having fun with your lives. Today's post is about getting started with pixy camera. Now, the first thing comes in mind is what is Pixy Camera so let's first have a little introduction about Pixy Camera on which I recently worked. Pixy Camera is a small camera board which uses NXP microcontroller. Its a very powerful board and can get easily interfaced with simple Arduino UNO board. So, now we can do image processing even on Arduino UNO. Image Processing needs a powerful board that's why we can't interface simple webcam with Arduino UNO or mega etc. Before using pixy camera, when I need to do on board image processing I always used either Arduino YUN, Raspberry Pi or Arduino USB host shield but still it was ...
Hello friends, I hope you all are doing great. In today's tutorial, we are gonna have a look at detailed Introduction to TIP122. It is a Darlington braces NPN transistor. It works like an ordinary NPN transistor, but as it consists of a Darlington pair it has a decent collector current assessment of nearby 5 amperes and it's gain is around 1000. This transistor can bear 100 volts around collector and emitter terminals due to this feature it can be used for high loads.
This is a common purpose transistor it used in different industrial projects. It manufactured for less time taking switching submissions. In today’s post, we will have a look at its protection, wreck, distinction, entitlements, etc. I will also share some links where I have connecte ...
Hello everyone! I hope you all will be absolutely fine and having fun. Today, I am going to give you an elaboration on Introduction to LM293 an Integrated Circuit (IC). LM-293 is a dual independent accurate voltage comparator. LM 293 has a capability to perform its operation from a single supply source as well as from split power supply. The purpose to design LM-293 is to permit a common mode range to the ground level and it perform this operation with single power supply source.
LM-293 is the most common device in the market these days due to its high performance and cost effectiveness. This device is considered to be an ideal for a lot of electronics applications. LM-293 has a lot of features which make it different from all other devices. The ...
Hey Fellas! Hope you are getting along with life pretty well. This post is another addition in this Arduino Tutorial for Beginners series. Today, I'll discuss How to use analogWrite in Arduino? The analogWrite is mainly used to update the status of analog pins and is also used to map the analog values on the PWM (Pulse Width Modulation) pins.
You can check the article that I have posted previously on How to use analogRead in the Arduino - this command addresses the analog pins on the board and reads its status, while today's one does the exact opposite.
In this post, I'll try to break down each and everything related to analogWrite in simple steps, so you can grab the main idea pretty well. Let's jump right in.
How to use analogWrite in Arduino?
...
Hello friends, I hope you all are doing great. In today's tutorial, we are gonna have a look at detailed Introduction to MPR121. MPR121 is a touch sensor controller, its working is like the capacitor's working principle. This module has twelve electrodes points, it communicates via I2C protocol. When any objects come closer to an electrode point, we can observe the presence of an object by variation in capacitance of an electrode. It's working voltage should be between 2.5 to 3.6 VDC.
MPR121 is used in different industrial projects and electronic devices such as mobile phone and remote control systems. In today's post, we will have a look at its working, pinout, protocol, applications, etc. I will also share some links where I have interfaced it with other microcontrollers. If you have ...
Hi Guys! Hope you’re well today. I welcome you on board. In this post today, I’ll detail the complete Introduction to BD138.
BD138 is a PNP transistor that is incorporated in audio amplification and switching applications. It is composed of silicon material and comes in the TO-126 package. It contains three terminals, where small input current across one terminal is used to produce large output current across the remaining two terminals. The collector-base and collector-emitter voltages are 60V with emitter-base voltage 5V that illustrates the amount of voltage it requires to bias the transistor.
In this post I’ll walk you through the Introduction to BD138 detailing pinout, working, physical dimensions, applications, power ratings, and alternati ...
Hello Friends! Hope this finds you well. I welcome you to another addition to the introduction series. In this post today, I’ll be discussing the Introduction to BC560.
BC560 is a general-purpose transistor mainly used to drive loads under 100mA as it carries collector current 100mA. It falls under the category of PNP transistors and is mainly used for amplification and switching purposes.
I suggest you read this entire post as I’ll detail everything about BC560 transistor covering pinout, working, power ratings, applications, and physical dimensions.
Continue reading.
Introduction to BC560
BC560 is a PNP transistor mainly used for switching and amplification purpose. It comes with transition frequency 150MHz and junction temperature of 150 C ...
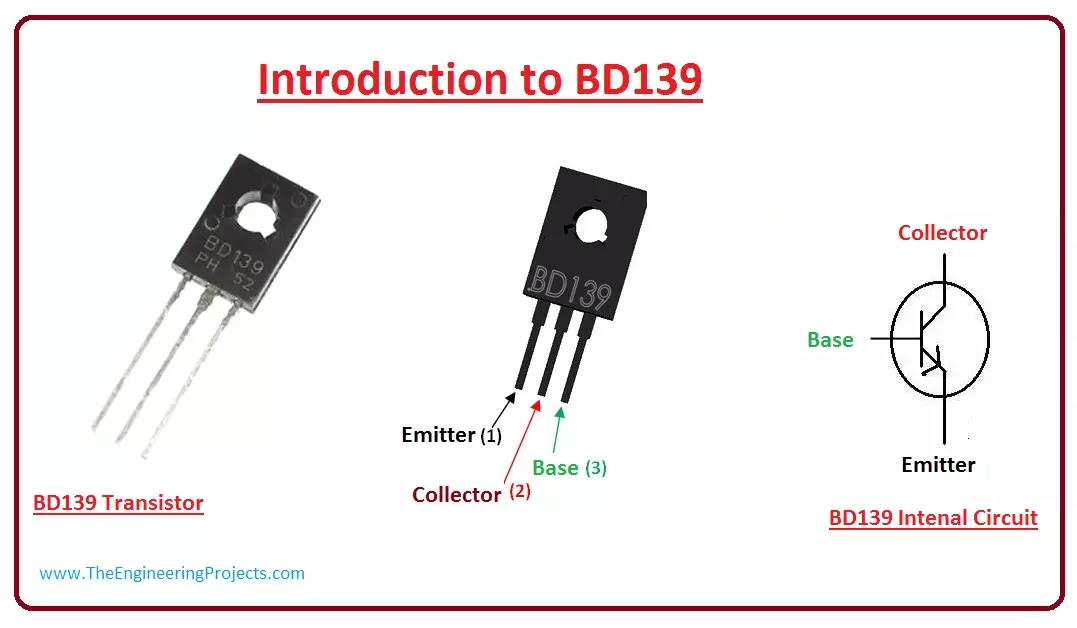
Hello friends, I hope you all are doing great. In today's tutorial, we are gonna have a look at detailed Introduction to BD139. BD139 is a Bipolar NPN transistor, it is mounted in the SOT-32 plastic package. It is designed for audio amplifier and driver utilizing complementary circuits. BD139 has a gain value of 40 to 160, which determine the amplification capacity of a transistor. It has three main pinouts which are a collector, base and emitter. It is used to control (On/Off) bigger loads that consume less than 1.5A.
BD139 is used in different industrial projects such as RF amplifier and Switching Circuits. In today's post, we will have a look at its pinout, Arduino interfacing, applications, Specifications, etc. I will also share some links whe ...