Hello friends, I hope you all are happy, healthy and, content. We have been discussing transistors lately, from the basic definition to the types and characteristics of transistors we have covered it all. If you have a brief idea about transistors, you must be aware of the field effect transistor or you might have heard or read about it somewhere, it is one of the earliest known types of transistors which is our topic of discussion today.
Field Effect Transistors were made to cover up the lacking of previously known transistors which occupied large space and produced a lot of noise, another major problem was the low reliability of previous versions. So, let's get started with the FETs.
Definition of Field Effect Transistor
Let us define field effect transistor first,
"The Field e ...
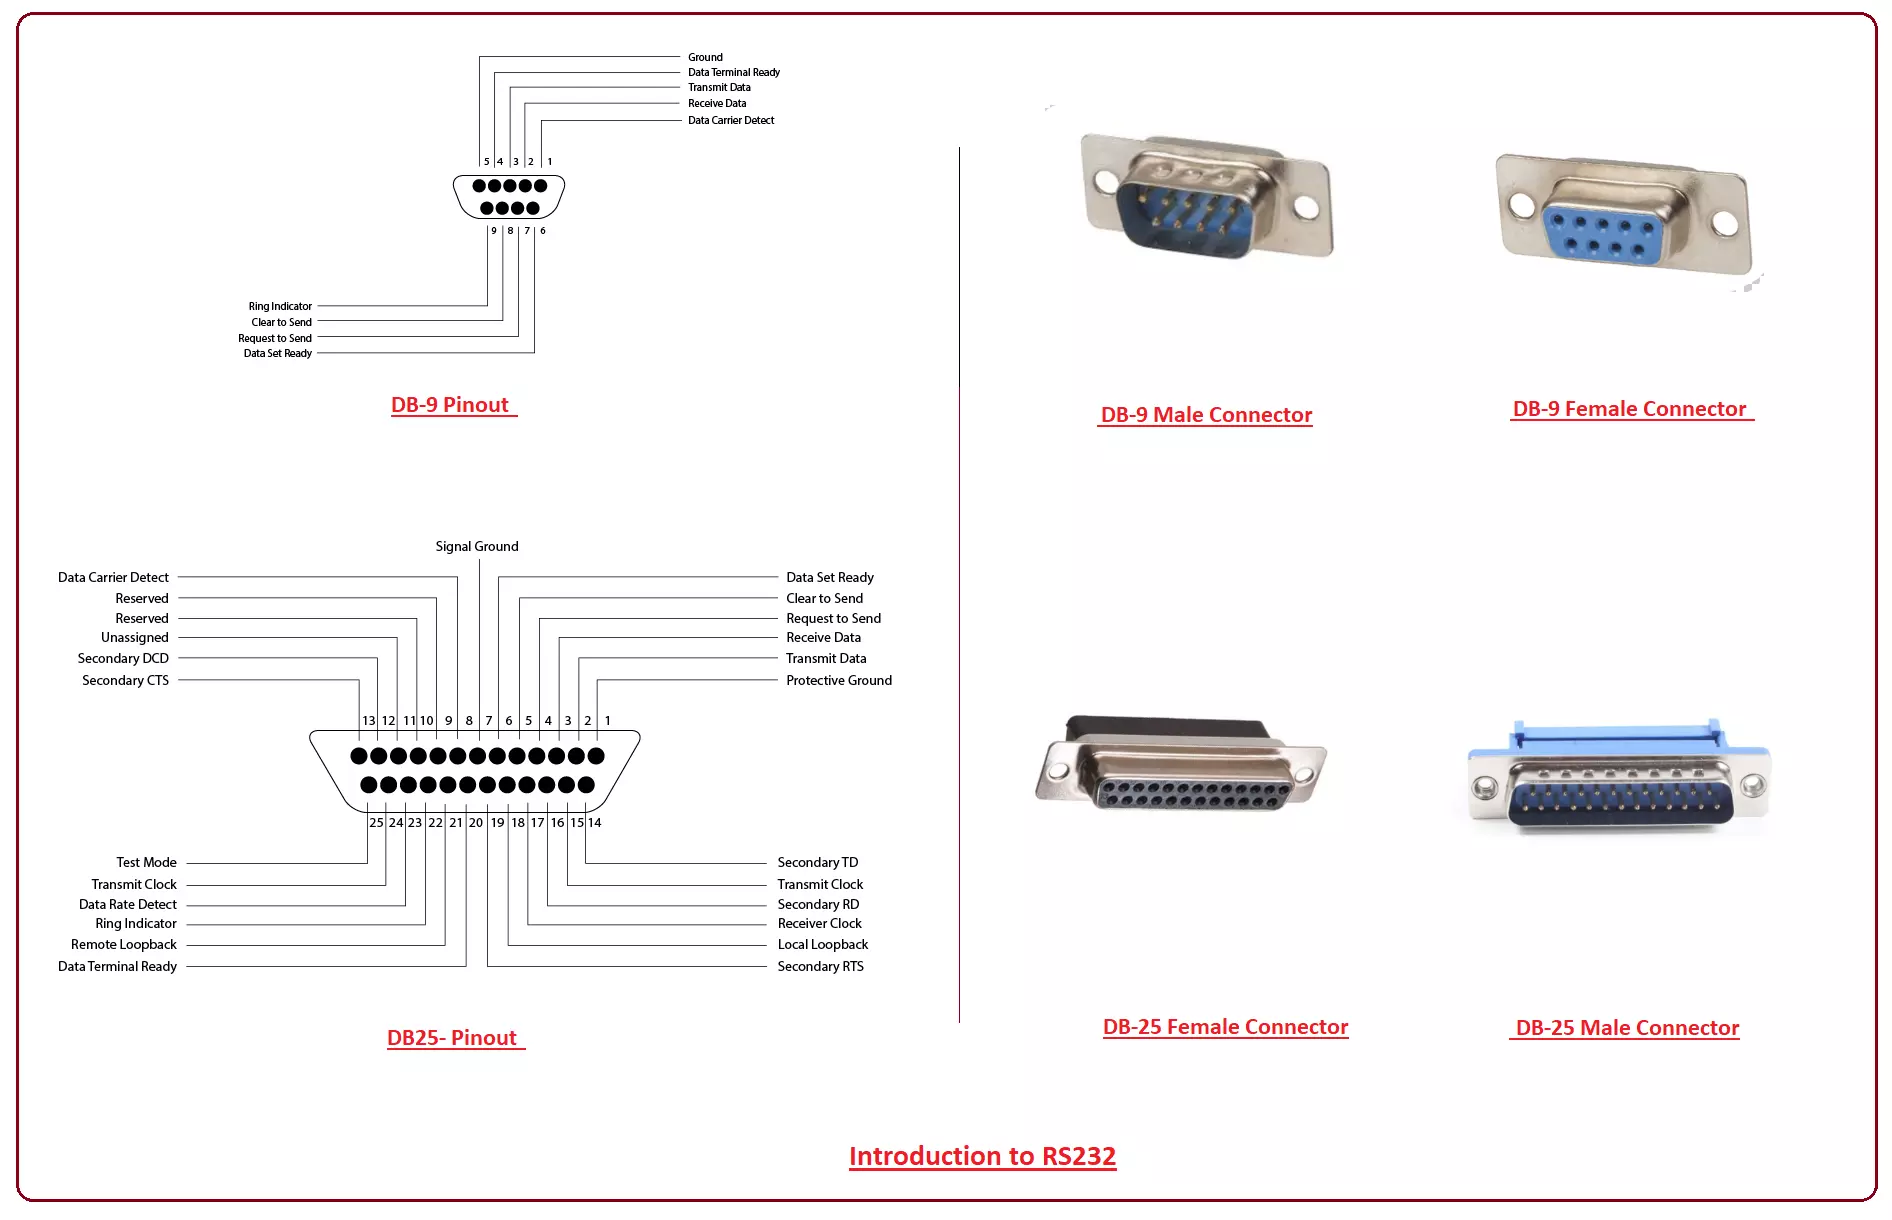
Hello Friends! Hope you are doing well. I am back to give you a daily dose of valuable information. Today, I'll discuss the detailed Introduction to RS 232 which is a standard communication protocol mainly used for serial communication between two devices. It was first introduced by the EIA (Electronic Industries Association) in 1960 to provide a pathway for connecting one device with other peripheral devices for flawless digital communication.
It is true, that the inception of USB has grossly reduced the need for RS232 protocol, still, we can't brush off its significant importance in some industrial applications where Programmable Logic Controllers and Computerized Numerical Control Equipment are specifically programmed using RS 232 connectors ...
Hello everyone! I hope you all will be absolutely fine and having fun. Today, I am going to give you an elaboration on Introduction to LM2575. LM2575 is specially designed to simply the design of switching power supplies. It can be done by providing all the necessary active functions required in Integrated Circuit (IC) for step down regulators. LM-2575 can deliver load current of around 1A along with the good line regulation as well as load regulation. LM 2575 has different builtin functions e.g. frequency compensation, cycle by cycle current limiting, oscillator with the fixed frequency and a lot more.
LM-2575 has many amazing features i.e. it can reduce the heat sink size due to its higher efficiency parameter. In some cases even heat sink is ...
Hi Guys! Hope you are doing well. In this platform, we always strive to keep updated with valuable information related to engineering and technology. Today, I'll discuss the detailed Introduction to CD4047. It is a CMOS Low Power monostable/astable multivibrator mainly used for converting DC current signal to AC signal.
This inverter proves to be very handy in some countries where load-shedding creates a significant problem as it comes with an ability to store electrical energy and discharge it in the absence of main electrical power.
In this tutorial, I'll cover the entire details on this inverter, its main features, working, and applications. Let's dive in and explore everything you need to know about this inverter.
Introduction to CD4047
CD40 ...
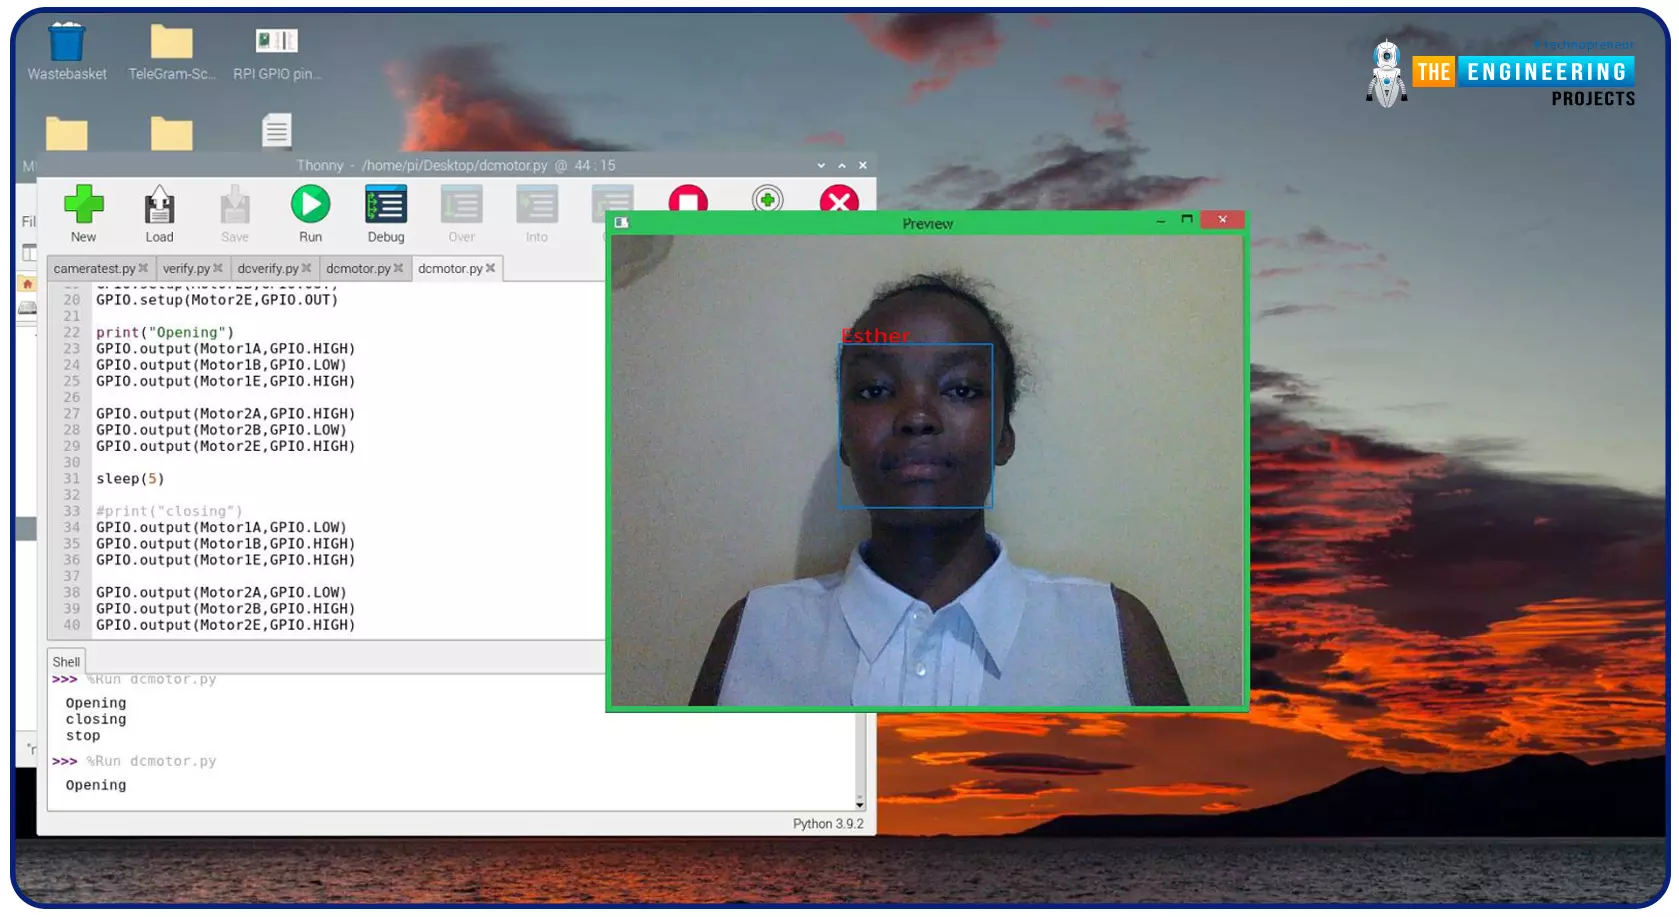
Greeting, and welcome to the next tutorial of our raspberry programming tutorial. In the previous tutorial, we learned how to build a smart attendance system using an RFID card reader, which we used to sign in students in attendance in a class. When it comes to building a face-recognition program on a Raspberry Pi, this tutorial will show you how. Two Python programs will be used in the lesson, one of which is a Training program that analyzes a collection of photographs of a certain individual and generates a dataset. (YML File). The Recognizer application uses the YML script to detect a face and afterward utters the person's name when the face is detected.
Components
Raspberry Pi
Breadboard
L293 or SN755410 motor driver chip
Jumper wir ...
Hello everyone! I welcome you on board. Hope you’re well. In this post today, I’ll detail the Introduction to 2sb772.
2sb772 is a PNP transistor that comes in the TO-126 package. It is mainly used for amplification and switching purposes. This is a bipolar junction transistor which means the conductivity is carried out by two charge carriers i.e. holes and electrons. And it comprises of two junctions where the base-emitter junction is forward biased and the base-collector junction is reverse biased in forward active mode.
In this post, I’ll be discussing the working principle, pinout, datasheet, physical dimensions, power ratings, and applications of the device 2sb772.
Let’s get started.
Introduction to 2SB772
The 2sb772 is a medium power PN ...
Hello friends, hope you all are fine and having fun with your lives. In today's post, I am going to share GSM Library for Proteus. Yeah you have read absolutely fine, today I am gonna share the most awaited and most demanded Proteus Library. :) Till now, I have received hundreds of suggestions and requests about this Library and I have always told them that its under designing process and I will post it real soon. So finally the wait is over and we have our new GSM Library for Proteus, ready to download and simulate in Proteus. Using this GSM library for Proteus, now you can easily simulate your GSM module in Proteus and can test your code. :)
As its the first version of our GSM Library so its not complete or perfect. It is really the basic model ...
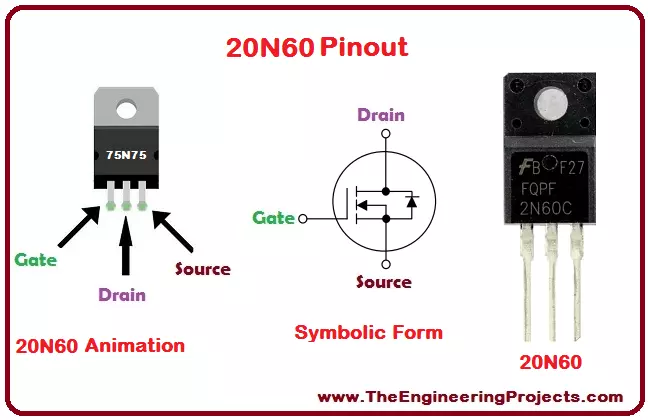
Hello friends! I hope you all will be absolutely fine and having fun. Today, I am going to give you an elaboration on Introduction to 20N60. 20-N-60 is basically a power Metal Oxide Semiconductor Field Effect Transistor (MOSFET). Power MOSFET is a device that can handle a specific level of power. I have already shared information about MOSFET in my previous tutorials e.g. Introduction to 75N75, SG3524, 50N06, IRFZ44N, C945 and TL072. Before going into the details of this article you must have a look at these articles. They will result in the better understanding of this article.
MOSFET family is divided into two categories. P-channel MOSFET and N-channel MOSFET. 20-N-60 belongs to the N-channel MOSFET. It is based on United Technologies Corporat ...
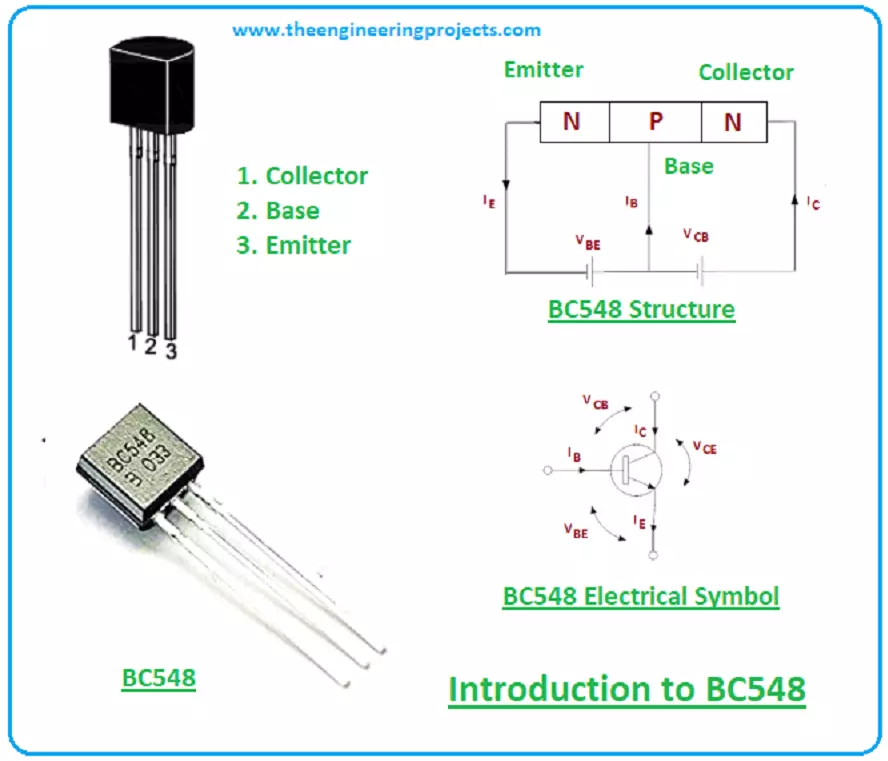
Hi Friends! Glad to see you here. I hope you’re well today. In this post, I’ll walk you through the Introduction to BC548. BC548 is a general-purpose transistor that falls under the family of NPN transistors. It carries three pins that are mainly used for external connection with the circuit. The small current at one terminal is used to control the large current at other terminals. Moreover, it can drive loads under 500mA and is available in TO – 92 package.
I suggest you read this post all the way through as you’ll get to know all nuts and bolts of BC548 transistor i.e. pinout, working principle, power ratings, applications, and physical dimensions. Let’s jump right in.
Introduction to BC548
BC548 is an NPN general-purpose transistor, comes w ...
Hey Guys! Hope you are doing well. Welcome you onboard. Today, I'll discuss the detailed Introduction to CD4046 which is a Micropower Phase-Locked Loop (PLL) that comes with a common comparator input and a common signal input amplifier between a low-power linear voltage-controlled oscillator (VCO) and two different phase comparators.
The phase locked loop, as the name suggests, is a loop where the phase of the output signal is compared with the phase of the input signal using a phase detector between two signals.
Phase detector operates with the aim to adjust the two signal and make them quite in line with each other so they generate signals with the same magnitude.
In this tutorial, I'll walk you through the main details related to CD4046 by ...