Hello friends, today's post as the name suggests is about how to send SMS with Arduino UNO and SIM900D using AT Commands. There are different types of SIM900D modules available in the market, so it doesn't matter which module you are using. All SIM900D modules work at AT commands basically so today I am going to show you how to send an SMS via AT commands without using any Arduino library. You should first read the AT commands manual which will give you an idea about AT commands. AT commands are special sets of commands which are used for communicating with SIM900 module. Using these AT commands we let our GSM work for us. Like if you want to send SMS then there's a specific AT command for sending the SMS similarly if you want to change the PIN co ...
Update: I have updated the code and removed the bug. Thanks for informing. Now this code will work perfectly.
Buy This Project
Hello friends, hope you all are fine and having good health. Today, as the name suggests, I am gonna post on how to Receive SMS with AT Commands using Sim900 and Arduino. I have already posted a tutorial on How to Send SMS with Arduino UNO and Sim900, so now we are gonna check the opposite. Sending SMS is quite easy, you just need to write some AT commands and write the message you wanna send and hit the Cntrl + Z and it will be sent. But receiving a text message on your SIM900 shield is a bit difficult because now you need to place a check when user will send a message. So, ideally whenever anyone send a message to yo ...
Hello friends, hope you all are fine and having fun with your lives. Today's post is about interfacing of RFID module RC522 with Arduino. RC522 is very simple yet effective module. It is an RFID module and is used for scanning RFID cards. Its a new technology and is expanding day by day. Now-a-days it is extensively used in offices where employees are issued an RFID card and their attendance is marked when they touch their card to rfid reader. We have seen it in many movies that when someone places ones card over some machine then door opens or closes. In short, its a new emerging technology which is quite useful.
I recently get a chance to work on a project in which I have to use RFID reader to scan cards. In this project I have used it for for s ...
Hello friends, I hope you all are fine and having fun with your lives. In today's post we are gonna see Interfacing of EasyVR with Arduino UNO. In the previous post, we have seen Getting Started with EasyVR Commander. It was quite simple and if you follow the steps carefully you wont stuck anywhere but still if you into some trouble i am here.
Now this tutorial is quite a quick and important one as it contains the real code using which we will control our robot. After adding the voice commands, now close the EasyVR Commander and open the Arduino Software. Connect the arduino board with computer and double check that your jumper J12 in on position SW. You should also read Training Error: Recognition Failed in EasyVR, if you got such error while ...
Hello friends, hope you all are fine and having fun with your lives. In today's post, I am going to share GSM Library for Proteus. Yeah you have read absolutely fine, today I am gonna share the most awaited and most demanded Proteus Library. :) Till now, I have received hundreds of suggestions and requests about this Library and I have always told them that its under designing process and I will post it real soon. So finally the wait is over and we have our new GSM Library for Proteus, ready to download and simulate in Proteus. Using this GSM library for Proteus, now you can easily simulate your GSM module in Proteus and can test your code. :)
As its the first version of our GSM Library so its not complete or perfect. It is really the basic model ...
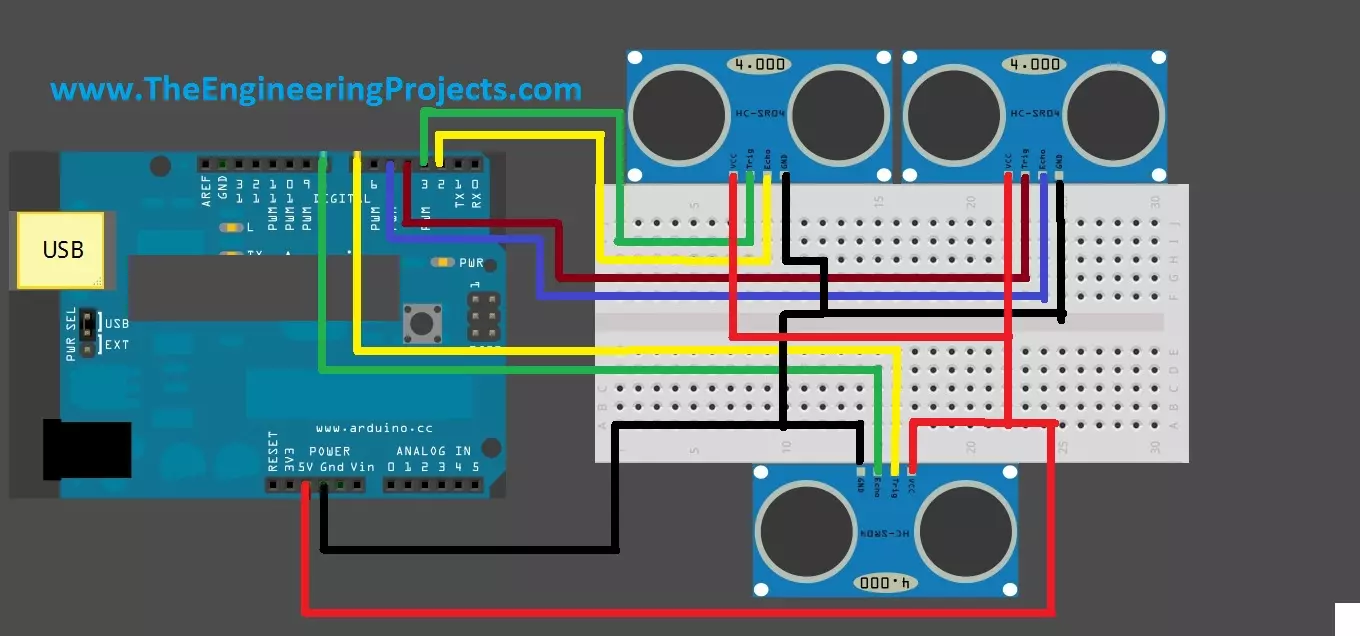
Hello friends, hope you are having fun and enjoying life. Today, I am gonna post about interfacing of multiple Ultrasonic sensor with Arduino. In the previous post, we have seen Interfacing of Ultrasonic Sensor With Arduino and in this post I have interfaced single ultrasonic sensor but in projects especially related to robotics, we have to interface multiple ultrasonic sensors. For example you have an obstacle detection robot, now in order to detect obstacle in front of robot you have to place once sensor on the front side but now you can't detect any object present on left or right side of your robot, so you have to place two sensors one on the left side of robot and one on the right side so in this project you need to use total three ultrasonic ...
Hello friends, hope you all are fine and having fun with your lives. Today, I am going to share a complete project with you guys. Its an Intelligent Energy Saving System which I designed around two years ago. So, today I thought to share it so that others could also get benefit. In this project, I have used Arduino UNO board for programming purposes. Its not much complicated project but is the basic for many complex projects.
Energy, is a small word, but is the problem of whole world. Particularly when we are talking about electrical energy. IF you consume more electrical energy then you will get quite huge bill at the end of the month. :P So, there's always work done on reducing the consumption of electrical energy and also we compare energy cost ...
In the previous post we have seen the project description of Voice Recognition Project using EasyVR shield. Today we will have a look at Getting started with EasyVR commander. EasyVR shield is a module which is used for voice recognition. First of all, we save our commands in the EasyVR shield and then we use these commands to control anything. In this project, I need to control the robot with voice commands like when someone says FORWARD then the robot start moving in forward direction.
Now first of all what I need to do is to save this FORWARD voice in the shield, which we will see today how to save the command in the shield and after that I will show you the Interfacing of EasyVR shield with Arduino UNO. So that when I say Forward the motor sta ...
Hello friends , I hope you all are fine and having fun with your lives. Today, I am going to share a new project which is XBee Arduino Interfacing. In my previous tutorials in the XBee series, we have had first Introduction to XBee Module and after that we have also discussed How to Interface XBee Module with Computer. Now we are all well aware of XBee Module and can easily do the XBee Arduino Interfacing. We have seen in the previous tutorial that XBee Module works on Serial protocol so we have to use the Serial Pins of Arduino UNO board.
If you want to use any other microcontroller then you can its not a big issue, just see the way how the programming goes and convert it to the language of your microcontroller i.e. PIC Microcontrollers or 805 ...
Hello friends, I hope you all are fine and enjoying. I have been working on a project these days and one portion of my current project includes the NRF24L01 Arduino Interfacing. So, I thought why not share this knowledge with you people, I hope you will learn something new and more interesting. If you don't know much about it, then you should have a look at Introduction to NRF24L01.
Few days ago, I have also posted a tutorial on XBee Arduino Interfacing, in which we have seen how to make wireless communication between two XBee Modules which is also an RF module. So, now we are gonna have a look at How to make Wireless Communication between two NRF24L01 modules. I hope you are gonna enjoy this nrf24l01 arduino Interfacing. Here's the video demonstr ...