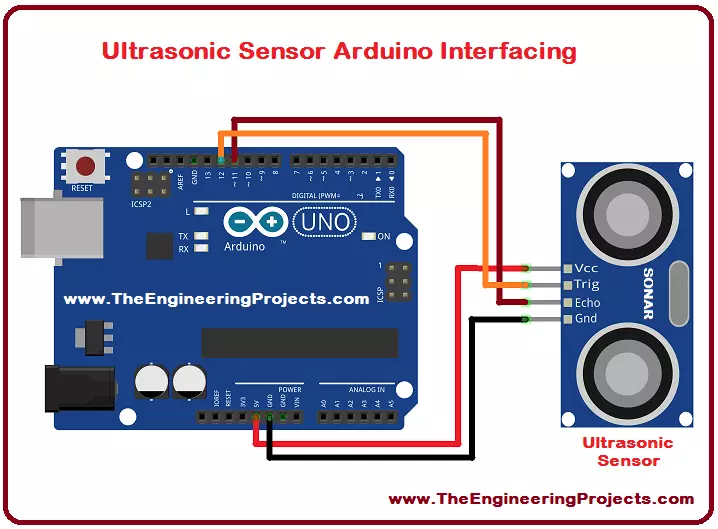
Hello everyone! I hope you all will be absolutely fine and having fun. Today, I would like to provide a complete discussion on Ultrasonic Sensor Arduino Interfacing. I would like to tell you some detail about ultrasonic sensor, after that we will move towards ultrasonic sensor Arduino interfacing. Ultrasonic sensor is also known as SONAR sensor. SONAR basically stands for Sound Navigation and Ranging. Ultrasonic is mostly used for the distance measurements. It can also be used for measuring the depth of the sea.
I have already shared Ultrasonic Sensor Library for Proteus. Ultrasonic/SONAR sensor is an electronic device used to estimate the distance of an object by continuously transmitting sound waves at a particular frequency and listens to tha ...
Hello friends, I hope you all are doing great. In today's tutorial, I am going to share a new Infrared Sensor Library for Proteus. This IR sensor is not available in Proteus and we are sharing this library for the first time. I hope it will help in your Embedded Systems Projects particularly related to robotics and automation. So, if you want to work on this IR Sensor then I would suggest you to first design its simulation and then try your luck with hardware.
There are different types of Infrared Sensors & modules available in the market. Some of these modules have transmitter & receiver on separate chips and are mostly get activated when someone interrupts the light. The one we have designed has a transmitter & receiver on a single c ...
Hello everyone! I hope you all will be fine and having fun. Today, I am going to give you a detailed Introduction to MAX232. It is an Integrated Circuit(IC) embedded in a single chip and acts as a voltage-level converter. MAX 232 is capable of converting 5V TTL Logic level to TIA/EIA-232-F level and can take up to +-30V input. It is normally used for the communication between microcontroller and Laptop/PC.We can use MAX-232 to convert Transistor Transistor Logic (TTL) voltage level to RS232 and vice versa. RS232 is the method of transferring data using serial communication. MAX 232 is a dual receiver or driver having a capacitive voltage generator to supply RS232 voltage levels from a single supply of 5V. Each receiver converts RS232 inputs to 5V either Transistor Transistor Logic (TTL) ...
Hello friends! I hope you all will be absolutely fine and having fun. Today, I am going to give you an elaboration on Introduction to 2SC3320. I have shared the basic knowledge of different electronic devices in my previous articles like Introduction to ULN2003, LM317, LM393, IRF540, BC547, UA741 and MC34063. 2SC-3320 is a Negative Positive Negative (NPN) transistor. It is made up of silicon. It is basically a power transistor. Power transistor is an electronic device which is able to handle certain level of power. 2SC-3320 has three terminals whose detail will be given later. Its an efficient device with higher efficiency available at at lower cost in the market these days. Due to cost efficiency and its unique features it is more popular devic ...
Introduction
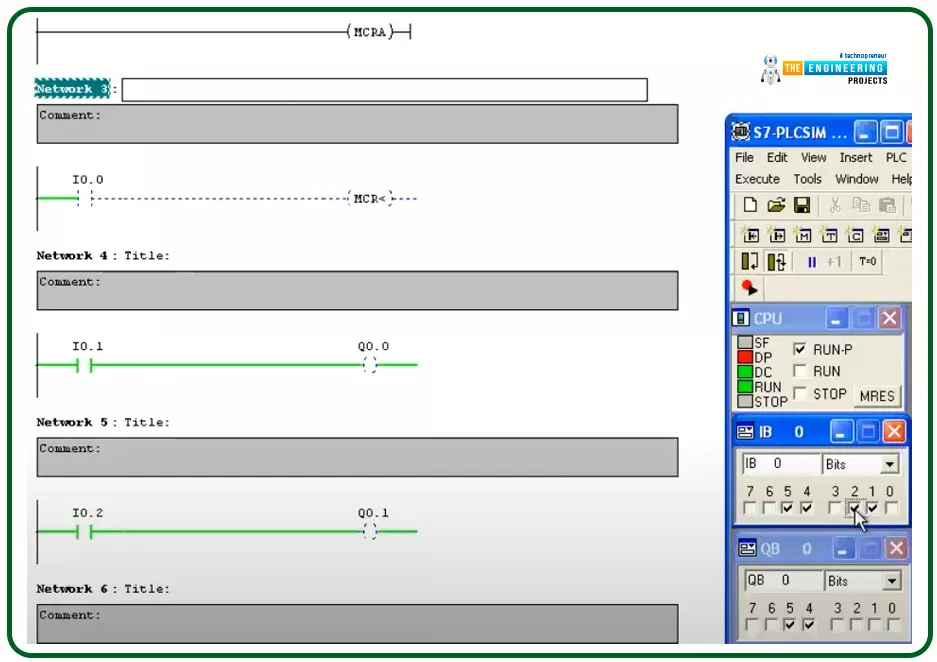
Hello friends, I hope you are doing very well. Today we are going to learn and practice the master control reset (MCR)! So what is that MCR? Well! This is a tool you might use to control a group of devices with one push button for performing fast emergency responses with one click for a group of devices in one zone. In another word, you divide the program into zones and put this zone between a master control to control their operation as one unit by one contact. This technique is useful for applying emergence stops and also protecting some equipment by applying a safety restriction to not operate when that condition is in effect.
The concept of the master control reset (MCR)
Figure 1 shows the master control relay in a ladder logic showing a couple of rungs between the ma ...
Hello friends, hope you all are fine and having fun with your lives. Today, I am going to share a new project in which we are gonna do Arduino Bluetooth communication. The Bluetooth module I have used for this project is HC-05, which is a serial Bluetooth module. We can quite easily perform the Bluetooth communication with this module using Arduino board. I have worked on many projects in which I have to send the data from sensors to my computer via Bluetooth. So, in such projects I normally use this Bluetooth module which is connected with the sensors and then Arduino gets the data from these sensors and then send this data to computer via Bluetooth module. In this project, I have used Arduino board but you can use PIC Microcontroller or 8051 Mic ...
Hello friends, hope you all are fine and having fun with your lives. Today's post is about interfacing of RFID module RC522 with Arduino. RC522 is very simple yet effective module. It is an RFID module and is used for scanning RFID cards. Its a new technology and is expanding day by day. Now-a-days it is extensively used in offices where employees are issued an RFID card and their attendance is marked when they touch their card to rfid reader. We have seen it in many movies that when someone places ones card over some machine then door opens or closes. In short, its a new emerging technology which is quite useful.
I recently get a chance to work on a project in which I have to use RFID reader to scan cards. In this project I have used it for for s ...
In today's post, I am gonna share a new Arduino Library for Seven Segment Display. In my recent project, I got a chance to work on seven segment displays, I have worked on them using PIC microcontroller but haven't got a chance to use them with Arduino. So, now as usual when I started working on them, I started searching for Arduino Library but I kind of got disappointed after getting quite heavy libraries for seven segments, and after a lot of search I thought of designing my own Arduino library for seven segment display, which I am gonna share in this post. :)
It's not very advanced library as we know seven segment displays are not too complex, so its quite simple and using it you can quite easily display any numerical digit on the seven segment ...
Hello friends, I hope you all are fine and having fun with your lives. In today's post, we are gonna have a look at How to interface Seven Segment display with 8051 Microcontroller. Seven Segment Display is normally used in those projects where counting or clock functionalities are required. If you wanna read the basic details of Seven Segment Display then must read Interfacing of Seven Segment Display with Arduino, I have explained 7 Segment Display in detail in that tutorial. And have also interfaced it with Arduino board. So, I am not gonna go into the details of 7 Segment in today's tutorial and I would recommend you to must read this tutorial.
As 8051 Microcontroller is concerned, we all know that Its a Microcontroller in which we program our ...
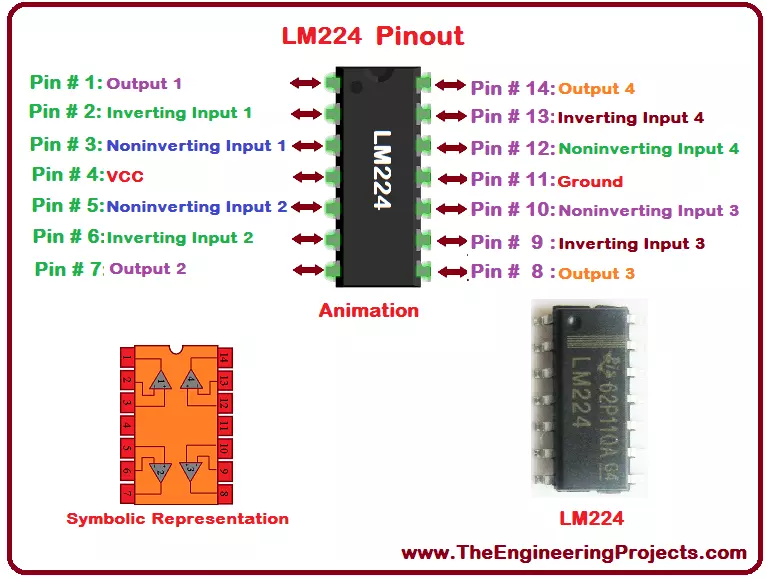
Hello everyone! I hope you all will be absolutely fine and having fun. Today, I will provide you document on detailed discussion about Introduction to LM224. LM-224 has four internal builtin operational amplifiers. These amplifiers are frequency compensated. The basic purpose to design these type of device is to operate it from a single power supply sources. Moreover, they are also able to perform different tasks using split power supplies. Magnitude of power supply and the current current drain both are independent of each other.
LM-224 has a very wide range of application areas which include DC gain blocks, transducer amplifiers etc. LM 224 has a large number of amazing features include wide power supply ranges, large bandwidth, low input offs ...