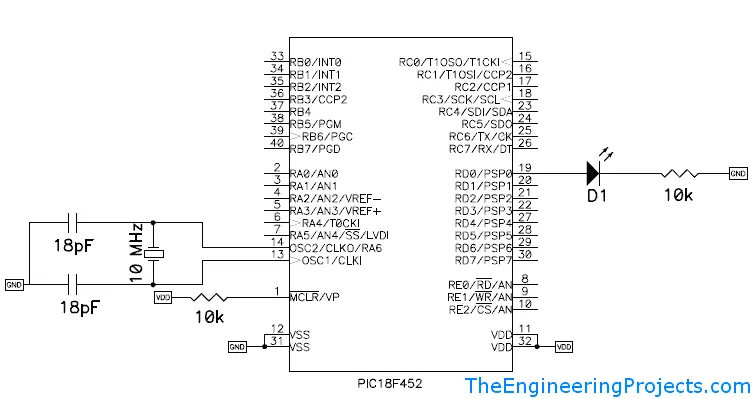
In the previous tutorial, I explained Getting Started with PIC microcontrollers and the software etc. Today, I am going to explain the hardware of PIC18F452 i.e. the functions available in PIC18F452. In other words, working of pins. We have a total of 40 pins in 18F452 microcontroller. Different PIC microcontrollers have different pins and different functions. Some of the PIC Microcontrollers lack the below functions and some of them have much more functions than these. So, here I am just discussing the PIC Microcontroller 18F452 because it is a moderate one and is mostly used in engineering projects. It's an 8-bit microcontroller. So now we are gonna have a look at the functions available in the PIC18F452 microcontroller. In the next tutorial, I ...
In the last tutorial, we discussed Getting Started with Microcontrollers and how they work and now we are gonna have a look at Getting Started with PIC Microcontrollers. PIC microcontrollers, as I mentioned before, are manufactured by Microchip. There are many types of microcontrollers but here I am concerned with PIC18F452.So let's have a small review of PIC18F452 PIC microcontrollers.
PIC18F452 is a 40-pin microcontroller each pin has its functionality, which we will see in our next classes one by one. suppose I want to create a project on LED blinking, a simple project on PIC so what do I have to do? First of all, I need the following things so that I may use them to work with PIC. I have discussed the Functions available in the PIC18F452 Microcontroller in the next post.
Importan ...
No.
Proteus Tutorials
Give Your Suggestions !!!
1.
Getting Started With Microcontrollers
2.
Getting Started with PIC Microcontrollers
3.
Functions Available in PIC18F452
4.
How to Install MPLAB Software
5.
How to Install MPLAB C18 Compiler
6.
Getting Started with MPLAB
7.
LED Blinking Project on PIC Microcontroller
Hey guys hope you all are fine and healthy. Today I am going to start a new tutorial, about PIC Microcontrollers. I will start from the very basics of PIC Microcontroller so that the beginner can also learn from it and can easily work on their projects and I will also post some projects in which I will use PIC Microcontroller and will control different modules using it.
The only thing I hate about PIC Microcon ...
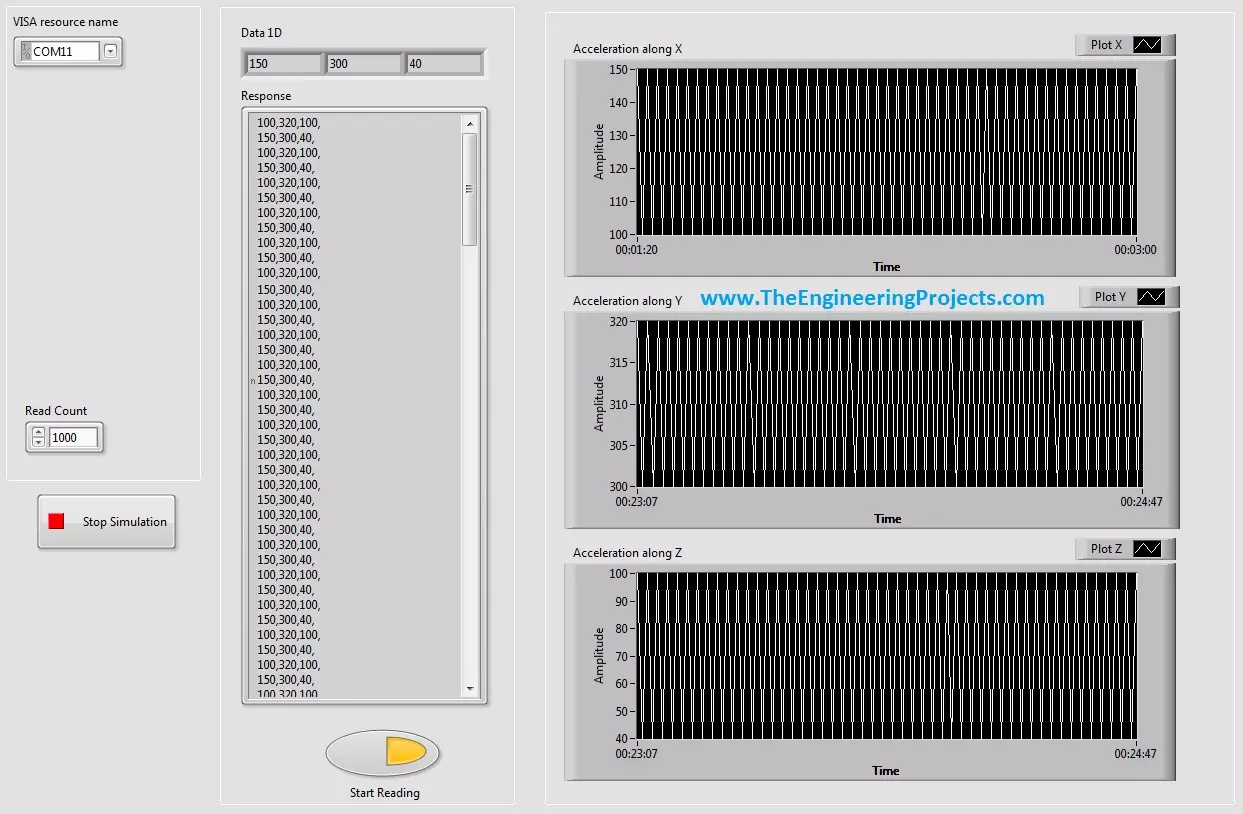
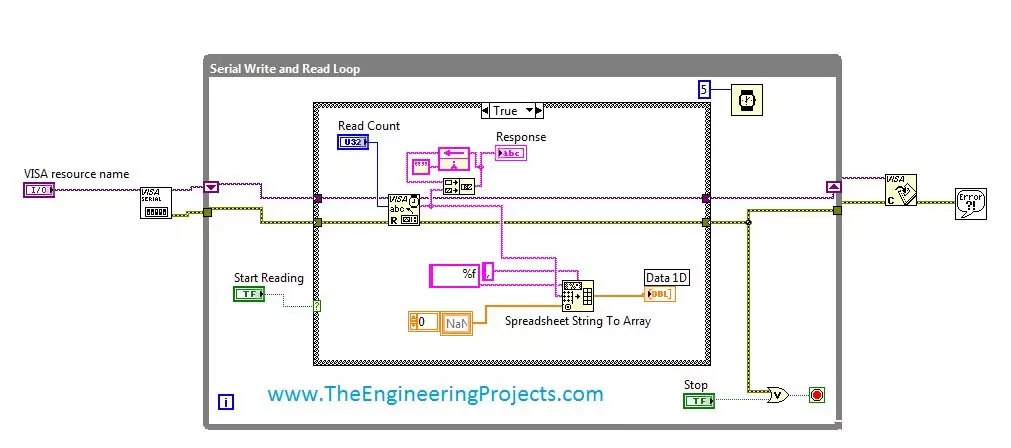
Hello friends, hope you all are fine and having fun with your life. Today's post, as the name suggests is about How to Display Serial Data on Real Time Graph in Labview. In our previous post, we have seen that how to Get Continuous Data From COM Port in Labview. Today's post is a sequel of this previous post so I would recommend that if you haven't had a look on that post then first visit it as I am gonna start today's post from where I stopped the previous one.
In the last post, we were able to get the continuous data from COM port using Labview and we have also separated the data based on a character which I have used this one "," i.e. comma. Now, suppose you are sending 3 values from your COM port and these are the sensors' values so tthe best ...
Hello friends, hope you all are fine and enjoying good health. Today's post is my first post on LabView Software. I have worked on LabView quite a lot in past but these days I am continuously working on LabvView so I thought to write some tutorials on it. In today's tutorial, I will explain in detail How to get continuous data from COM Port in LabView software. LabView is a very handy tool for the engineers. One can easily plot graphs and can work on different hardware modules with it. One of the best feature of LabView is its extensive help desk. There are many examples present in it which are ready to run and can help a lot, moreover their online is also very extensive. I got into many problems while working on it and I never get stuck, I just s ...
Hello friends, I hope you all are doing great. Today, I am going to share Circuit Designing of LCD with Arduino in Proteus ISIS. In my previous tutorial, I have posted a tutorial on How to use Arduino Library in Proteus. Using that library, we can easily test Arduino code in Proteus to check whether its working or not. If you haven't read that post then before starting it, first read it, as without adding the arduino library we can't use Arduino in Proteus.
Coming to today's post, as we have done adding the Arduino Library in Proteus, so I thought to do some projects on it and the first one I chose is quite simple one i.e. Circuit Designing of LCD with Arduino in Proteus ISIS. So we will have a look on how to show some characters on LCD using Ardu ...
Hello friends, hope you all are fine and enjoying life. Today's post is about removing a small error named as Recognition Failed in EasyVR, which I encountered while working with EasyVR shield with Arduino UNO. I have posted a complete project on EasyVR shield around a year ago in which I haven't mentioned this error because at that time I didn't encountered it. But today while working with EasyVR shield, I encountered this problem so I thought to share it with you guys.
EasyVR shield is a voice recognition module which is used for recognizing voices and operating accordingly. Using this module, one ca quite easily control anything using voice. In the previous project, I have controlled a robot using voice commands like when I say Forward then it ...
Hello friends, today's post as the name suggests is about how to send SMS with Arduino UNO and SIM900D using AT Commands. There are different types of SIM900D modules available in the market, so it doesn't matter which module you are using. All SIM900D modules work at AT commands basically so today I am going to show you how to send an SMS via AT commands without using any Arduino library. You should first read the AT commands manual which will give you an idea about AT commands. AT commands are special sets of commands which are used for communicating with SIM900 module. Using these AT commands we let our GSM work for us. Like if you want to send SMS then there's a specific AT command for sending the SMS similarly if you want to change the PIN co ...
Hello everyone, I hope you all are doing great. In today's tutorial, I am going to give you a detailed Introduction to Arduino YUN, and we will also have a look at its basic functionalities. Arduino YUN is a latest microcontroller board, manufactured by Arduino. It's the most advanced and highly stylish arduino board. The beauty of Arduino YUN lies in having two on board processors, which I haven't seen yet in any other Microcontroller board. One of them is simple Arduino processor which is similar to that of Arduino Leonardo while the second processor is Atheros AR9331. Atheros supports Linux server, which is the new thing in Arduino YUN. Because of these two processors, one now can do anything in the world of automation as well as web servers. ...
Buy This Project
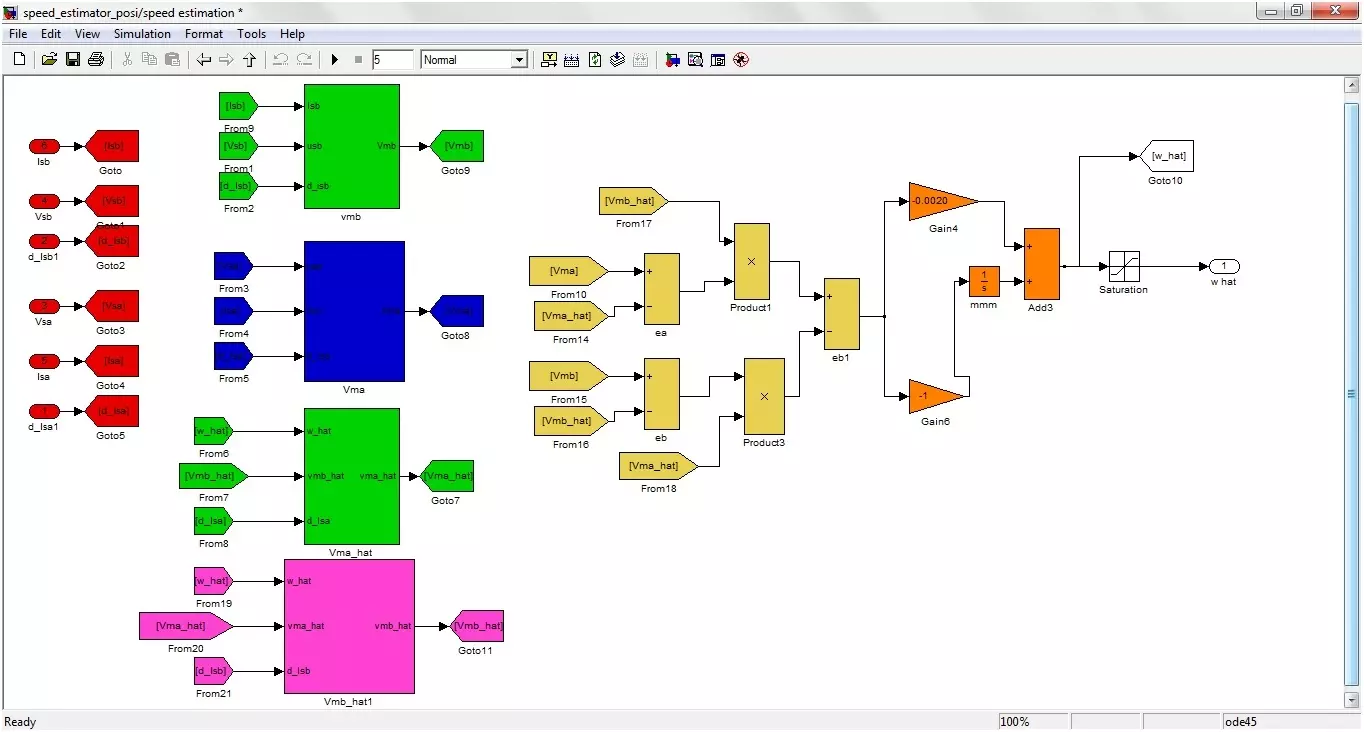
Today I am going to show you Sensorless Speed Estimation of Induction Motor in MATLAB. In order to control and estimate the speed of Induction motor, there are many methods proposed by different scientists. The method I have selected in my project is Adaptive method. Using this method, I have controlled the speed of Induction motor using MATLAB software. Matlab software is used for simulation design. The simulation is designed in simulink and the MATLAB version used for designing this project is MATLAB 2010. It is also tested on MATLAB 2012 and 2013. All the details of this project are mentioned below.
If someone wants to buy this project then click on the button shown on right side. Its quite difficult to implement and is designe ...