Update : Here are the latest versions of this library: Arduino Library for Proteus(V3.0) and Arduino UNO Library for Proteus(V2.0) . ]Hello friends, hope you all are fine. In today's post, I am going to share the Arduino UNO Library for Proteus . I designed this library by myself in Proteus, it was quite difficult and literally, it took me weeks to figure out How to add functionality of a new component in Proteus. First, I used Proteus VSM but it was quite difficult so I left it and finally, I used Microsoft Visual Studio C++ Language to design this Arduino library for Proteus. I am not going to discuss How I designed this library because it's quite a lengthy process and I will discuss it some other time. Today, I will provide the Arduino UNO library for Proteus to download, so that you ca ...
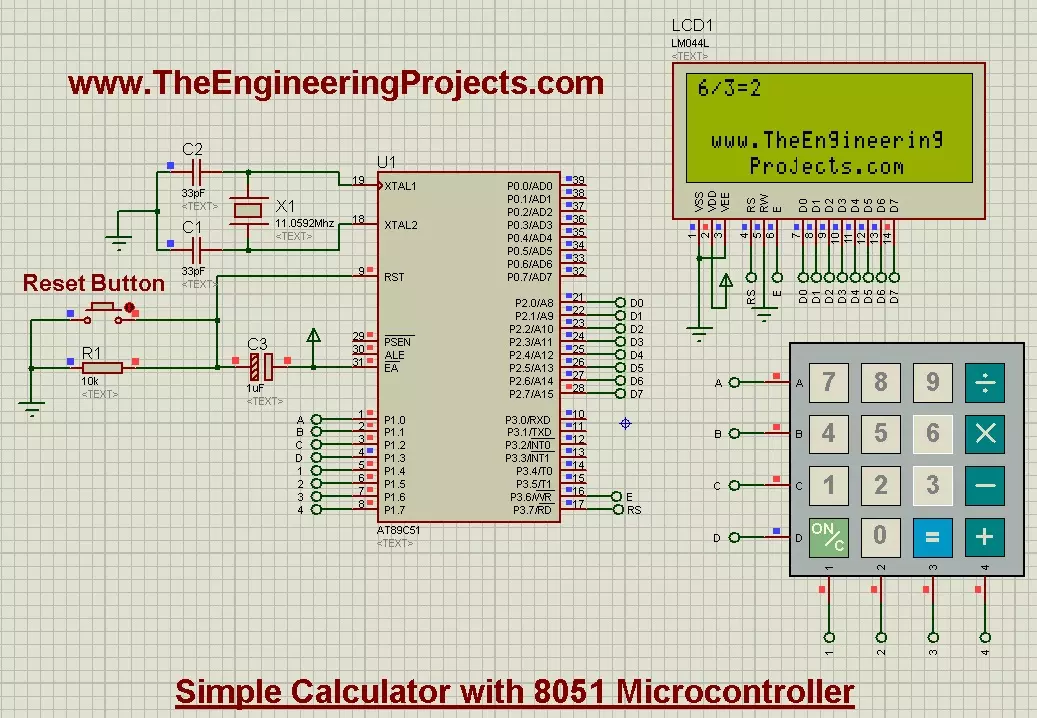
Hello friends, today's post is about designing a simple calculator with 8051 Microcontroller. In our previous post, we have seen How to Interface keypad with 8051 Microcontroller in Proteus ISIS . Moreover, we have also worked on Interfacing of LCD with 8051 Microcontroller in Proteus ISIS . If you haven't read these two posts then my suggestion is to read them first before going into the details of this post, as we are going to use both keypad and LCD in order to design the simple calculator with 8051 Microcontroller. Actually we have already understood the working of both keypad and LCD so I thought to share this small project as it will give you the practical application of both keypad and LCD. And if you are new to 8051 Microcontroller then its always better to first design a small pro ...
Hello friends, in today's post we are gonna have a look at Interfacing of Keypad with 8051 Microcontroller in Proteus ISIS. In the previous project, we have seen the Interfacing of LCD with 8051 Microcontroller and I have told there that LCD is a great debugging tool as we can print our data on it and can display different values and that's what is gonna done in today's post. Today, I will get the values from keypad and then question is how to know that we are getting the correct values. So in order to do so, we will display these values over LCD. So, that's how we are gonna use LCD as a debugging tool. As the debugging is concerned, there's another great tool for debugging which is called Serial port, we can also display these values over to Serial port. So, you should also read Serial co ...
Hello friends, hope you all are fine and having fun with your lives. Today's post is about Interfacing of LCD with 8051 Microcontroller. In my previous post, we have seen How to do Serial Communication with 8051 Microcontroller , which was quite a basic tutorial and doesn't need much hardware attached to it. Now today we are gonna have a look at Interfacing of LCD with 8051 Microcontroller. LCD is always the basic step towards learning embedded as it serves as a great debugging tool for engineering projects. LCD is also used almost in every Engineering Project for displaying different values. For example, if you have used the ATM machine, which you must have, then you have seen an LCD there displaying the options to select. Obviously that's quite a big LCD but still LCD. Similarly, all mob ...
Hello friends, hope you are having fun. In today's post, we will have a look at Serial Communication with 8051 Microcontroller in Proteus ISIS. In the previous post, we have seen a detailed post on LED Blinking Project using 8051 Microcontroller in Proteus ISIS, which was quite a simple tutorial. And I hope if you are new to 8051 Microcontroller then from that post you must have got some idea about C Programming of 8051 Microcontroller. Now, today we are gonna go a little further and will have a look at Serial Communication with 8051 Microcontroller and we will also design the simulation of this project in Proteus ISIS software. 8051 Microcontroller also supports Serial port similar to Arduino and PIC Microcontroller . And the communication protocol is exactly the same as its a Serial Port ...
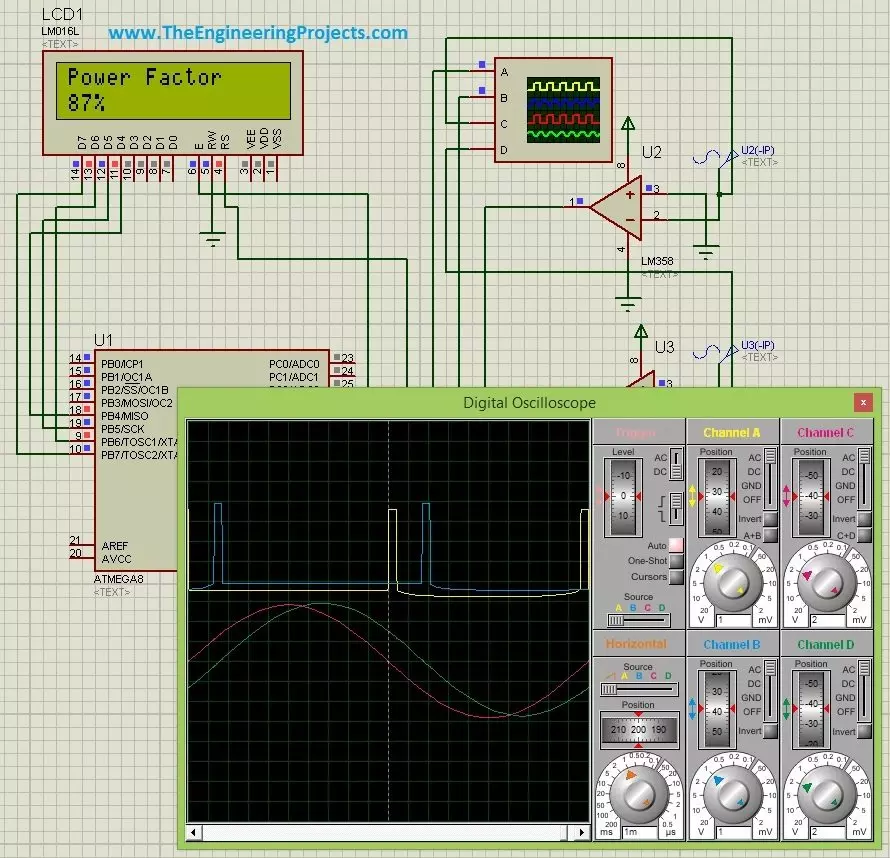
Buy This Project Hello friends, hope you all are fine and having fun. Today's post is about Power Factor Measurement using Microcontroller in Proteus ISIS. As usual, I have this project simulation in which I have to simulate a power factor measuring project using atmega microcontroller . So, I use atmega8 microcontroller and the used Proteus ISIS as the simulating software. Power Factor Measurement isn't that difficult but its a quite tricky and in today's post we are gonna cover it in full detail. There are many ways for power factor measurement and today's the method we are gonna use is called zero crossing detection. We will first detect the zero crossing of our signal and then we are gonna do the power factor measurement based on the detection of zero crossing of our voltage and curren ...
Buy This Simulation Hello friends, Hope you all are fine and having fun with your lives. In today's post, I am going to show How to display a Scrolling Text on LED Matrix 8x8 using Arduino in Proteus ISIS. We all know about LED Matrix but if you don't know then google it. :P LED Matrix is used to display long messages, the best thing about LED Matrix is you can combine then in serial way and can make it of any size you want. Like in this post I have combined 8 LED matrices and then displayed my message on them. I have given all the details here but as you can see we have done a great effort in designing this simulation so I haven't posted it free but have placed a very small amount of $20 on it and you can buy it quite easily from our shop by clicking the above button. I have used Proteus ...
Hello friends, hope you all are fine and having fun with your lives. In today's post we will have a look at How to interface keypad with Arduino in Proteus ISIS . Keypad is used almost in every engineering project . If you even look around you will find keypad in many electronic appliances. For example, a simple ATM machine has a keypad on it using which enter our pin code and give commands to the ATM machine. Similarly, calculator also has keypad on it. So, in short there are numerous applications of keypad. You should also read the Real Life examples of Embedded Systems and you will find Keypad in them as well. Keypad is used where you need to used numerical buttons or you need to use lots of buttons for sending commands so like in some application I need to use 10 buttons so instead of ...
In today's post we are gonna have a look at How to Train Pixy Camera with Computer. We have yet posted three tutorials in the Pixy Camera series. In the first tutorial, we have seen How to Get Started with Pixy Camera in which we have studied the basics of Pixy Camera. After that that we have seen the Installation of Pixy Camera Software which is named as PixyMon and in the third tutorial we have covered How to Upload the Latest Firmware in Pixy Camera because its always the best strategy to deal with latest tools. So until now we have configured our Pixy Camera in all possible ways now the next thing is to train our Pixy Camera with Computer using PixyMon software. Let's first discuss How the Pixy Camera works. Pixy Camera has on board NXP microcontroller which is used for image processin ...
Hello friends, hope you all are fine and having fun with your lives. In today's post we are gonna have a look at How to use Temperature Sensor 18B20 in Proteus ISIS. I will use Arduino board as a microcontroller and will connect the temperature sensor with it and then will display the code on LCD. I have already posted the same tutorial in which I have done Interfacing of Temperature Sensor 18B20 with Arduino but in that project I have used the real components and designed the hardware. But today, I will just show you the simulation so that you could test the simulation first and then design it in hardware. Temperature Sensor 18B20 is the most commonly used temperature sensor. Its a one wire sensor means it sends data through a single wire and we can connect multiple sensors with a single ...