Greetings, and welcome to today's tutorial. In the last tutorial, we learned how to construct a system for tallying individuals using Raspberry Pi, astute subtraction, and blob tracking. We demonstrated the total number of building entrances and exits. Feature computation and HOG theory were also discussed. The tests proved that a device based on the raspberry pi could effectively function as a people counting station. One of the many benefits of the Pi 4 is its internet connectivity, which is especially useful for home automation projects due to its low price and ease of use. We're going to see if we can use a web page's buttons to manage our air conditioner today. With this Internet of Things (IoT) based home automation, you can command your home gadgets from the comfort of your couch. T ...
Introduction
Welcome to the following tutorial in our raspberry pi four programming tutorial. In the previous tutorial, we learned how to build a raspberry pi four website monitoring tool. We say how beautiful soap is applied in browser automation tasks such as tracking website activities. But in this guide will discover how to utilize our Raspberry Pi 4 as a wifi repeater. If you want a lag-free wireless network, a wifi Wireless Adapter is exactly what you need. You may want to set up a wifi repeater if your signal is weak in certain rooms of your home or if you have entirely lost service in one or more rooms that are too small to accommodate your current network setup. If you want to increase the range of the wifi connection without breaking the bank or wasting a lot of energy, consider ...
Hi Folks! I welcome you on board. Today, I am sharing the 2nd
tutorial in the Raspberry Pi 4 learning series. In this post today,
we’ll cover What is Raspberry Pi 4?
Raspberry Pi 4 Pinout, Specs, Projects, Datasheet etc.
Raspberry
Pi 4 is a tiny dual-display single-board computer, developed by
Raspberry Pi Foundation. This foundation has introduced a series of
Raspberry Pi boards to teach computer basics in schools.
With Raspberry Pi 4, you can control two monitors at once. Moreover, it
is incorporated with a quad-core processor that is powerful and comes
with more speed compared to its predecessors.
I suggest you read this post till the end as I’ll cover Raspberry Pi 4
in detail.
Let’s get started.
What is Raspberry Pi 4?
Raspberry Pi 4
is a dua ...
Thank you for being here for today's tutorial of our in-depth Raspberry Pi programming tutorial. The previous tutorial taught us how to install a PIR sensor on a Raspberry Pi 4 to create a motion detector. However, this tutorial will teach you how to connect a single seven-segment display to a Raspberry Pi 4. In the following sections, we will show you how to connect a Raspberry Pi to a 4-digit Seven-Segment Display Module so that the time can be shown on it.
Seven-segment displays are a simple type of Display that use eight light-emitting diodes to show off decimal numbers. It's common to find it in gadgets like digital clocks, calculators, and electronic meters that show numbers. Raspberry Pi, built around an ARM chip, is widely acknowledged as ...
Introduction
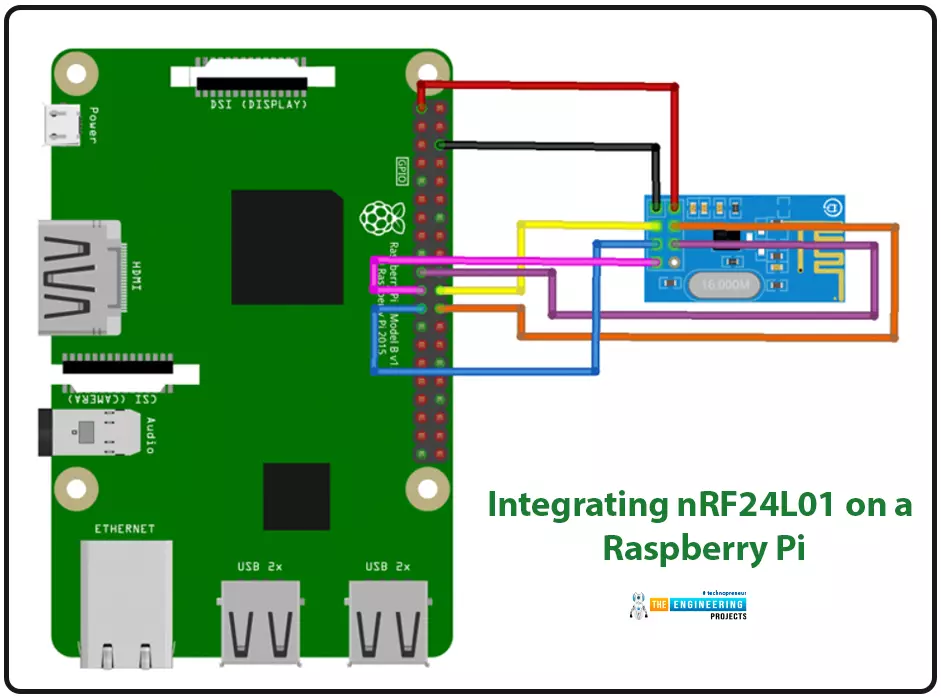
We're glad you could join us for another lesson in our series on programming for the Raspberry Pi 4. The previous chapter covered how to interface the USB barcode scanner with raspberry pi 4. We looked at different types of barcodes and what each stripe represents as well as the different types of barcode scanners available today. We also built a python program for the intelligent shopping cart and now our familiarity with barcodes and scanners and how they function has significantly increased. The benefits and drawbacks of its use were also discussed, but what we're interested in for this article is the transmission of radio frequency signals using the nrf24l01 Module in a raspberry pi 4.
Components
nRF24L01 RF module
Raspberry pi 4
Arduino Uno
Jumper wires
Power suppl ...
Introduction
Welcome to the next tutorial in our raspberry pi programming. In the previous tutorial, we learned how we could run Xbox cloud on our pi 4. We found that we can run any game easily without lag or having raspberry pi shut down, proving that pi 4 is quite a powerful minicomputer. However, this tutorial will demonstrate how to use Python on raspberry to monitor websites. This Python program will execute on Pi 4 and watch over a website, alerting you whenever it changes or goes down. This is accomplished by keeping a straightforward webpage duplicate locally and monitoring for updates. This webpage monitor is straightforward, so it should work well on pi Zero. Throughout this tutorial, we will demonstrate how to develop your custom code to monitor a webpage. With this information ...
Welcome to the second chapter of our beginner's course on the Raspberry Pi. In the previous tutorial, we learned about the components of this little computer. We also considered its uses, as well as the most important advantages and disadvantages. Let's get started with setting up our little computer to run the Raspbian operating system in this lesson.
How to Install Raspbian using an imager
The next step is to make sure you have your board and SD card. The Raspberry Pi has an operating system because it is a full computer. For those who prefer a GUI desktop experience, a headless mode is still an option. Most people use Raspbian, a Debian-based operating system tailored specifically for the Raspberry Pi. However, there are other options. An exce ...
Welcome to the next tutorial of our raspberry pi 4 programming course. The last guide covered connecting a Sharp infrared distance measurement sensor to a Raspberry Pi 4. Infrared (IR) sensors were demonstrated to be widely used for nearby object recognition and motion tracking. But in this session, we'll utilize Raspberry Pi 4 to create a radio-frequency (RF) remote control that can be used to operate the gadgets wirelessly. With the help of this RF remote control, we can Power On/Off the devices.
Components
Transmitter Side
RF Transmitter
HT12E IC
4 Push Buttons
750k resistor
9 Volt battery
Receiver Side
Raspberry Pi
16x2 LCD
10K POT
Breadboard
1K Resistor (Five)
33K resistor
HT12D IC
RF Receiver
LEDs (Five)
4 10K resistor
Jumper wires
RF Module
This ...
Introduction
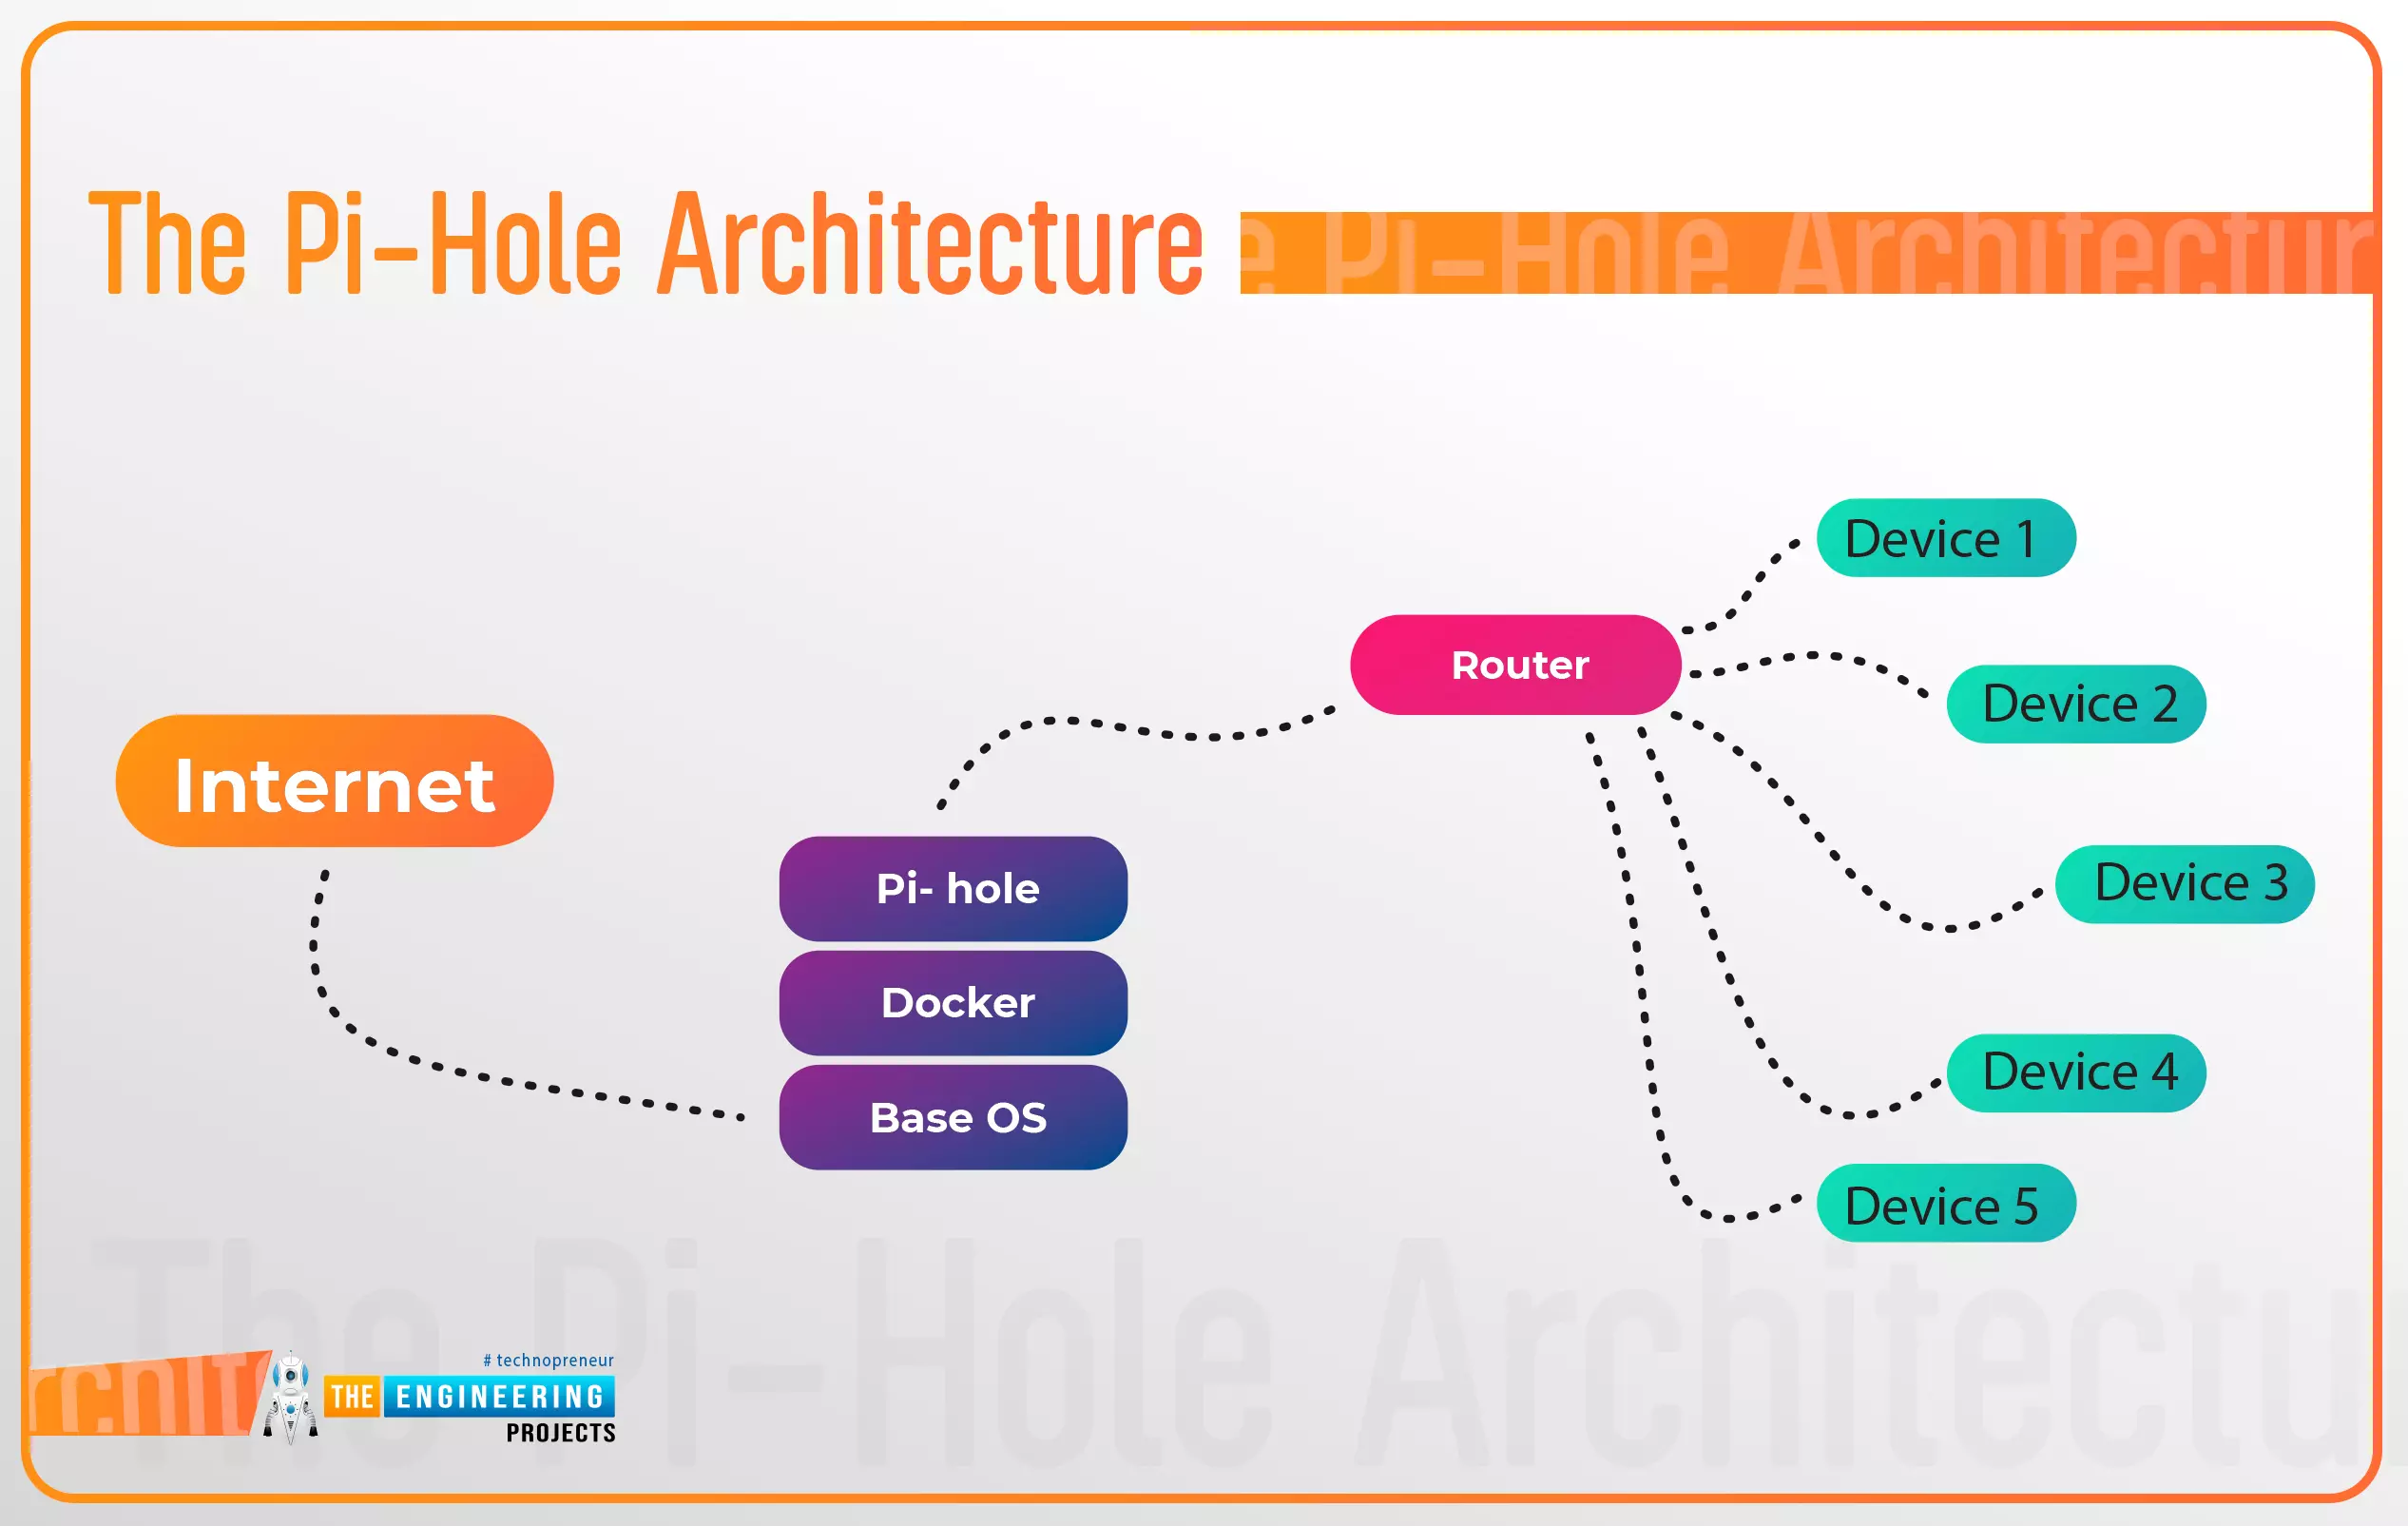
Thank you for joining us for yet another session of this series on Raspberry Pi programming. In the preceding tutorial, a facial recognition system on a Raspberry Pi 4 was used to develop a smart security system. We also learned how to create a dataset using two Python scripts to train and analyze a series of photographs of a certain person. This tutorial will teach you how to install pi-hole on a Raspberry Pi 4 and use it to block advertisements from anywhere. This is a great initiative for folks who are tired of annoying pop-up adverts while browsing. First, we'll learn how to set up the pi-hole without the need for an environment, then we'll use Docker to install pi-hole, and ultimately we'll see how we can access it from anywhere.
Prerequisites
A minimum of 512MB ...
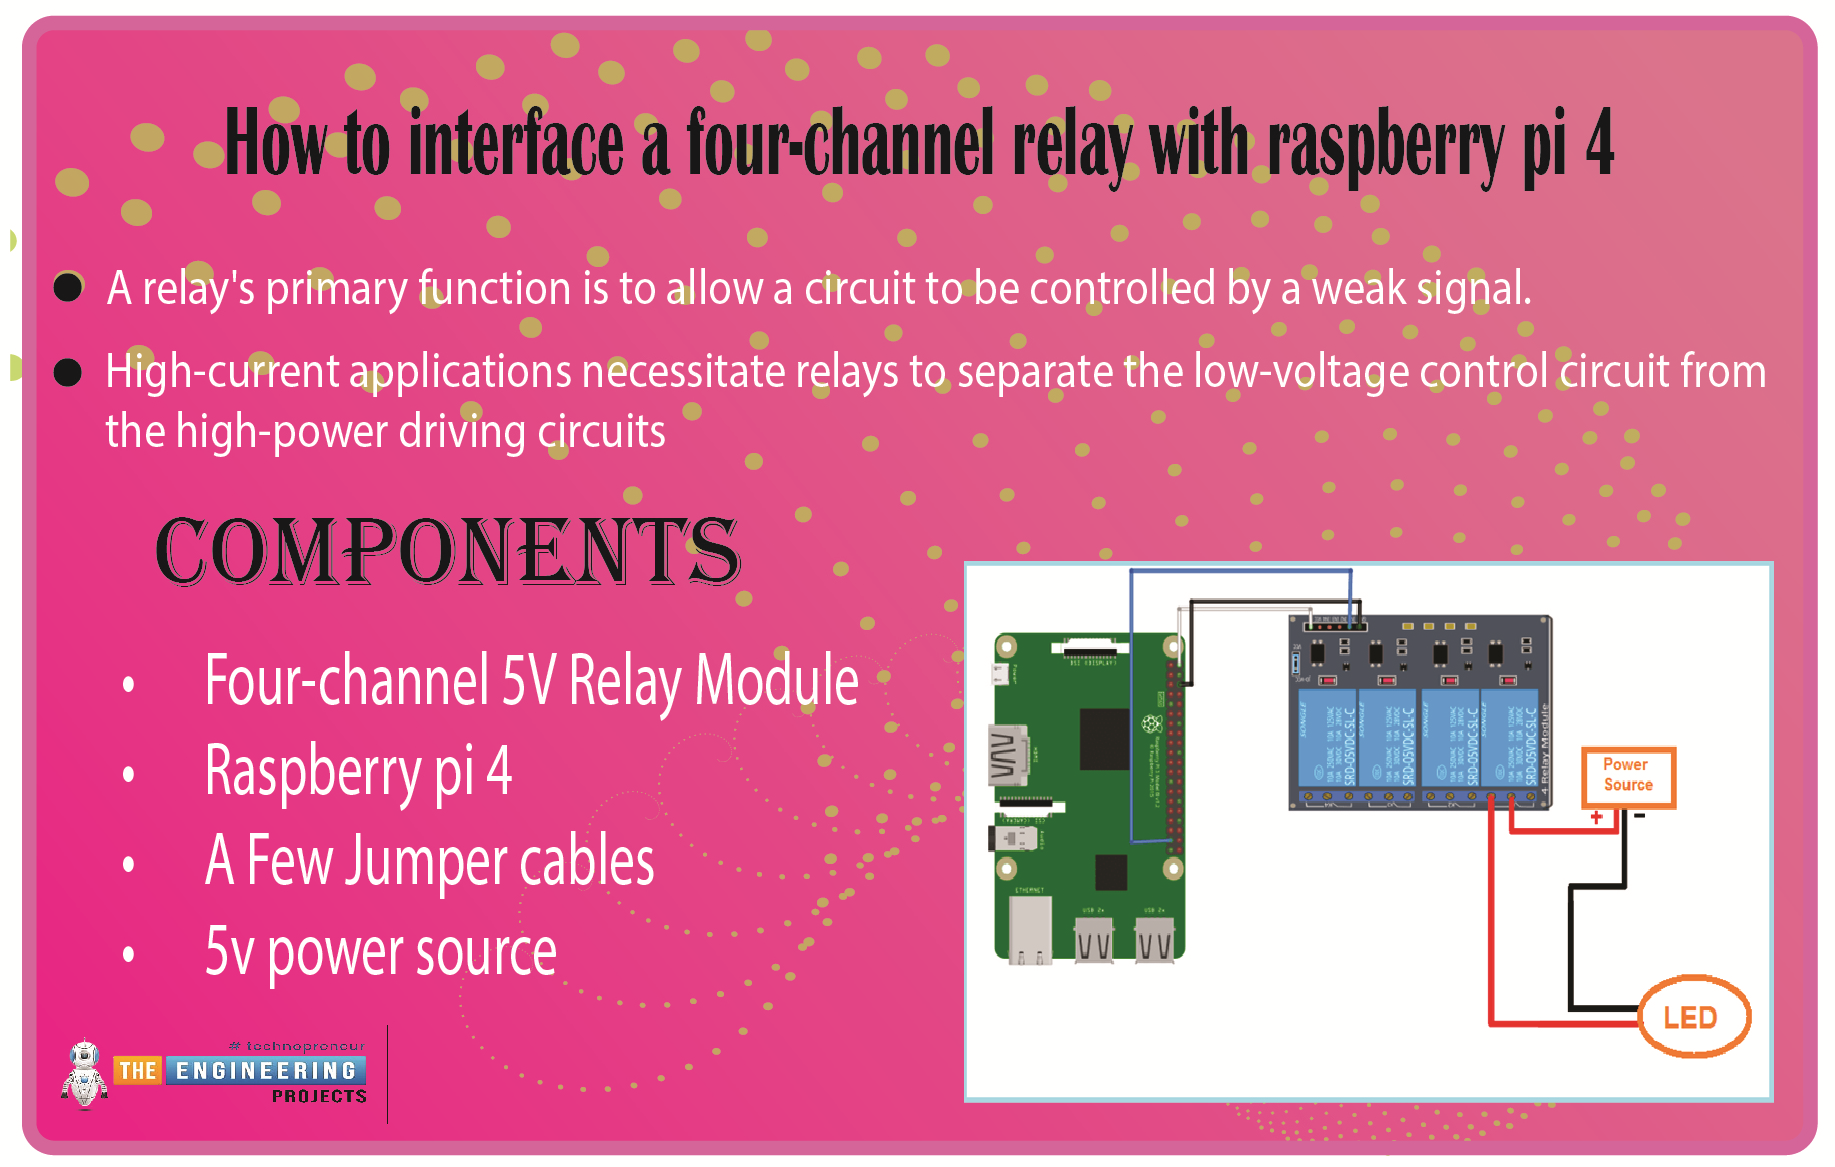
We learned in the previous tutorial how to connect a joystick to a Raspberry Pi 4 using an mcp3008 and an op-amp IC, the LM324A. For each of the interface methods we studied, we created a python script allowing us to interact with the circuit. This tutorial will show you how to connect a 4-channel relay module with a Raspberry Pi to carry out switching.
A relay's primary function is to allow a circuit to be controlled by a weak signal. High-current applications necessitate relays to separate the low-voltage control circuit from the high-power driving circuits. Because of this, understanding it is crucial for those interested in industrial or household automation.
If you've been tinkering with a raspberry pi for a while, consider the various ways ...