


Project Files of IoT Environmental Data Logger with ESP32 - Proteus Simulation
 Libraries
 Code
 Projects
 Simulation
e16c58bd74f847a89ddf547cf0eb4c00.zip

IoT Environmental Data Logger with ESP32 - Proteus Simulation V1.0
IoT Environmental Data Logger with ESP32 - Proteus Simulation V1.0 comes as a ZIP archive of 18 files (3.8 MB, 8.2 MB unpacked) holding Proteus library files, simulation model DLLs, a Proteus simulation, an Arduino sketch and compiled HEX firmware.
- LIBProteus library
- DLLProteus model
- DSNProteus simulation
- INOArduino sketch
- HEXHEX firmware
Description
IoT-Environmental-Data-Logger-ESP32-Proteus-Simulation-v1.0.zip: the complete Proteus simulation project (ESP32 DevKit V1, BME680, micro SD card module, 1.54" e-paper, the Laptop and Mobile WiFi Monitors), the Arduino sketch, every LIB and DLL the simulation needs and a README.

File Structure
 File Structure
12.5 KB66.2 KB54.9 KB36.6 KB39.5 KB60.3 KB13.1 KB342 KB315 KB318.5 KB2.9 MB29.7 KB182.6 KB342 KB315 KB318.5 KB2.9 MB10.1 KBGallery12 images from the tutorialOpen the tutorial
 Gallery12 images from the tutorial
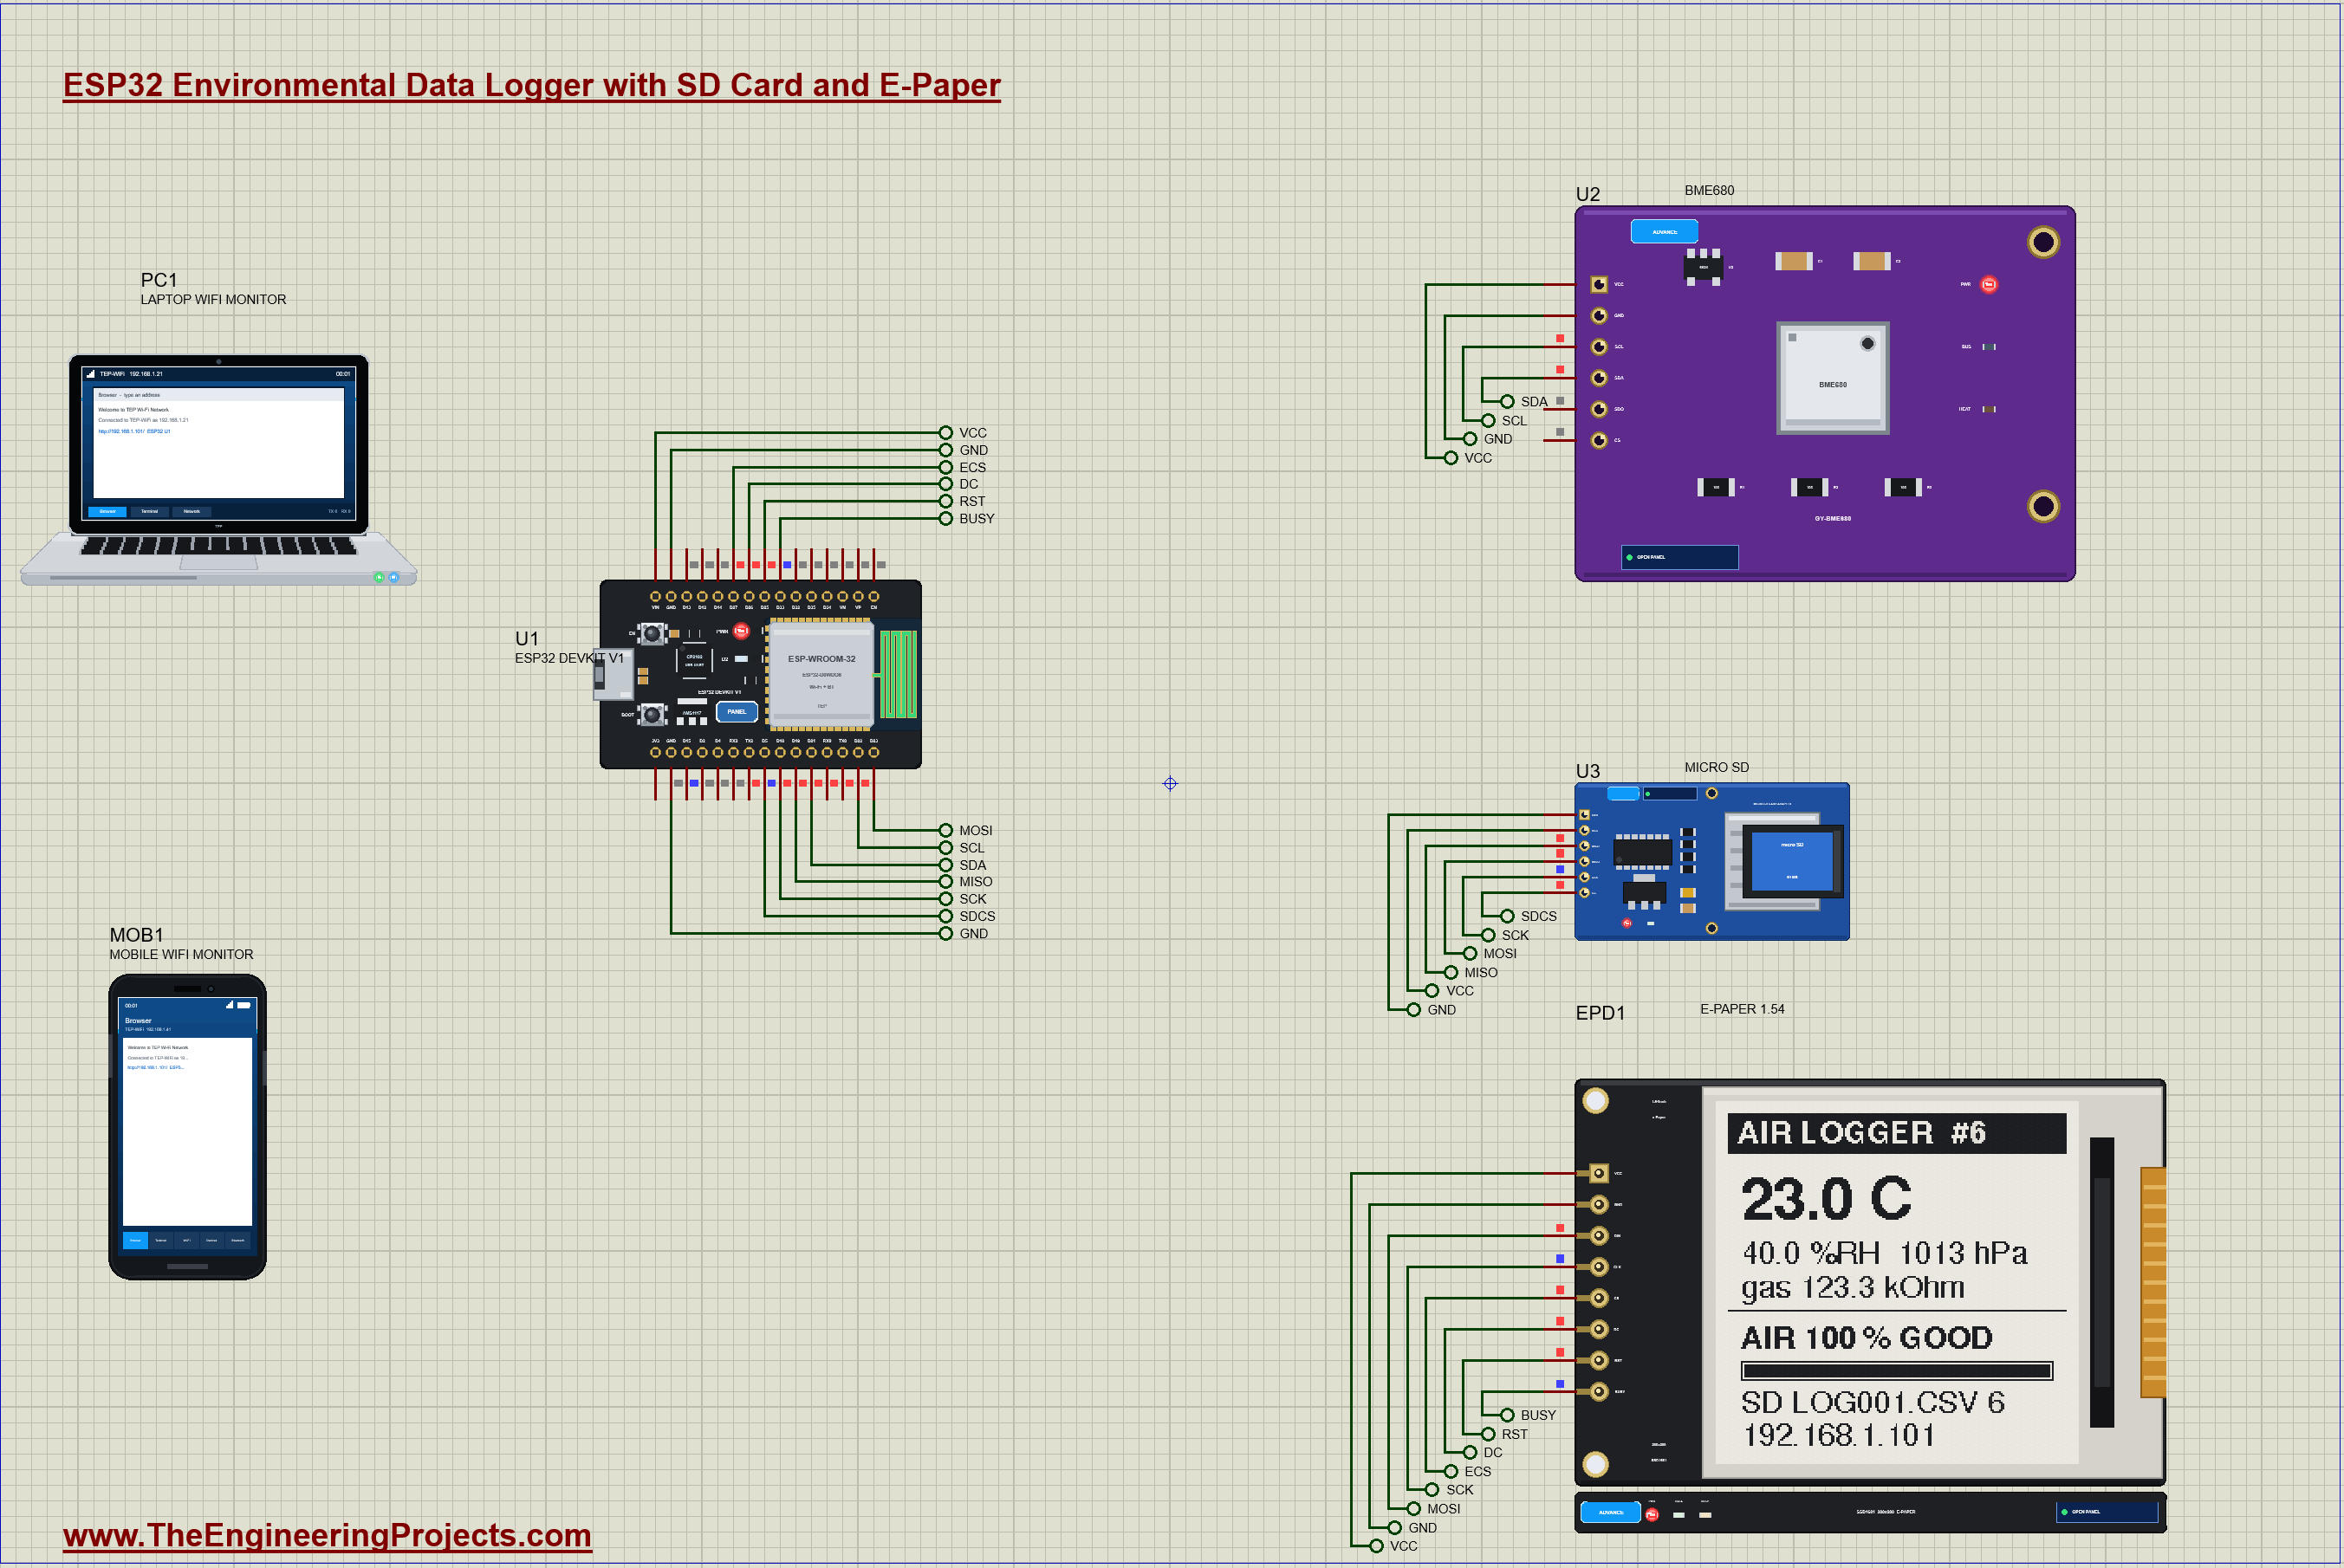
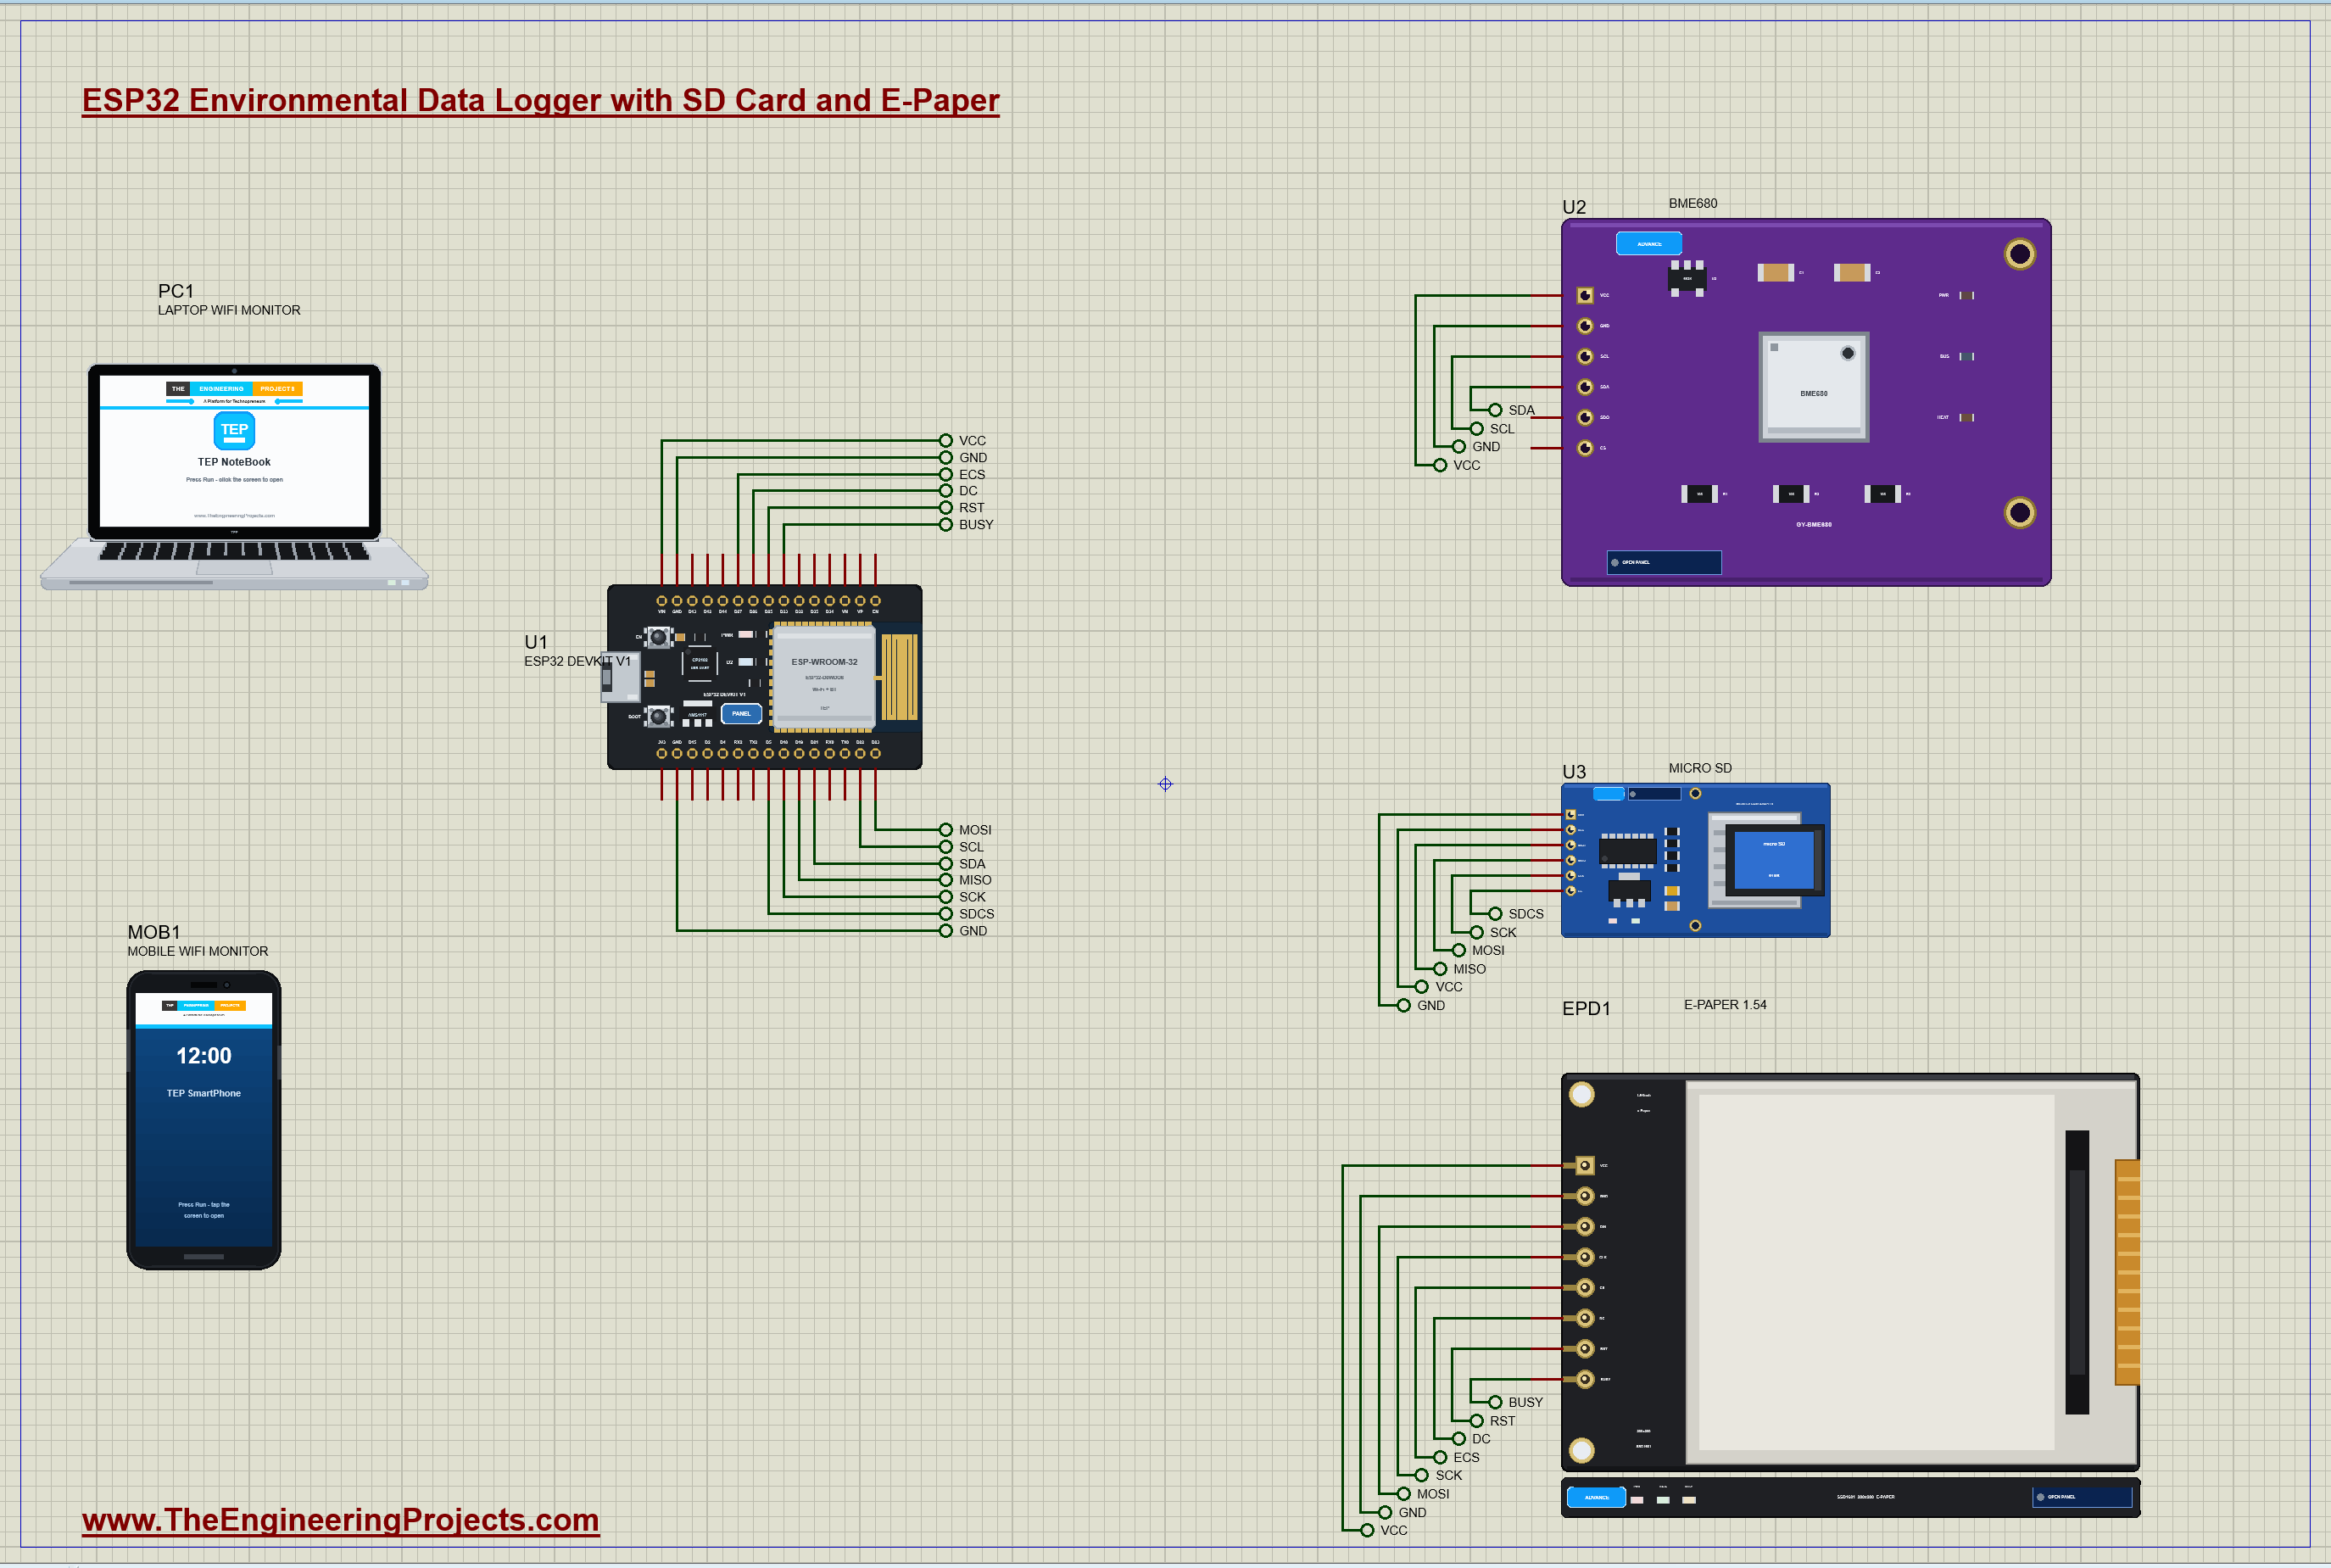
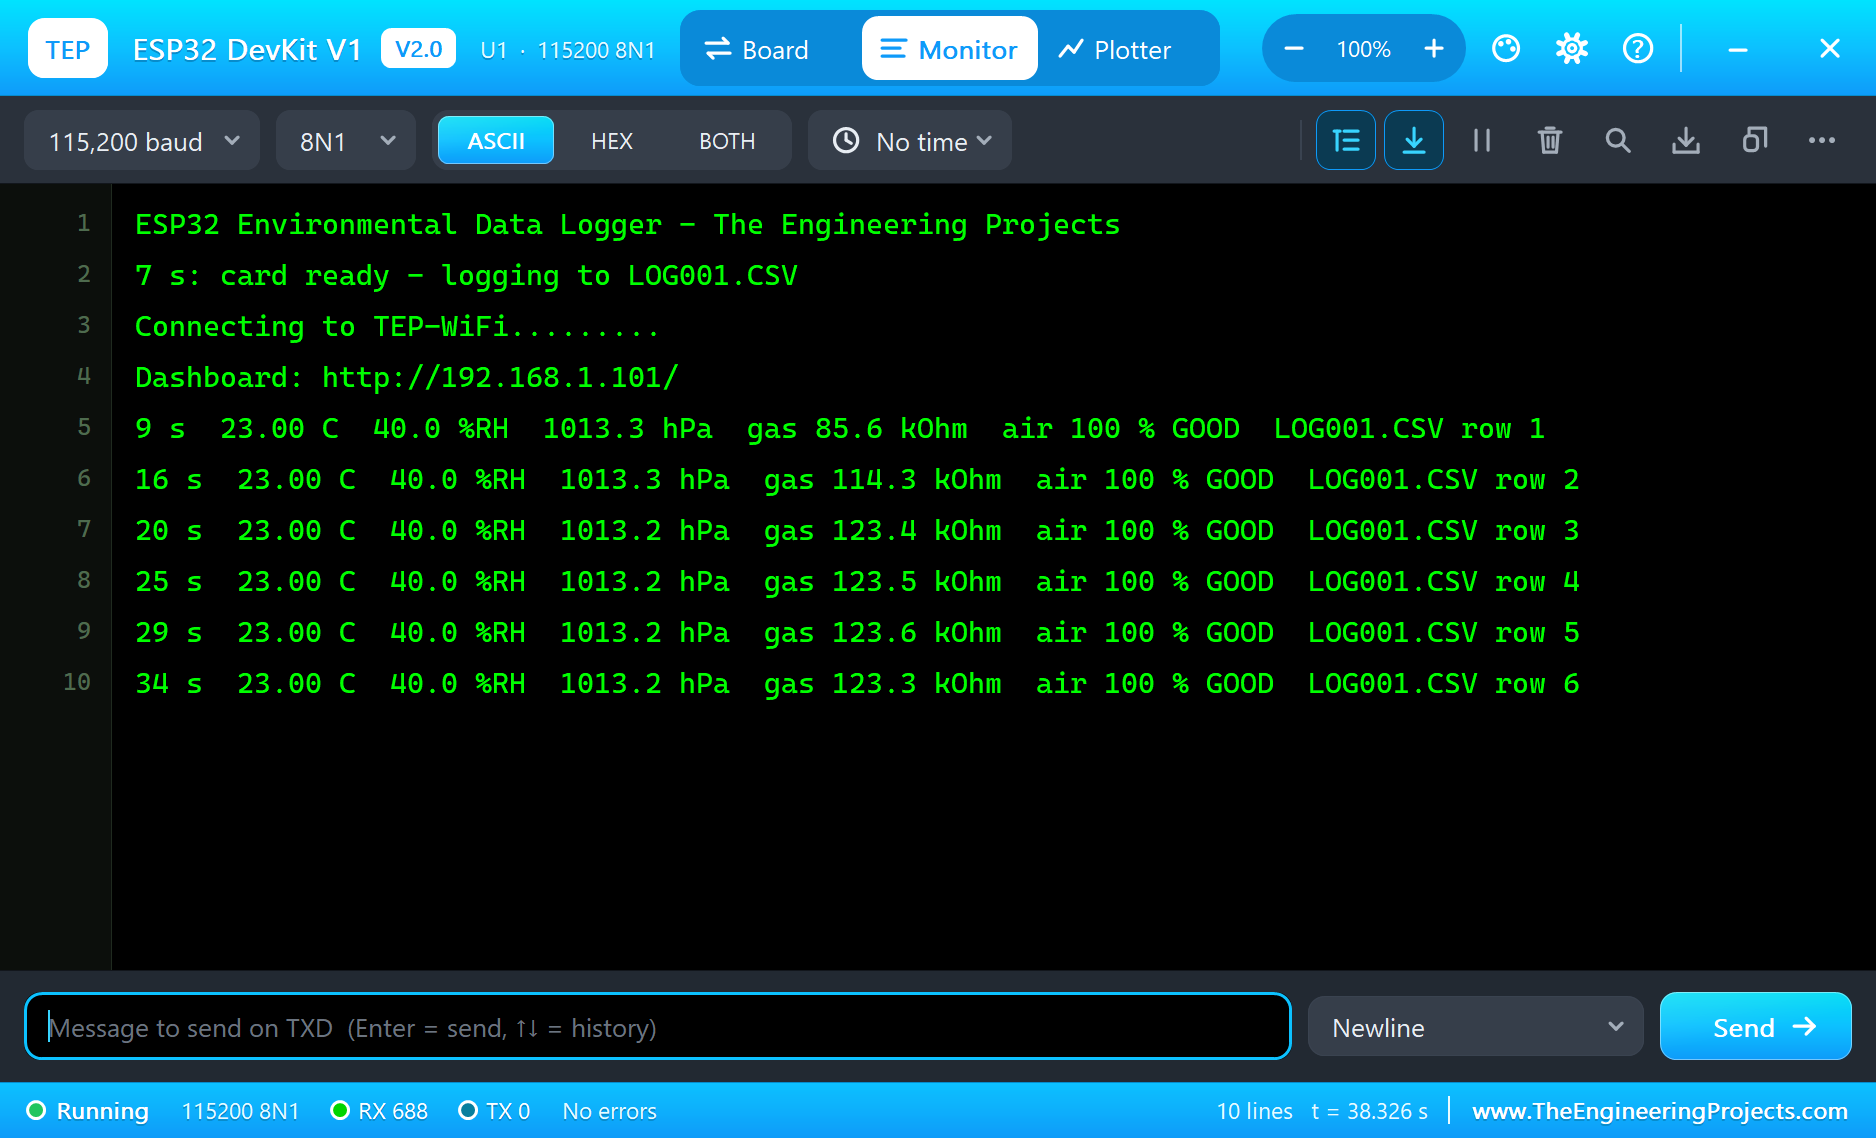
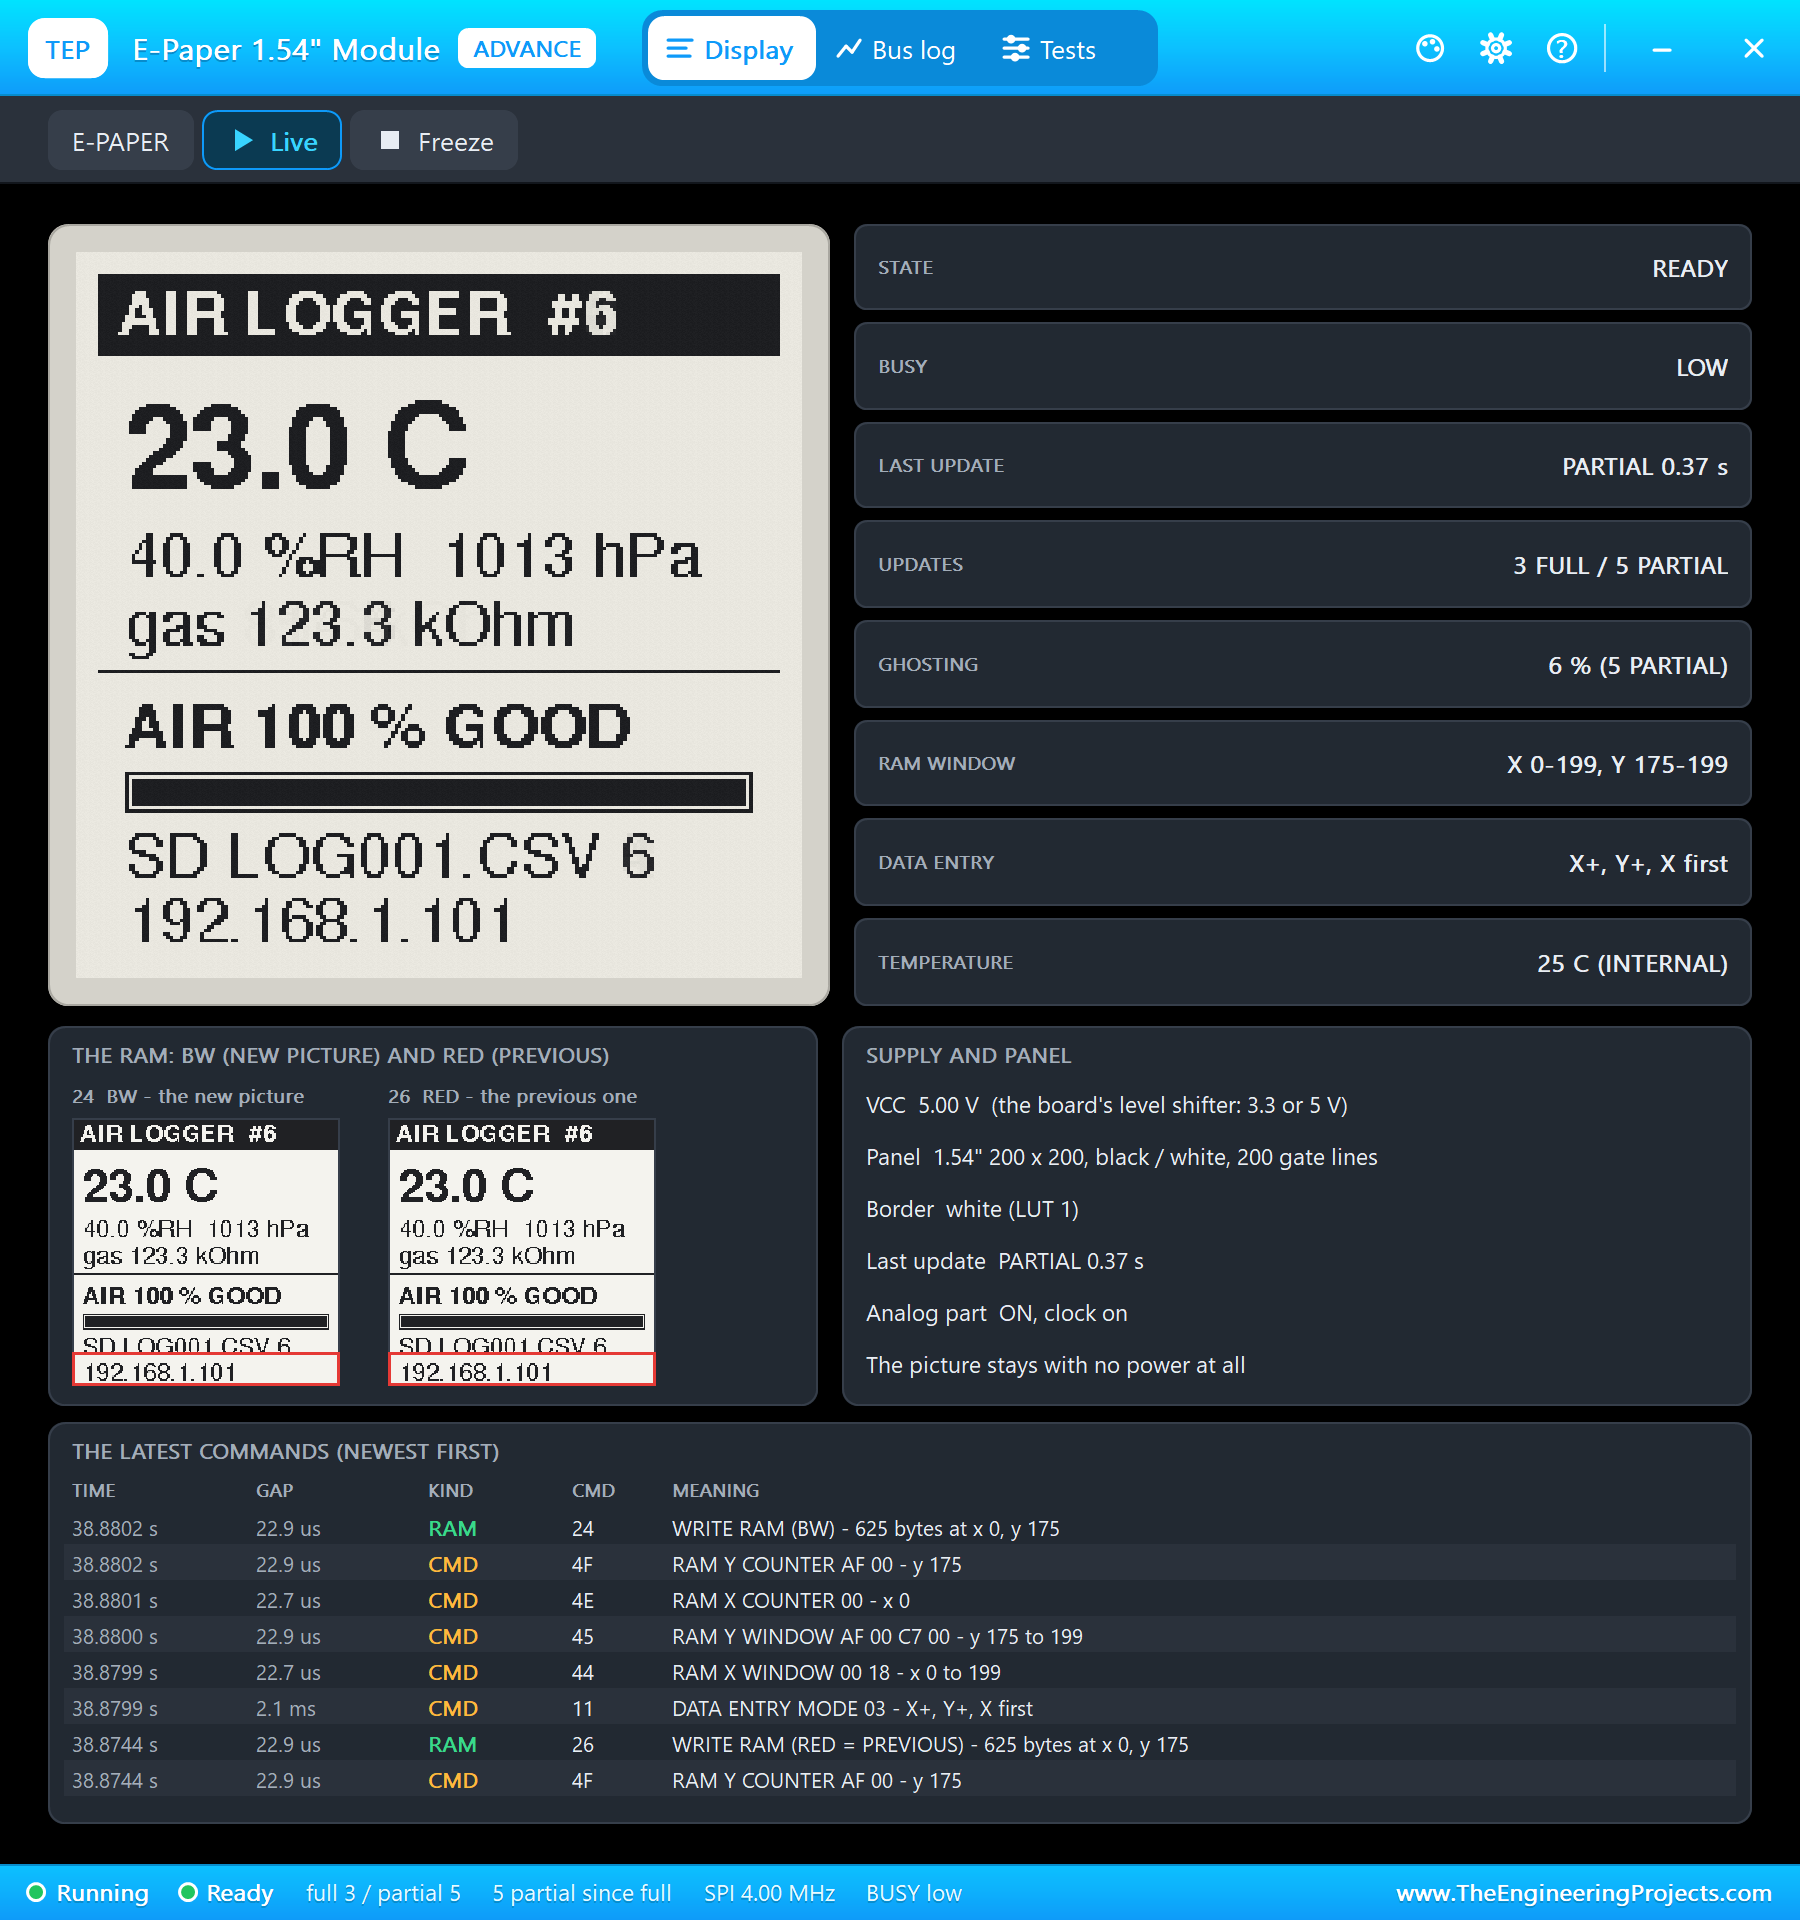
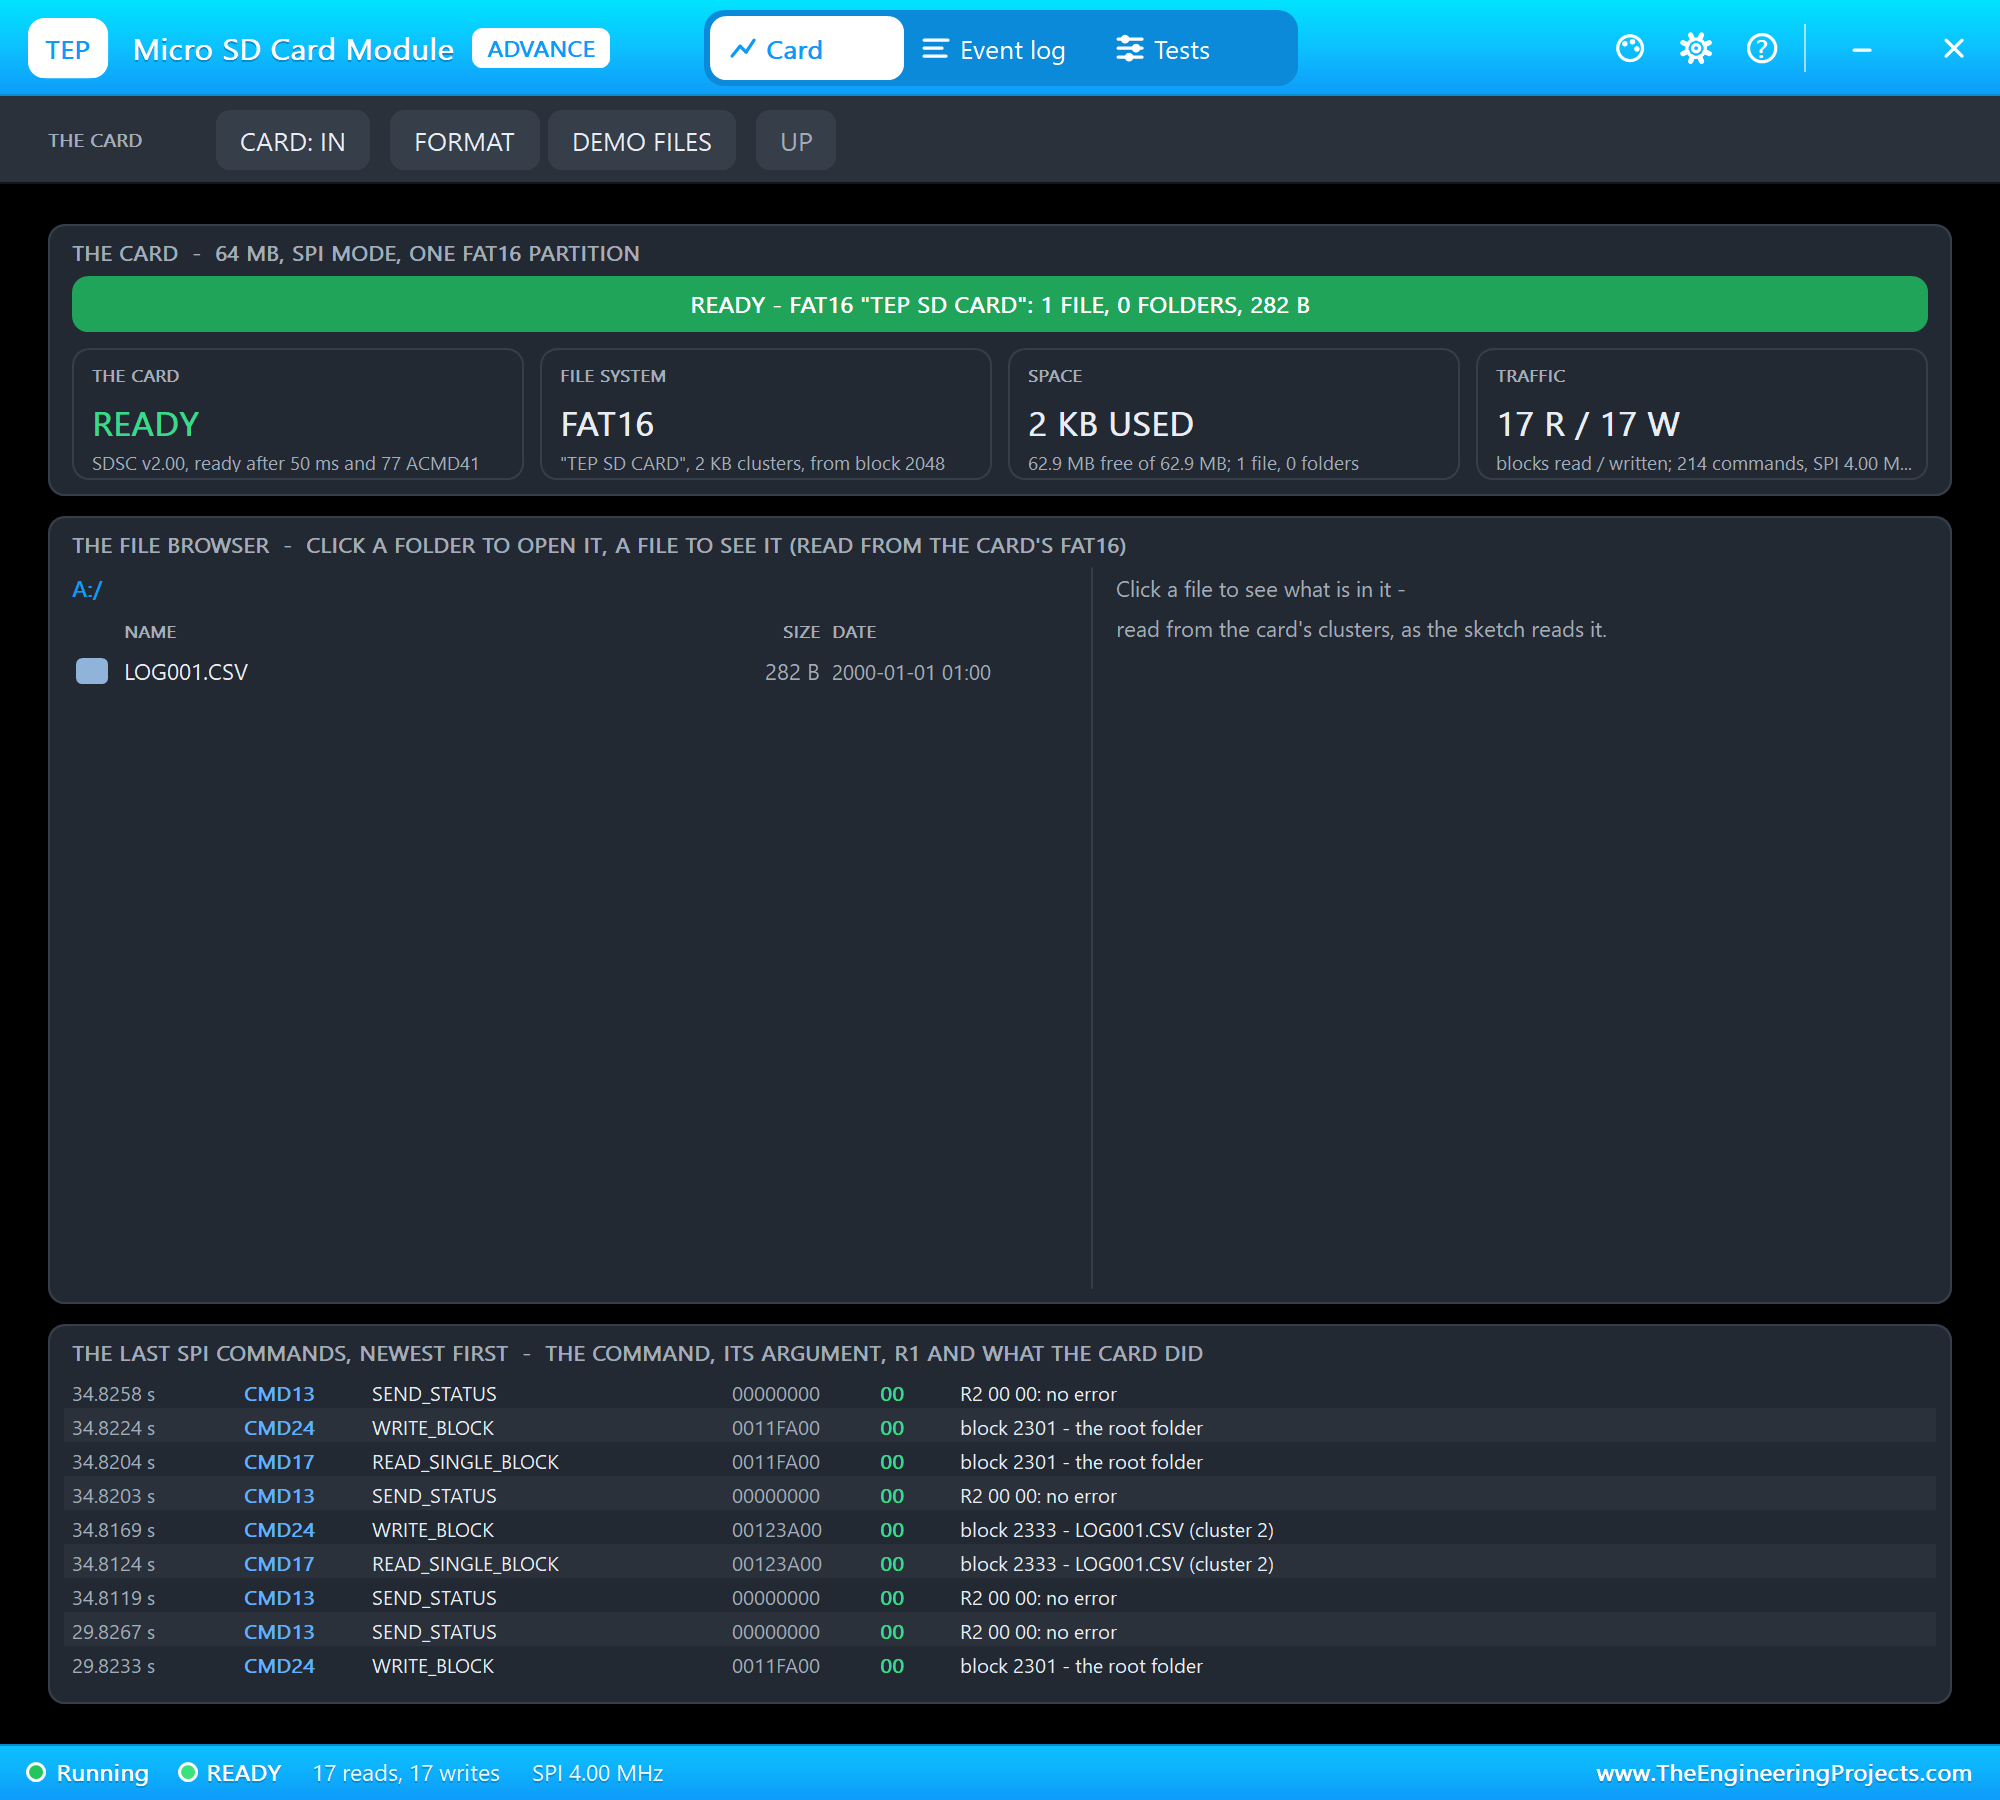
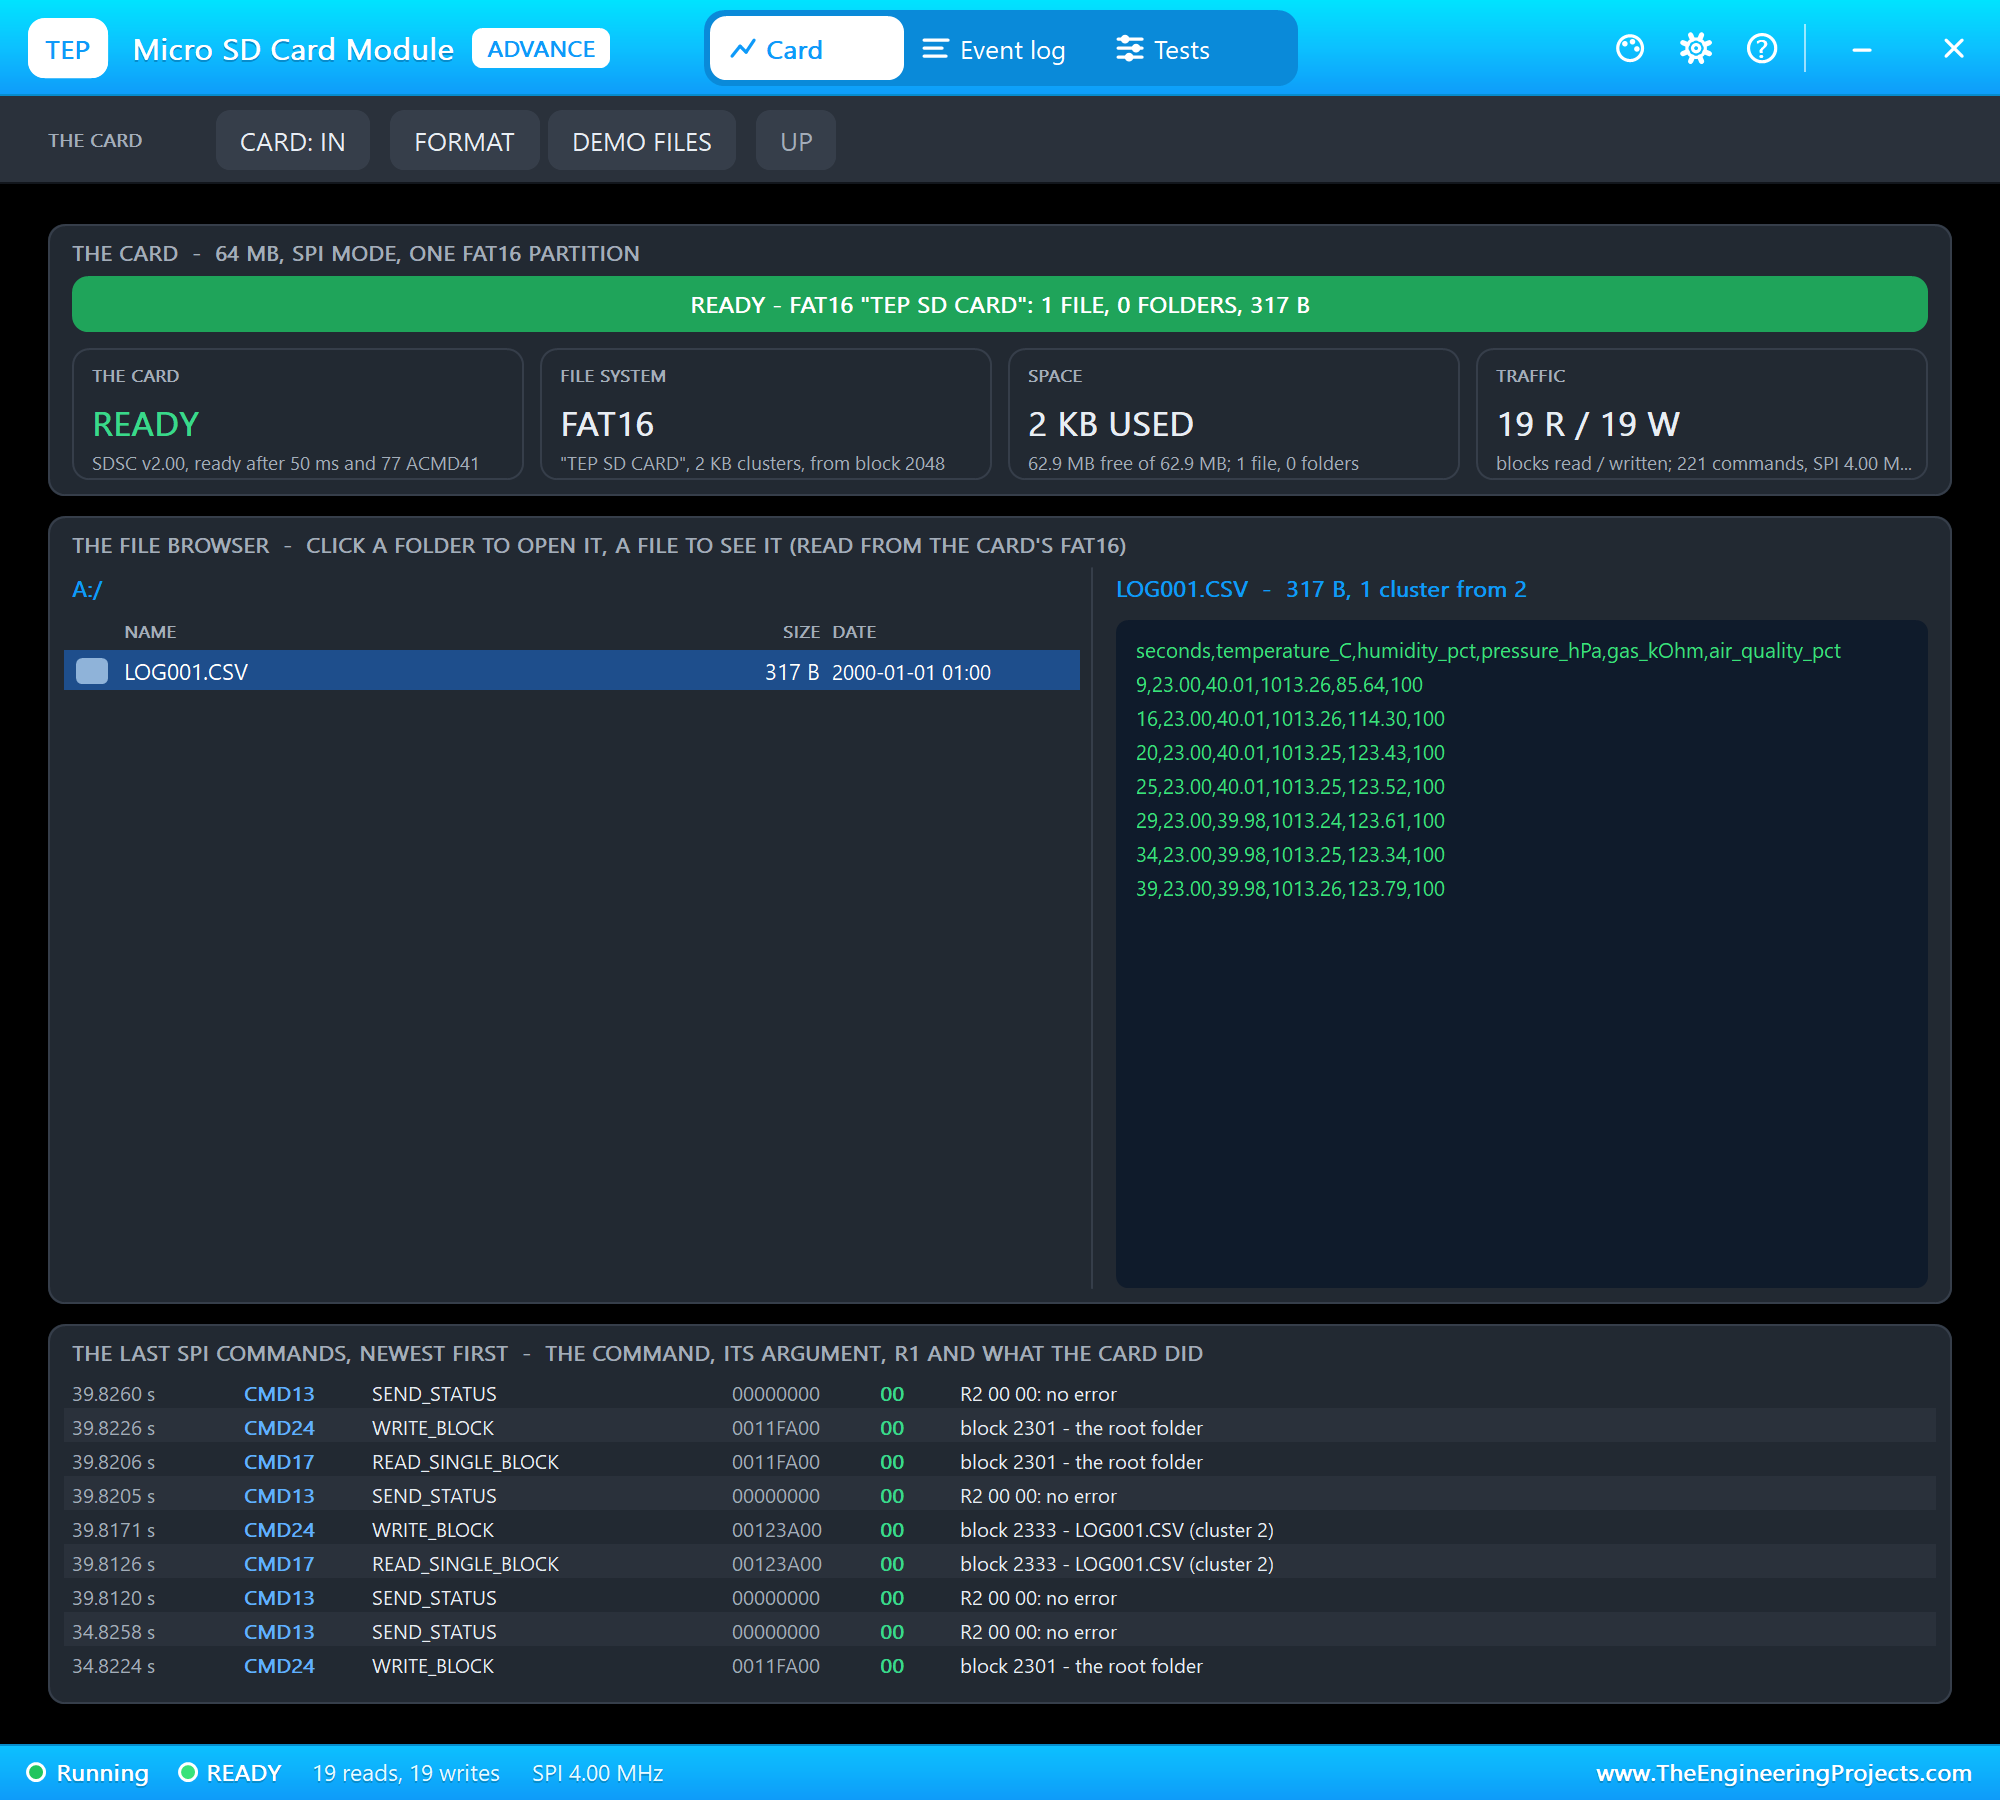
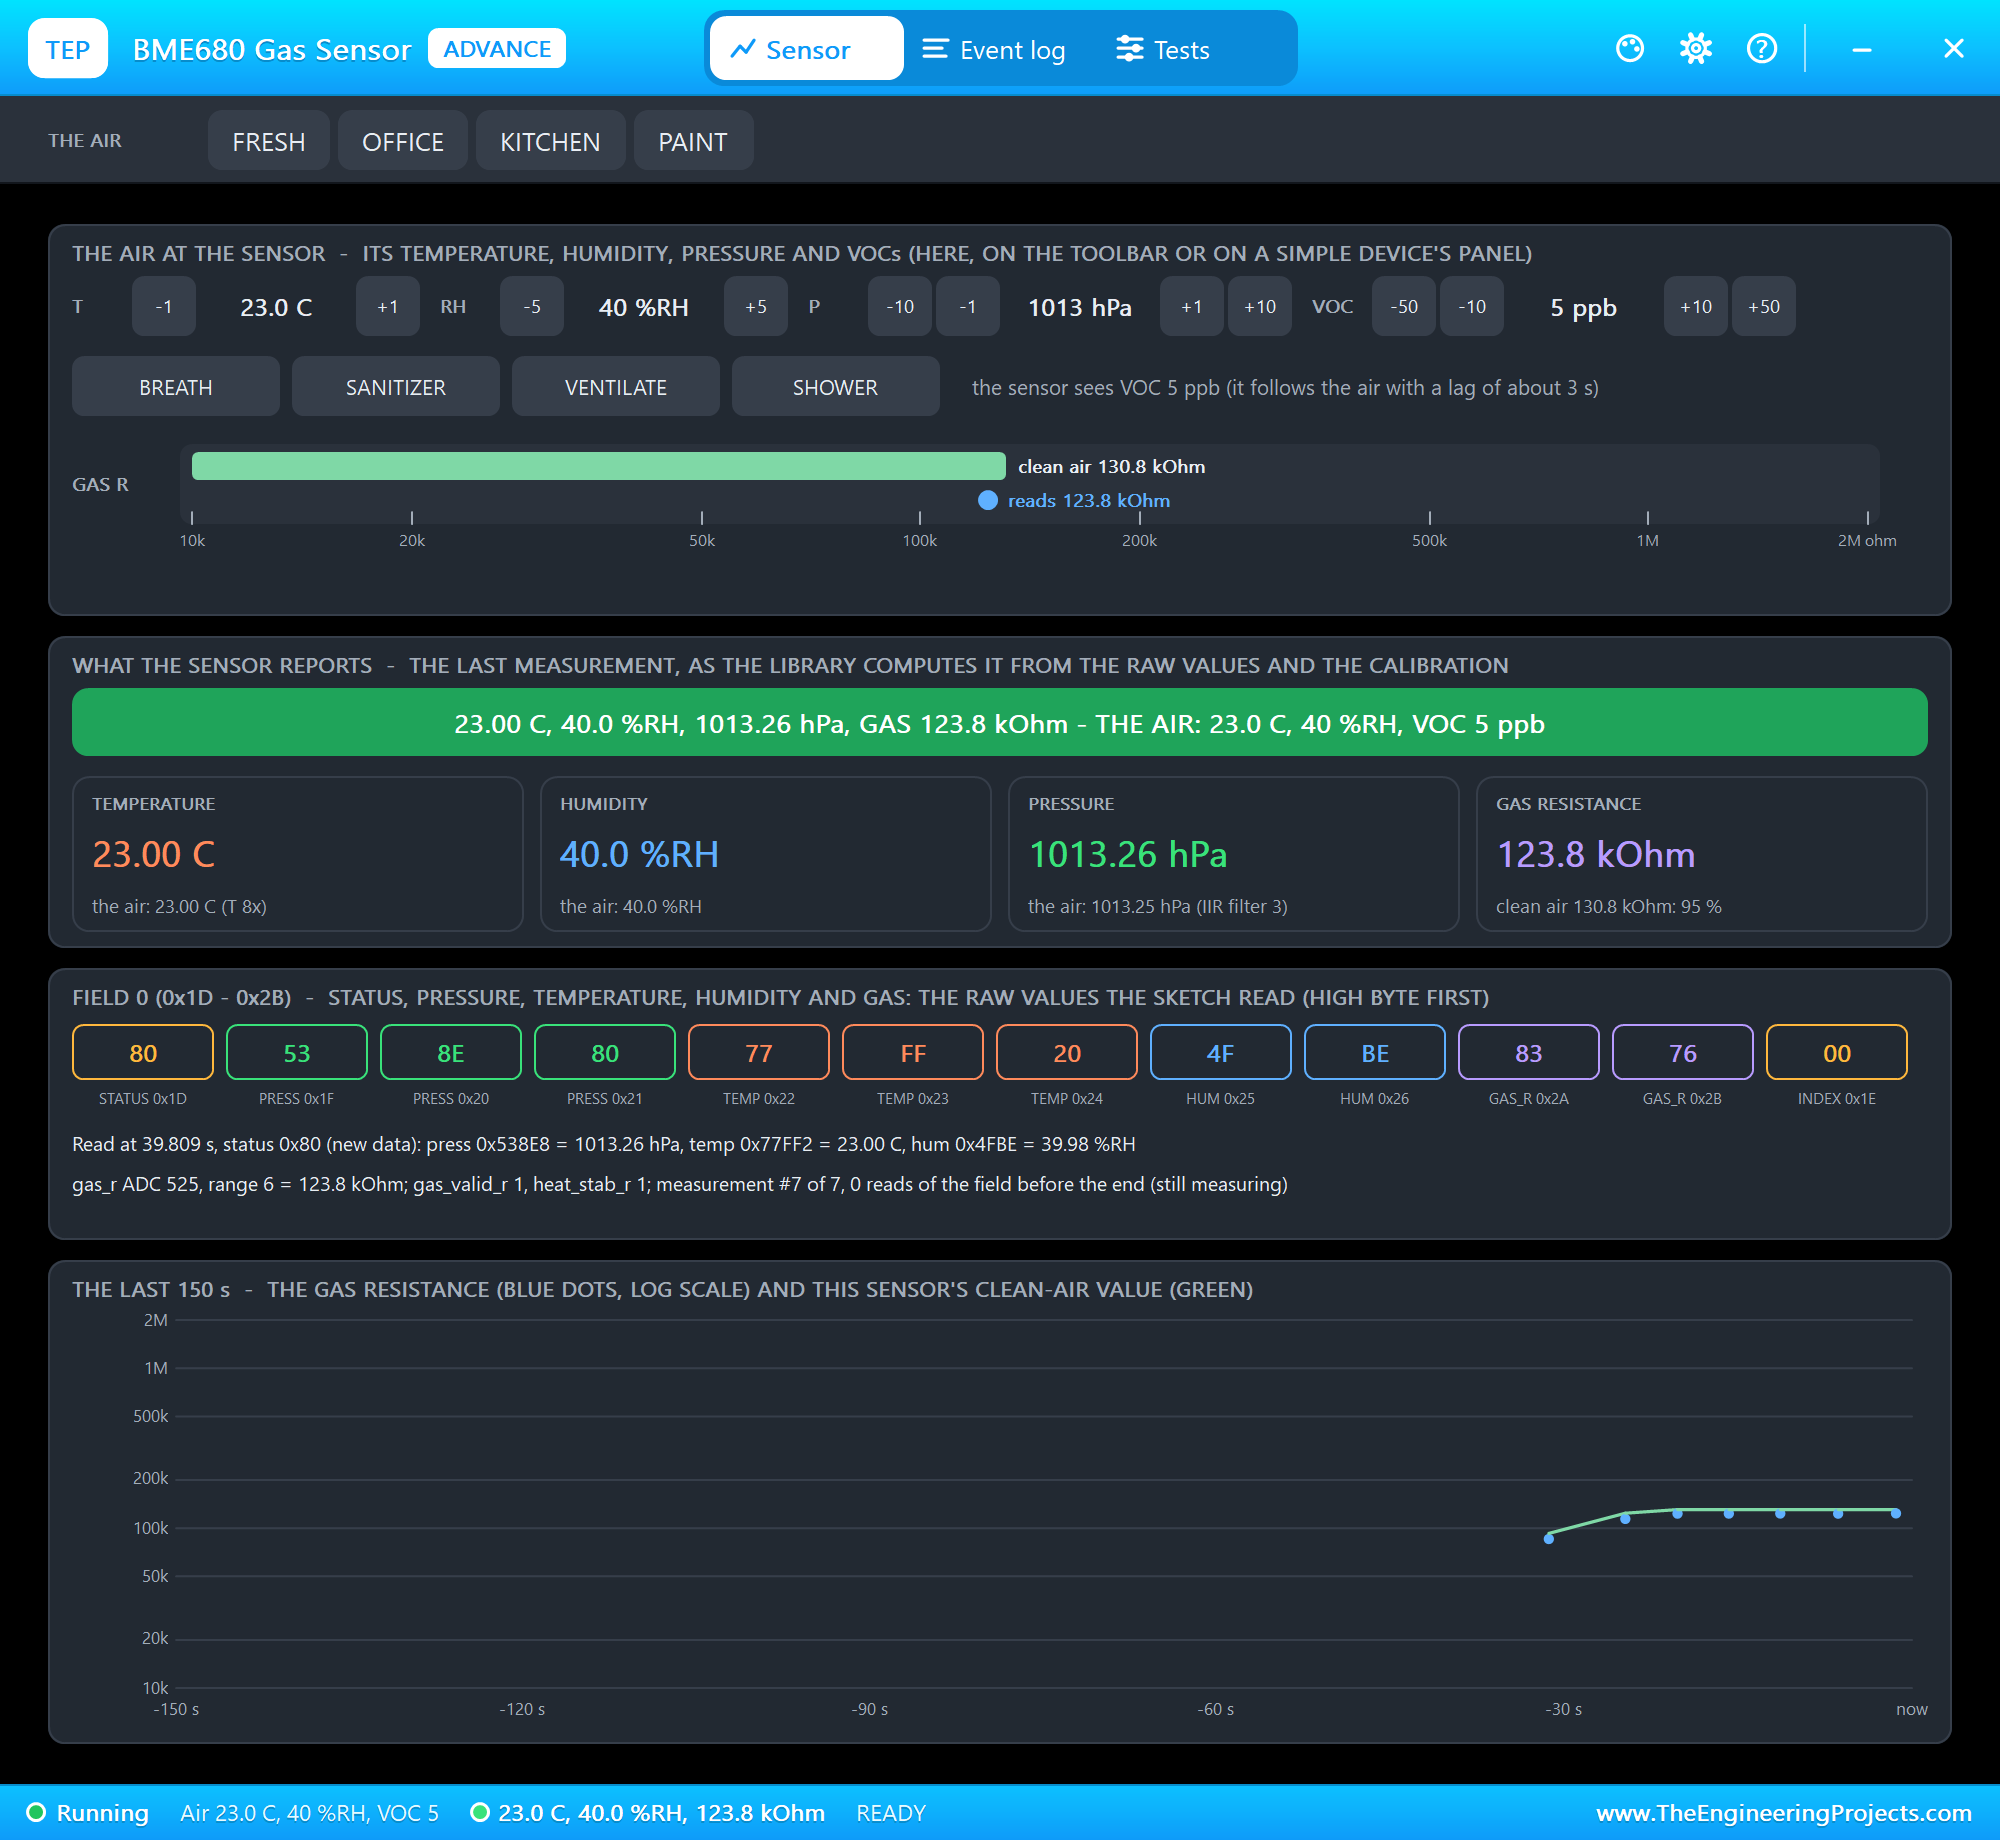
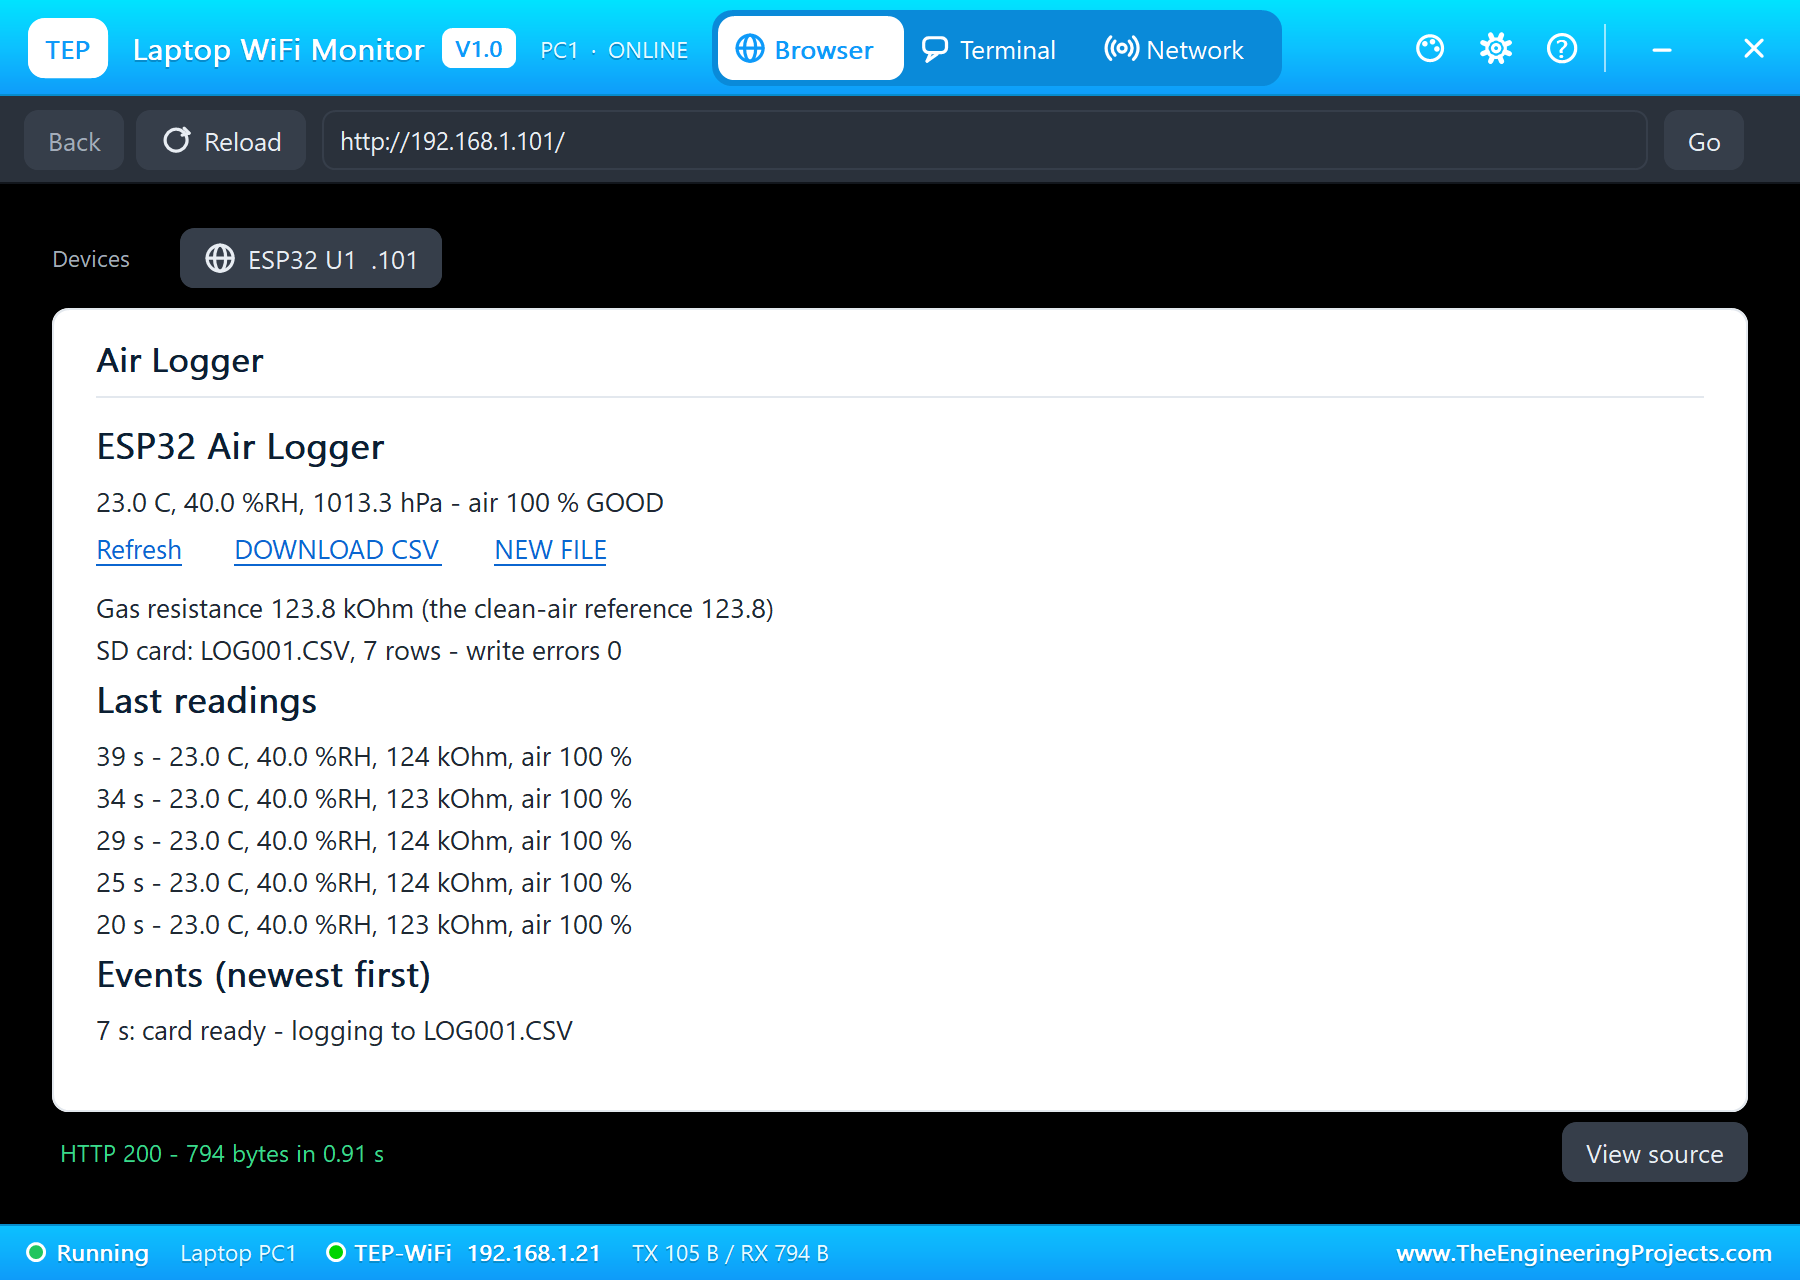
The circuit, the board and the results as they appear in IoT Environmental Data Logger with ESP32 - Proteus Simulation. Open an image for its full size.
README
 README
===============================================================================================================
  IoT Environmental Data Logger with ESP32 - Proteus Simulation Project V1.0
  The Engineering Projects - www.TheEngineeringProjects.com
===============================================================================================================

IMPORTANT LINKS
  The project tutorial (circuit, code, simulation results):
    https://www.theengineeringprojects.com/2026/11/iot-environmental-data-logger-esp32-proteus-simulation.html
  The libraries this project is built from (each post has its own full download and tutorial):
    ESP32 DevKit V1 board:
      https://www.theengineeringprojects.com/2026/10/esp32-devkit-v1-library-for-proteus-v2-0.html
    BME680 gas sensor:
      https://www.theengineeringprojects.com/2026/10/bme680-gas-sensor-library-for-proteus-v1-0.html
    Micro SD card module:
      https://www.theengineeringprojects.com/2026/10/micro-sd-card-module-library-for-proteus-v1-0.html
    E-paper display 1.54":
      https://www.theengineeringprojects.com/2026/10/e-paper-display-library-for-proteus-v1-0.html
    Laptop WiFi Monitor:
      https://www.theengineeringprojects.com/2026/10/laptop-wifi-monitor-library-for-proteus.html
    Mobile WiFi Monitor:
      https://www.theengineeringprojects.com/2026/10/mobile-wifi-monitor-library-for-proteus.html
  Support our free work: https://www.theengineeringprojects.com/donate

FILE STRUCTURE
ESP32-Air-Data-Logger-TEP-v1.0/
|-- Proteus Library Files/
|   |-- TEPBME680.LIB                                  66.2 KB   a part of the project -> LIBRARY folder
|   |-- TEPEPAPER.LIB                                  54.9 KB   a part of the project -> LIBRARY folder
|   |-- TEPESP32V1.LIB                                 36.6 KB   a part of the project -> LIBRARY folder
|   |-- TEPLAPTOP.LIB                                  39.5 KB   a part of the project -> LIBRARY folder
|   |-- TEPMICROSD.LIB                                 60.3 KB   a part of the project -> LIBRARY folder
|   |-- TEPMOBILE.LIB                                  13.1 KB   a part of the project -> LIBRARY folder
|-- Proteus Model Files/
|   |-- TEPBME680.DLL                                 342.0 KB   a model -> MODELS folder
|   |-- TEPEPAPER.DLL                                 315.0 KB   a model -> MODELS folder
|   |-- TEPMICROSD.DLL                                318.5 KB   a model -> MODELS folder
|   |-- TEPNET.DLL                                     2.89 MB   a model -> MODELS folder
|-- Proteus Simulation/
|   |-- ESP32_Environmental_Data_Logger.hex           182.6 KB   the firmware
|   |-- ESP32-Air-Data-Logger.pdsprj                   29.7 KB   the project simulation
|   |-- TEPBME680.DLL                                 342.0 KB   copy of the model
|   |-- TEPEPAPER.DLL                                 315.0 KB   copy of the model
|   |-- TEPMICROSD.DLL                                318.5 KB   copy of the model
|   |-- TEPNET.DLL                                     2.89 MB   copy of the model
|-- Arduino Code/
|   |-- ESP32_Environmental_Data_Logger/ESP32_Environmental_Data_Logger.ino   12.5 KB   the sketch (source of the .hex)
|-- README.txt                                        ~10.6 KB   this file
Total: 8.18 MB (unzipped). The C++ source code of the models is not included.

WHAT IS IT?
  An environmental data logger you can run in Proteus: an ESP32 reads a BME680 every 5 seconds, writes every
  reading to a micro SD card as a CSV file, shows the latest values on a 1.54" e-paper display and serves a web
  dashboard from which you download the whole log.
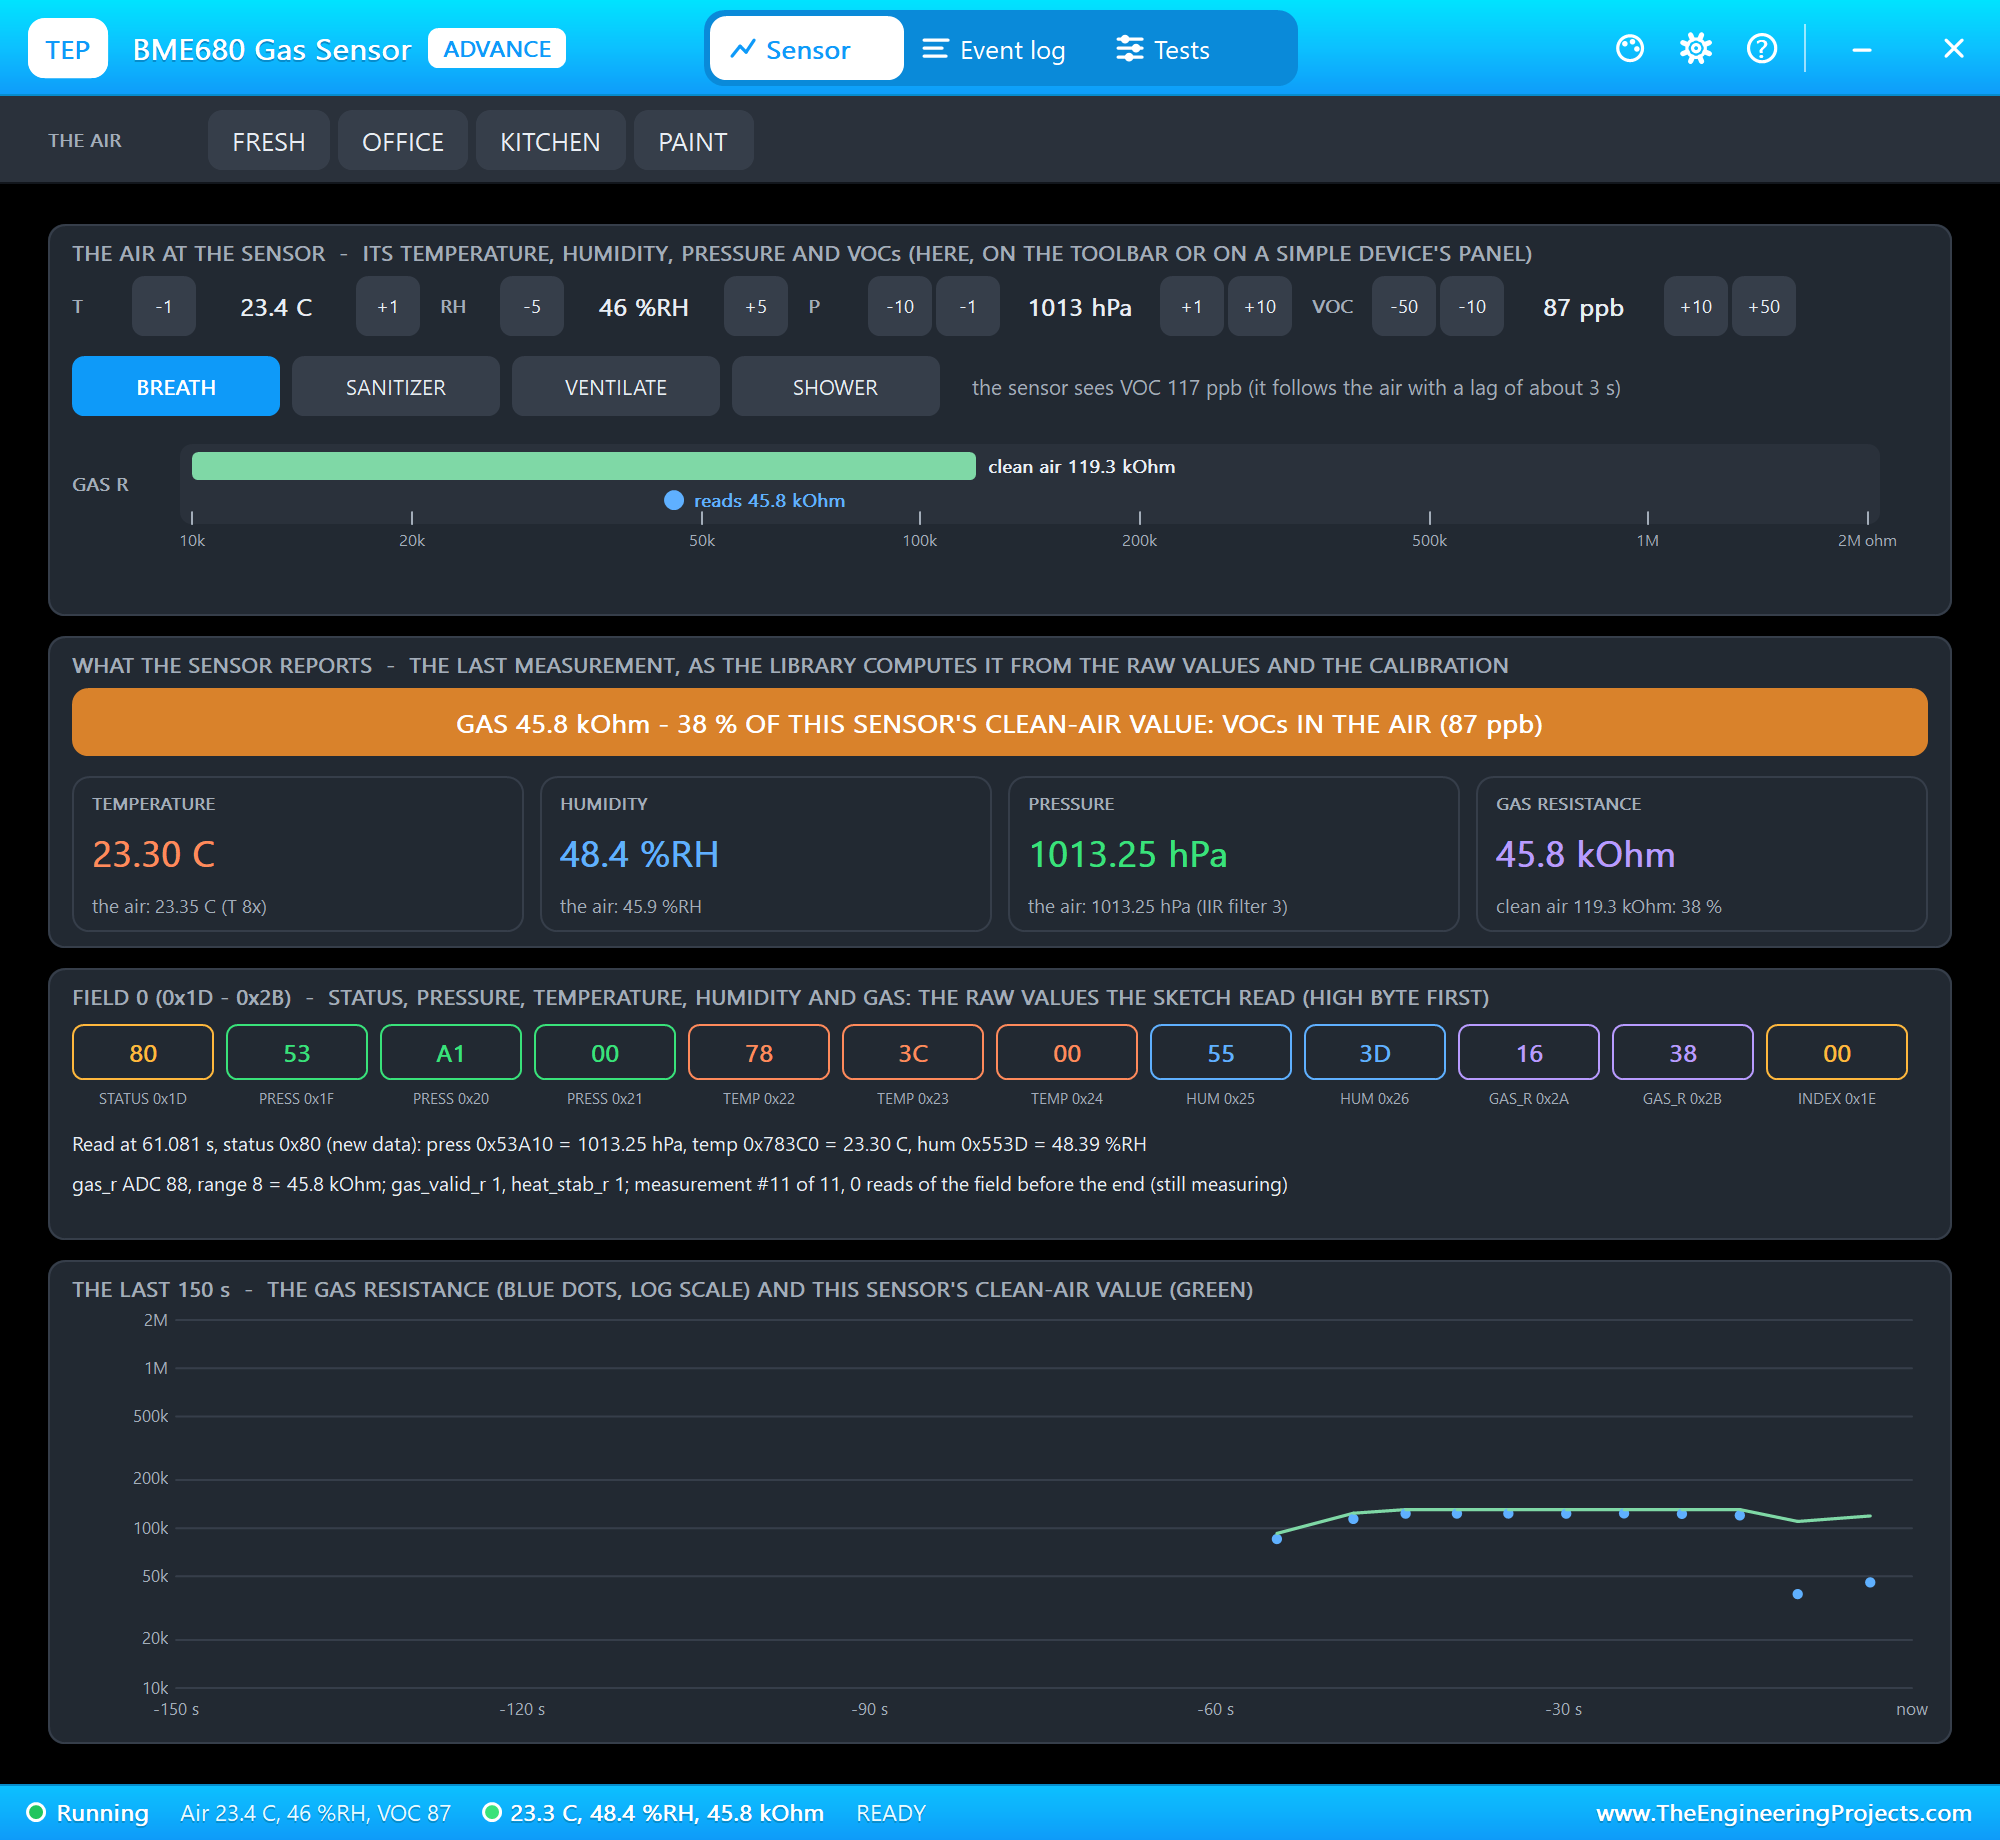
    * BME680 (BME680ADVTEP, U2) on the 5 V rail, I2C: SDA D21, SCL D22, address 0x77 (SDO and CS left open).
      Temperature, humidity, pressure and the gas resistance (the heater at 320 C for 150 ms). BURNIN=20 s for the demo.
    * Micro SD card module (MICROSDADVTEP, U3) on the 5 V rail, SPI: CS D5, SCK D18, MISO D19, MOSI D23. CARD=EMPTY
      (a formatted FAT16 card). One CSV file per start-up: LOG001.CSV, LOG002.CSV ... with a header row.
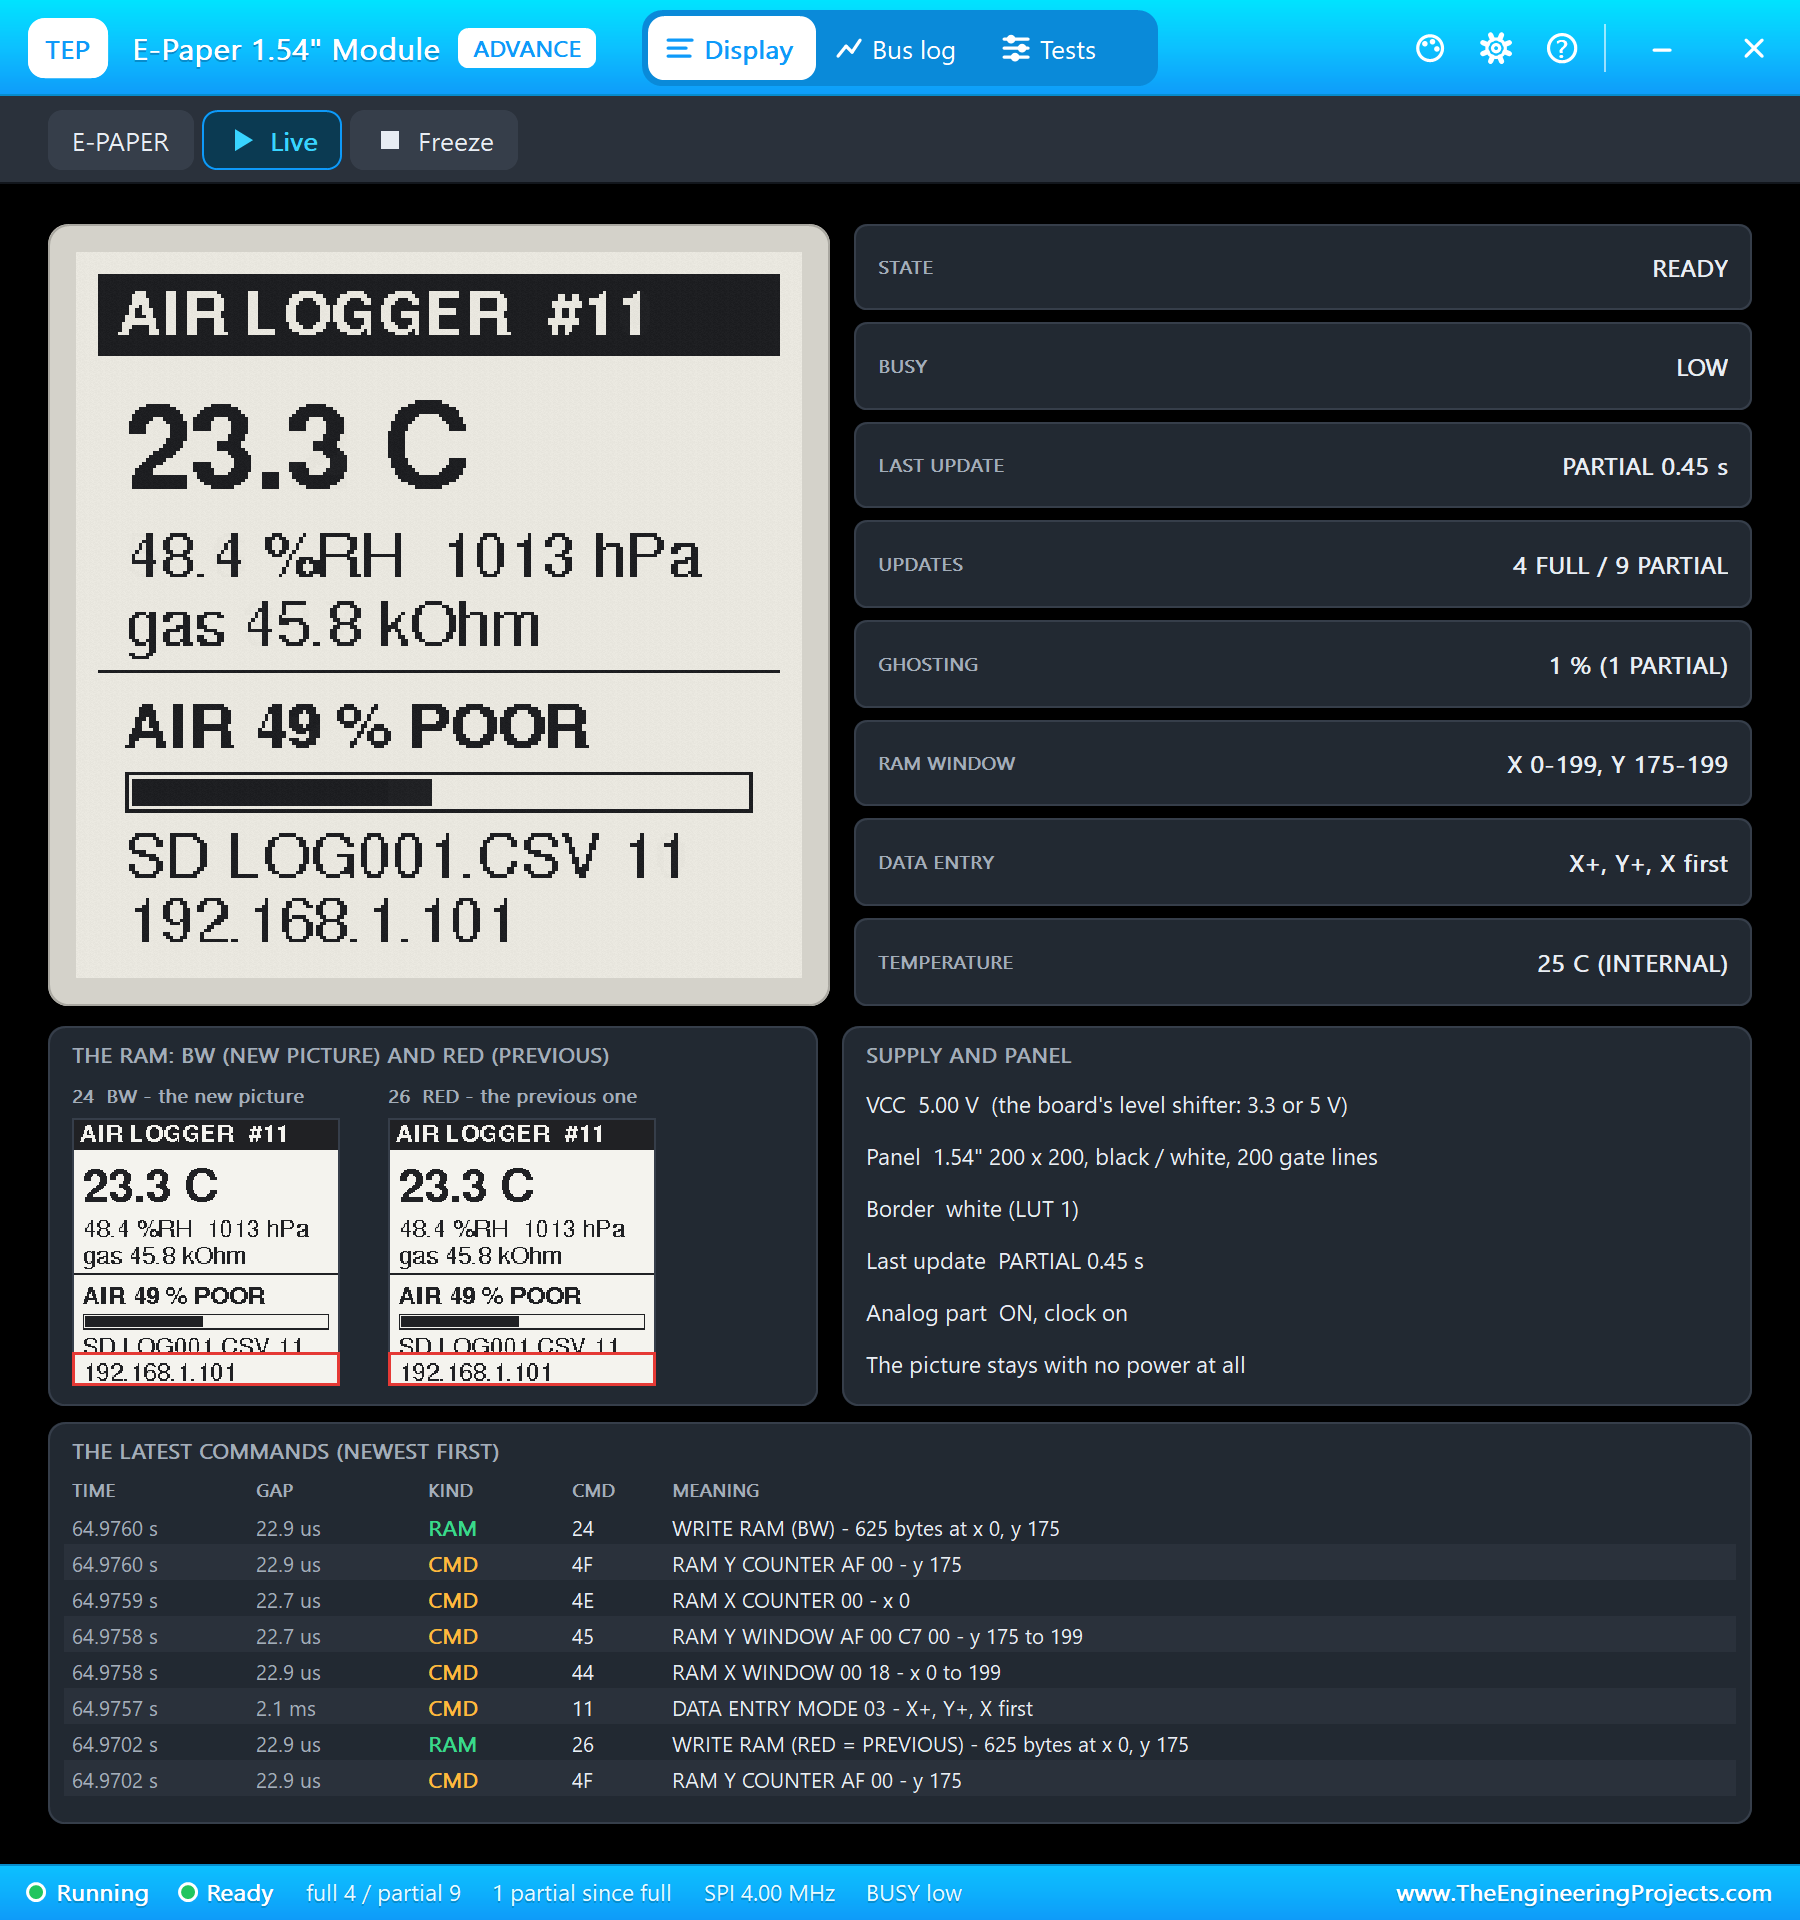
    * 1.54" e-paper 200 x 200, SSD1681 (EPAPER154ADVTEP, EPD1) on the 5 V rail, the same SPI: CS D27, DC D26, RST D25,
      BUSY D33, CLK D18, DIN D23. A partial refresh at every reading, a full refresh every 10th (clears the ghosting).
    * ESP32 DEVKIT V1 (U1) runs ESP32_Environmental_Data_Logger.hex on TEP-WiFi at 192.168.1.101 (port 80).
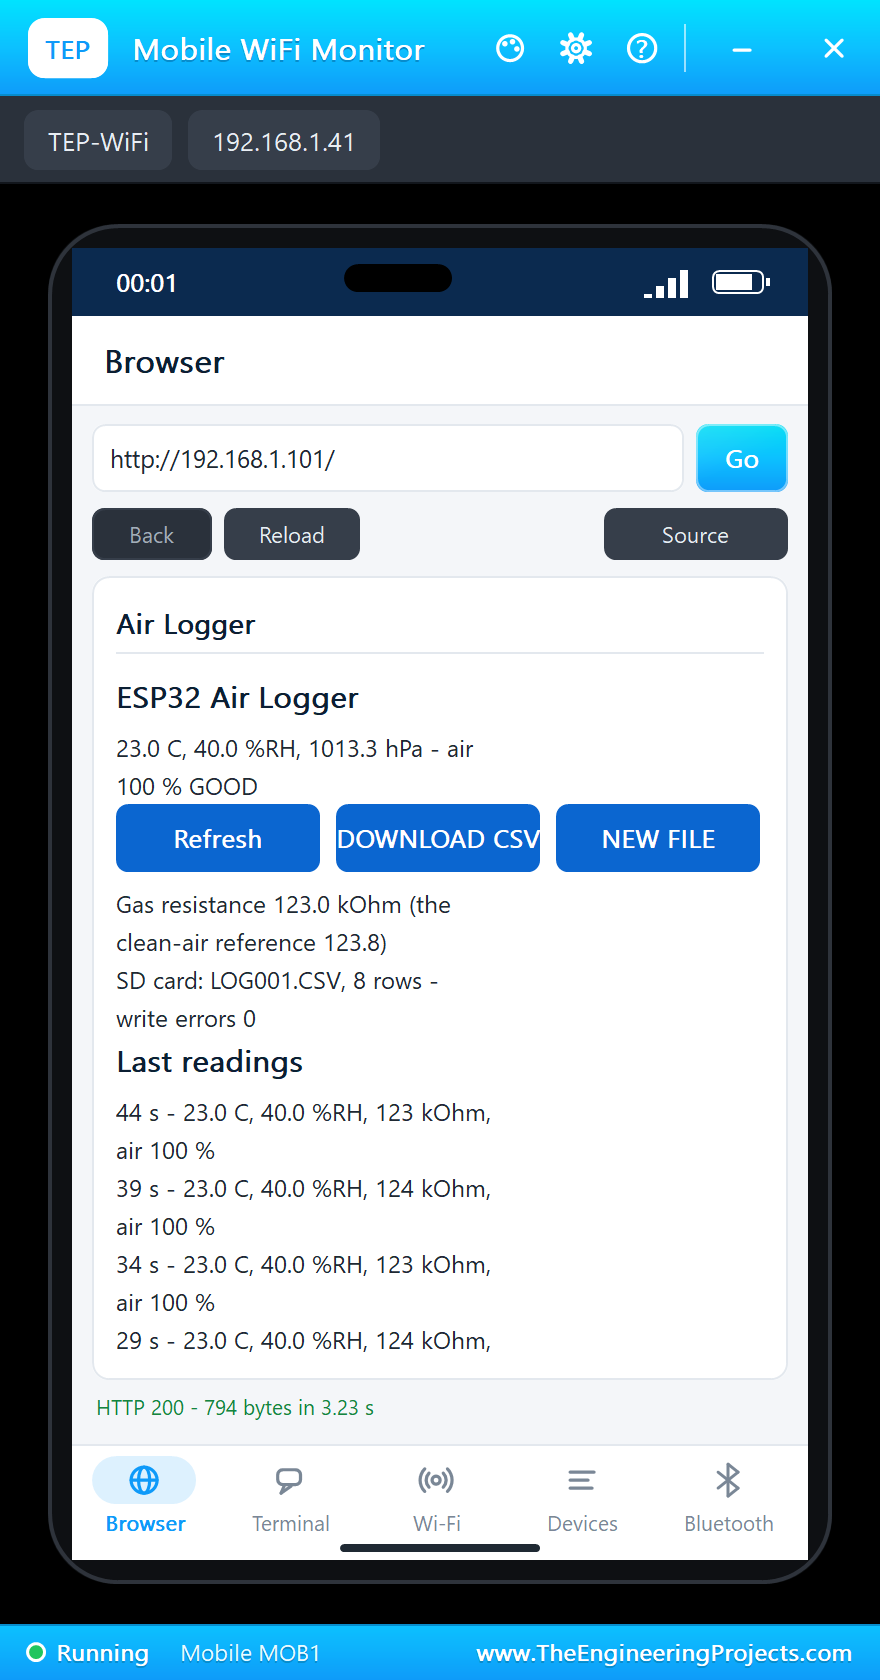
    * Laptop WiFi Monitor (PC1) and Mobile WiFi Monitor (MOB1) open http://192.168.1.101/.
  The rules (at the top of the sketch):
    * air quality 0 - 100 % = a humidity score (25 points, best at 38 - 42 %RH) + a gas score (75 points: the gas
      resistance / the cleanest resistance seen after the burn-in); 80+ GOOD, 60+ FAIR, 40+ POOR, below BAD;
    * every reading: the card is asked first (CMD13 SEND_STATUS - the SD library's close() reports no error, so a
      pulled card would go unnoticed), then the file is opened, one line added, the file closed;
    * no card: SD: NO CARD on the display, a write error counted, the card mounted again at every reading - a new
      file when it comes back.
  Its pages:
    /            the dashboard: the readings, the card, the file, the last readings, the events
    /log.csv     the whole log file as it is on the card (a download)
    /new         start a new log file
    /data        everything as JSON
  Libraries for your own builds (not included): Adafruit BME680 2.0.6 with Adafruit Unified Sensor and Adafruit BusIO,
  SD 1.3.0, GxEPD2 1.6.9 (GxEPD2_154_D67) and Adafruit GFX 1.12.6 - install them in the Arduino IDE.

TEST STATUS
  Tested in Proteus 8 Professional on Windows 11, the run that made the tutorial's screenshots (the sketch's times):
    * 7 s: card ready - logging to LOG001.CSV; the first reading at 9 s (23.00 C, 40.0 %RH, 1013.3 hPa, 85.6 kOhm
      during the burn-in); the gas resistance settled at 123 - 124 kOhm (the clean-air reference 123.8 kOhm).
    * BREATH: "air POOR - 42 %" at 54 s (55.6 %RH, 38.7 kOhm).
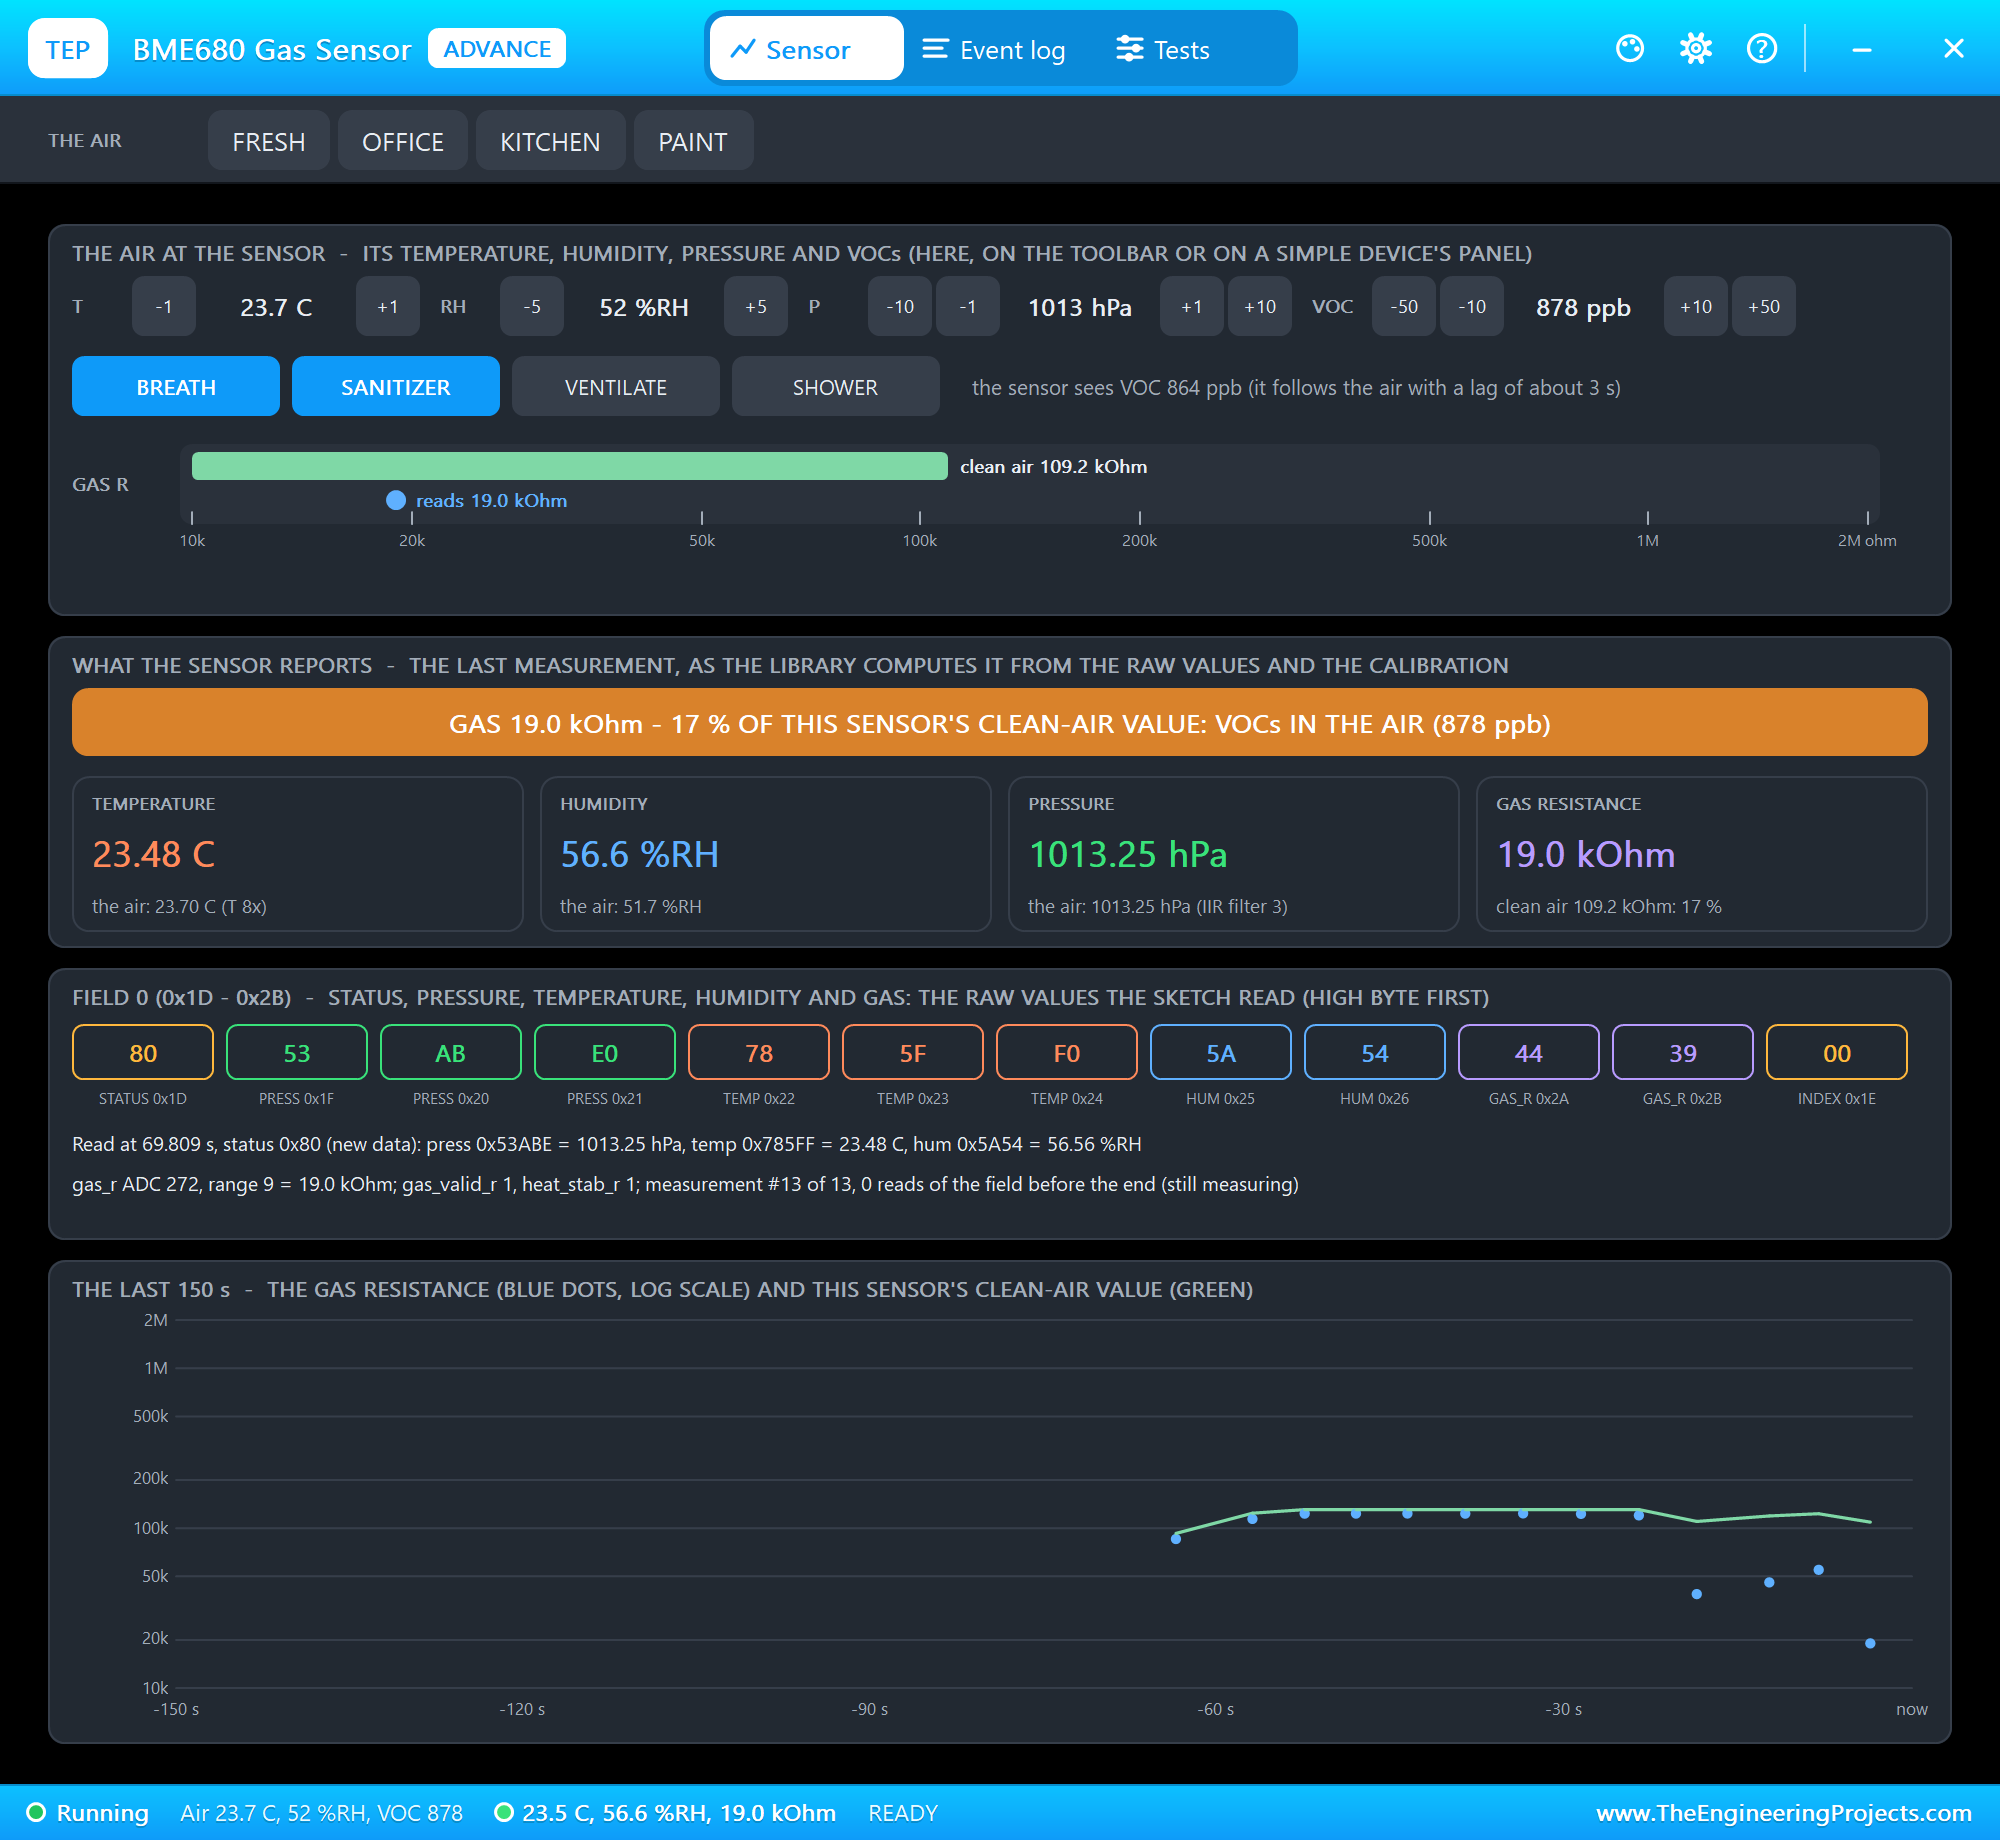
    * SANITIZER: "air BAD - 30 %" at 69 s (19.0 kOhm), 17.9 kOhm at 74 s.
    * VENTILATE: POOR at 89 s, "air FAIR - 60 %" at 119 s (61.9 kOhm), "air GOOD - 80 %" at 149 s (94.1 kOhm).
    * SHOWER: "air POOR - 40 %" at 154 s (90.0 %RH, 59.0 kOhm); FRESH: "air GOOD - 84 %" at 174 s.
    * The card pulled out: "SD write failed - no card in the socket" at 184 s, SD: NO CARD on the e-paper; put back:
      "card ready - logging to LOG002.CSV" at 198 s.
    * DOWNLOAD CSV from the laptop at 212 s (LOG002.CSV); NEW FILE from the phone at 221 s: LOG003.CSV.
    * The card at the end: LOG001.CSV 1262 B (35 readings), LOG002.CSV 249 B, LOG003.CSV 214 B; 829 commands,
      105 blocks read, 105 written, 0 errors. The BME680: 46 measurements.
  An earlier run showed why the sketch asks the card before writing: with the card pulled out, the SD library went on
  "writing" into its cache and every line looked fine - 18 readings went nowhere.
  236 s of simulation took about 30 minutes on our PC with all the captures.

INSTALLATION
  1. Close Proteus. Extract the WHOLE zip file, for example to your Desktop.
  2. Copy the files from "Proteus Library Files" into the LIBRARY folder of Proteus, for example
     C:\Program Files (x86)\Labcenter Electronics\Proteus 8 Professional\LIBRARY
  3. Copy the files from "Proteus Model Files" into the MODELS folder (next to LIBRARY).
  4. Start Proteus. Press P in the schematic and search for ESP32 DEVKIT V1, BME680ADVTEP or EPAPER154ADVTEP to check
     that the parts are there.

RUN THE SIMULATION
  1. Open "Proteus Simulation\ESP32-Air-Data-Logger.pdsprj". Keep the HEX and the DLL files beside it.
  2. Press Play. The e-paper shows starting, the card gets LOG001.CSV, a reading follows every 5 seconds.
  3. Open the Laptop WiFi Monitor (PC1) or the Mobile WiFi Monitor (MOB1) and press Go. Press Refresh to update it.
  4. In the BME680's pop-up (U2) click BREATH, SANITIZER, VENTILATE or SHOWER - each stays on until you click it
     again. Click CARD in the SD card's pop-up (U3) to pull the card out, and again to put it back.
  Your own sketch: compile it, export the compiled binary and set U1's PROGRAM property to the new file.

PROPERTIES USED IN THIS PROJECT
  U1 ESP32 DEVKIT V1           PROGRAM=ESP32_Environmental_Data_Logger.hex, AUTOOPEN=YES (TEP-WiFi, 192.168.1.101)
  U2 BME680ADVTEP              BURNIN=20 (the gas burn-in shortened for the demo)
  U3 MICROSDADVTEP             CARD=EMPTY (a formatted FAT16 card, no files)
  EPD1 EPAPER154ADVTEP         (no changes)
  PC1, MOB1                    HOMEPAGE=http://192.168.1.101/

TROUBLESHOOTING
  * SD: NO CARD at the start: check CS (D5), MISO and MOSI; a card property of RAW (never formatted) or NONE.
  * The e-paper stays blank: BUSY is not connected (the library waits for it), or CS / DC are swapped.
  * Faint old text on the e-paper: ghosting after partial refreshes - the full refresh every 10th reading clears it.
  * BME680 not found at 0x77: SDA / SCL swapped, or SDO tied LOW (the address is then 0x76).
  * The air quality reads 100 % at the start: normal during the burn-in, before the clean-air reference is set.

LICENCES
  * The project, the sketch, the parts (LIB files) and the models (DLL files) are made by The Engineering Projects
    and are free for learning and for your own projects. The models use only standard Windows libraries.
    The C++ source code of the models is not included; the source code is not included for any model.
  * The sketch uses the Adafruit BME680, Adafruit Unified Sensor, Adafruit BusIO and Adafruit GFX libraries (BSD,
    Apache 2.0 and MIT licences), SD (GNU GPL v3) and GxEPD2 (GNU GPL v3); they are named here, not included.
  * Proteus is a product of Labcenter Electronics and is not included. ESP32 is a product of Espressif Systems and
    BME680 a product of Bosch Sensortec. This project is not made or endorsed by them. The air-quality score is a
    relative score, not a certified air quality index.

VERSION
  V1.0 - the first release of the project.
===============================================================================================================Development1 release
 Development1 release
-
V1.0IoT Environmental Data Logger with ESP32 - Proteus Simulation V1.0this page
V1.0 is the only release in the Download Center so far. When a newer version is published, it appears above with its own download page.
Installation8 steps
 Installation8 steps
From the download to a working project, in order. The steps follow what the package contains.
You will need
- Proteus Design SuiteProteus 8 or newer (Labcenter), on Windows
- Arduino IDE1.8 or 2.x, with the board of the tutorial chosen under Tools → Board
- Any archive toolWindows, macOS and Linux extract ZIP files on their own
Steps
- 1
Extract the archive
Right-click e16c58bd74f847a89ddf547cf0eb4c00.zip and choose Extract All (or open it with 7-Zip or WinRAR) into a folder you can find again. Keep its folder structure (ESP32-Air-Data-Logger-TEP-v1.0) as it is.
- 2
Copy the library files into Proteus
Move TEPBME680.LIB, TEPEPAPER.LIB and TEPESP32V1.LIB and 3 more and the files into the LIBRARY folder of your Proteus installation: C:\Program Files (x86)\Labcenter Electronics\Proteus 8 Professional\LIBRARY for Proteus 8, or the matching Proteus 7 folder. Older versions keep it under ProgramData\Labcenter Electronics. If Proteus is open, close it first.
- 3
Add the simulation model
Copy TEPBME680.DLL, TEPEPAPER.DLL and TEPMICROSD.DLL and 1 more into the MODELS folder next to LIBRARY, so the component can run, not only be drawn.
- 4
Restart Proteus and place the component
Start Proteus, open a schematic, press P (Pick Devices) and search for the component by the name used in the tutorial. It appears with its pins ready to wire.
- 5
Open the sketch in the Arduino IDE
Open ESP32_Environmental_Data_Logger.ino, select your board and port under Tools, then Verify. Sketch → Export Compiled Binary writes the HEX file a simulation needs.
- 6
Load the HEX file
In Proteus double-click the microcontroller, set Program File to ESP32_Environmental_Data_Logger.hex and run the simulation. For real hardware, flash the same file with your programmer.
- 7
Open the example simulation
Open ESP32-Air-Data-Logger.pdsprj in Proteus to see the wiring exactly as in the tutorial. Check the controller's Program File path, then press Play.
- 8
Follow the tutorial
IoT Environmental Data Logger with ESP32 - Proteus Simulation explains every connection and setting in order; keep it open beside the files while you build.
FAQs9 questionsContact TEP
 FAQs9 questions
How do I download IoT Environmental Data Logger with ESP32 - Proteus Simulation V1.0?
Wait for the 30-second guest countdown on this page, then press the download button; the file comes straight from our storage. Members who are logged in skip the wait. If the browser opens the file instead of saving it, use its Save as option. The download link is made for you when the countdown ends and works for 15 minutes; a saved or shared link stops working, so share this page instead.
What is inside the archive?
IoT Environmental Data Logger with ESP32 - Proteus Simulation V1.0 comes as a ZIP archive of 18 files (3.8 MB, 8.2 MB unpacked) holding Proteus library files, simulation model DLLs, a Proteus simulation, an Arduino sketch and compiled HEX firmware. Open the File Structure tab for the full list of 18 files.
What should I do if the download does not start?
Check the browser's download list first; an ad blocker or a company firewall can also hold it back, so try another browser or network. If the file arrives incomplete, download it again. For an installation problem, read the Install tab or tell us in the comments with your software version and the exact error message.
Is this file free?
Yes. Every file in the TEP Download Center is free for learning, personal and student projects. If you share it, link back to this page or the tutorial so others find the latest version.
How do I check that the file arrived complete?
Compare its SHA-256 with the one on this page, 566874ea4372ec5a6bf14f6b61a11878b57ae9ffb103b47651a523a9c91ddb2a. In PowerShell run Get-FileHash "e16c58bd74f847a89ddf547cf0eb4c00.zip"; on macOS or Linux run shasum -a 256 "e16c58bd74f847a89ddf547cf0eb4c00.zip". The same value means the file is exactly the one in our storage; a different one means the download broke off, so download it again.
Do I need WinRAR to open the ZIP file?
No. Windows, macOS and Linux open ZIP archives on their own (Extract All, or double-click). WinRAR and 7-Zip work too. Extract the whole archive before using the files.
Where do I put the LIB and IDX files?
Both files go into the LIBRARY folder of your Proteus installation (Proteus 8: C:\Program Files (x86)\Labcenter Electronics\Proteus 8 Professional\LIBRARY; Proteus 7 has the same folder under its own name). Restart Proteus afterwards and search for the component with P.
Which Proteus version does the library need?
The tutorial names the Proteus version the library was made and tested with. Most TEP libraries work in Proteus 7 and Proteus 8; if the component does not appear after a restart, check that both the LIB and the IDX file were copied and that Proteus was fully closed while copying.
How do I get the HEX file into the simulation?
Compile the sketch in the Arduino IDE (Sketch → Export Compiled Binary gives you the HEX next to the sketch), then in Proteus double-click the board, set Program File to that HEX and run.
Members skip the wait. Log in or join TEP.

- 0Total downloads
- 4%Popularity
- ESP32 ProjectsCategory
- 0Comments
- ssyedzainnasirUploaded by
- 15 Nov 2026Uploaded at


 SHA-256
566874ea4372ec5a6bf14f6b61a11878b57ae9ffb103b47651a523a9c91ddb2a


 Need help with this file?
 Tags
Related ESP32 Projects
All ESP32 Projects tutorials


More ESP32 project files
All ESP32 tutorials

Comments
0