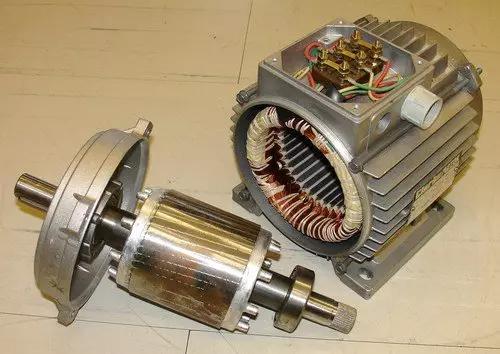
Hi fellows! Hoping everyone is fine and doing great. Today, I am going to give you an Introduction to Induction Motors, the term which is very common and familiar but still many of us do not know it’s working and difference from other motors. Induction Motor is an AC electric motor, having a stator and a rotor just like other motors, but the working principle is a little different which would be discussed further. There are two types of Induction Motors, one is named as Single Phase Induction Motor, while the second one is named as 3 Phase Induction Motor.
An Induction motor is also called asynchronous motor, because the speed of rotation of its rotor is less than stator. In other words, it does not run at its synchronous speed. Before going into ...
Hi everyone, I hope you are doing well. Today in this post we can discuss significant figures. Significant figures can be evolved and traced a few hundred years ago and they can be developed from time to time according to the precise calculations that can be done in mathematics and modern science and technology.The origin of significant figures can be traced to ancient times in Greece, Egypt, or many other countries where they can be used as Significant figures in calculations or mathematics. With time these significant figures can be used by astronomers, mathematicians, and scientists as well. To measure accurate and precise measurements they can use significant figures with scientific notation. In modern physics and mathematics, significant figures can be used essentially.Now we can star ...
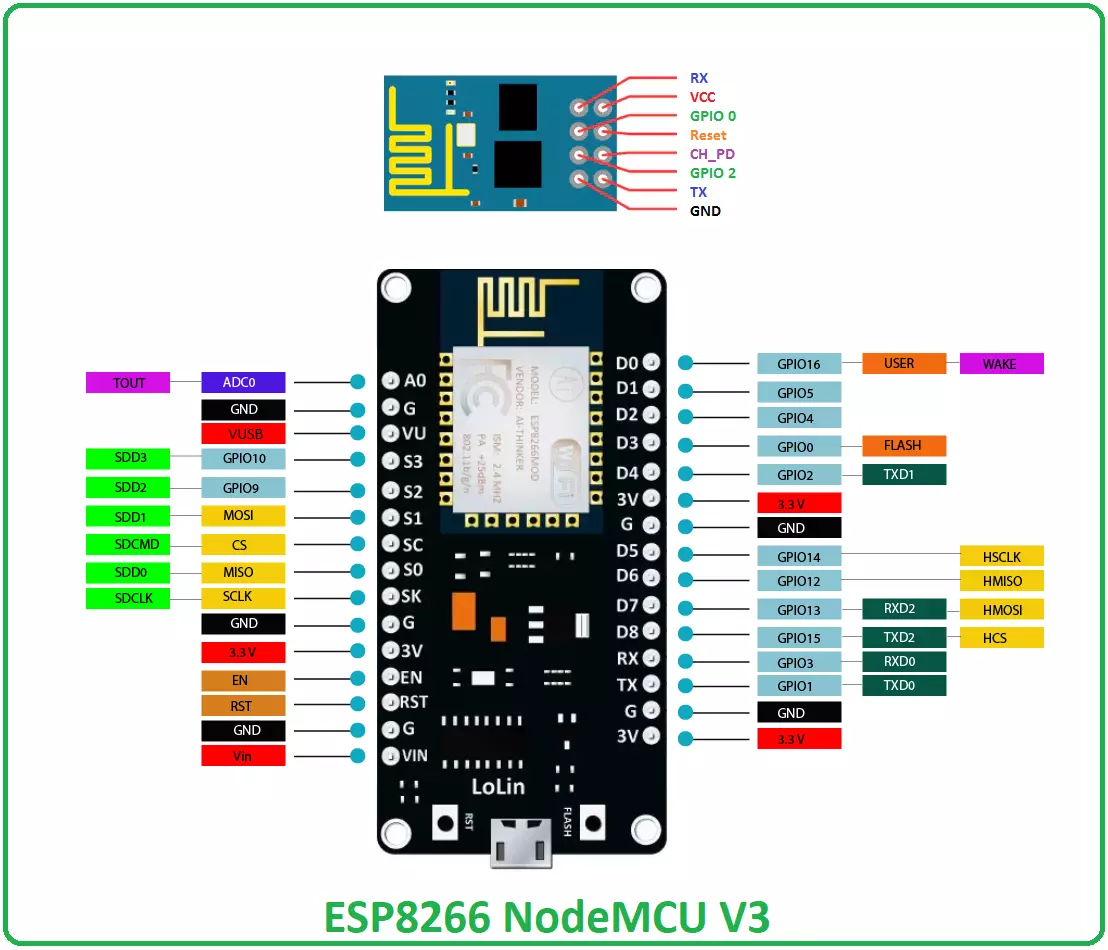
Hello friends! Hope you are doing well. Today, we will have a look at the detailed Introduction to ESP8266 WiFi module. ESP8266 is a very low-cost & user-friendly WiFi module, which develops a simple TCP/IP connection and can easily be interfaced with microcontrollers via Serial Port. The first chip in this series was ESP-01 which gained sheer attention in the market.
In this tutorial, we will discuss the ESP8266 WiFi module along with its pinout, features, specifications, applications and datasheet. Let's dive in and nail down everything related to this device.
ESP8266 WiFi Module
ESP8266 (also called ESP8266 Wireless Transceiver) is a cost-effective, easy-to-operate, compact-sized & low-powered WiFi module, designed by Espressif Systems, that supports both TCP/IP and Ser ...
Hello friends, I hope you all are fine and having fun with your lives. In today's tutorial, I am going to show you How to use Arduino Serial Monitor. It's not gonna be a very big post but its really very essential if you wanna learn Arduino coding. Because Arduino Serial Monitor is a great debugging tool and it helps a lot in Arduino Projects. In the previous post we have seen How to use digitalRead in Arduino and if you recall that tutorial then you must remember that in it we have used some Serial printing. So that's what we are gonna cover in today's tutorial.
Before going into the details, I must suggest you to first read these two posts because in those tutorials I have shown the serial communication which is essential for Serial Monitor Work ...
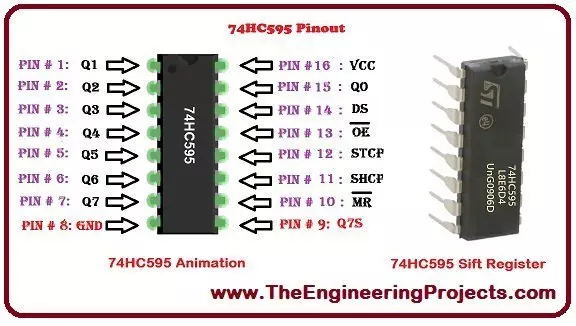
Hello everyone! I hope you will be absolutely fine and having fun. Today, I am going to explain all of you about Introduction to 74HC595. It is basically a shift register. It has an ability to store and to shift the data of 8 bits. First of all the data is written on the register serially and then it goes to the storage register. All of the output lines are controlled by this register.
74HC595 register is a very high speed device based on Complementary Metal Oxide Semiconductor (CMOS). 8 bit data register receives the data from the input DS. This data is then transferred from the input shift register to the output shift register. 74HC595 has a vey wide range of applications in daily life. It can be used as serial to parallel data converter, can ...
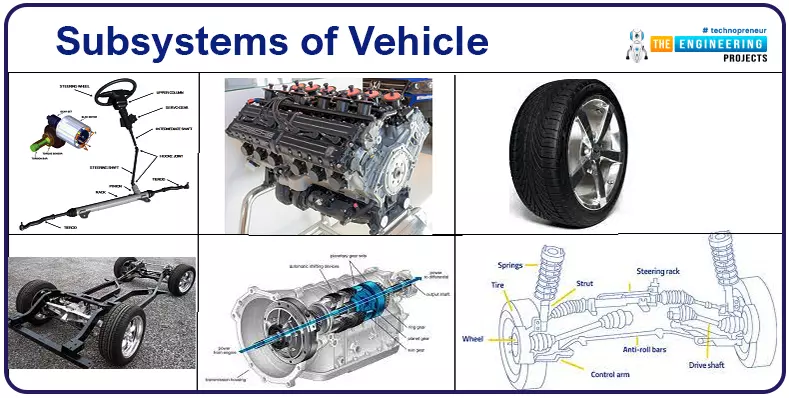
Just like the big bang theory which resulted in the world we live in. If we must mark a big bang for vehicles or the Automotive industry, it would be the invention of wheels. The invention of wheels redefined the aspects in which humans transported goods or traveled across places. Since, the invention of the wheel, transportation has always been contributing to the growth of society we live in. These vehicles later helped in conquering road travel. From its inception, the vehicle industry is technologically driven, pushing its own limits to find answers to challenges such as how can we travel faster? What will help us in making these rides more comfortable? Manually driven vehicles and their restrictions raise the need for a further quest. Quest f ...
Whether you are a start-up undergoing its teething phase or a fully fledged established entity that has its own IT department to cater to IT needs, there will be a point when you will need to develop software to cater to your business needs. When it comes to software development, many organizations find themselves debating a make or buy decision. Outsourcing has been very common among business organizations in the recent past. This is mainly attributed to the effects of globalization and the advancements in the Internet and Communication technologies which has helped in bringing the world closer together.
Although many large corporations have admitted the benefits of outsourcing partial or complete business operations to other parts of the world, ...
Hello everyone! I hope you all will be absolutely fine and having fun. Today, I am going to tell you about how to design an algorithm for Servo Motor Control using Arduino. First of all I would like to tell you a bit about the servo motors. Servo motors are small devices having an output shaft. We can adjust this shaft in different angular positions by continuously sending the servo coded signal. Servo motor maintains the angular position of the shaft as long as the coded signal is present at the input. If the applied coded signal changes, angular position of the shaft of a servo motor also changes correspondingly. If you are working on Servo Motor then i would suggest you to must have look at this tutorial Servo Motor control in Proteus, as its a ...
Hello everyone! I hope you all will be absolutely fine and having fun. Today, I would like to give a detailed discussion on Introduction to myRIO. myRIO is basically a sort of micro controller introduced by National Instrument (NI), that is why it is sometimes known as NI myRIO. First of all I would like to tell you a bit about this device then we will move further. After listening its name i.e. myRIO, the first question comes in mind that what is this RIO. So, RIO is basically abbreviated from Re-configurable Input/Output.
myRIO is a portable device and students can easily use it for the design and control of robots and may other systems quite efficiently. It operates on the frequency 667 MHz. myRIO has dual core ARM cortex A9 programmable proc ...
Hi readers! I hope you are doing well and want to learn something new. Have you ever asked why our homes feel warmer when it’s cold and cooler when it’s hot out? Welcome to learn some of the secrets of HVAC Systems. Today, we will learn about the HVAC System.
Specific requirements of HVAC refer to all installations providing comfort as well as keeping a good air condition indoors for residential, commercial, and industrial buildings. It discusses the necessary components for comfortable air in your home: temperature, humidity, and cleanliness through heating, cooling, and fresh air. Most HVAC systems are based on thermodynamic principles and operate using the refrigeration cycle to transport heat through the phases of heat transfer by compressing, condensing, expanding, and evaporating re ...