Hey Fellas! This is a platform where we always strive to provide you quality content based on your field of interest. Today, I am going to discuss the details and characteristics of one of the best PCB service providers called PCBWay You need to be very vigilant and follow the protocols required for developing the clinical project that comes with no or minimum problems during the troubleshooting process. Development of project starts with building its design and the selection of components needed to produce the project in real time. PCB Fabrication House Measurements and steps taken in the early stage can save you bunch of time in the execution process. If you are professional, you may already have got your hands on many electronic projects, however, if you are newbie or students and getti ...
Hi Guys! Hope you doing well. Today, I am going to discuss 5 Ways to Keep Your Data Safe and Secure. Data security is one of the biggest issues of today’s businesses with data breaches being more common than ever. Companies take several steps to secure data, but nothing seems to be working with hackers improving their tactics to attack businesses . If you are also running a business then you need to be careful about the data as it is not just yours but your customers’ data too that is at risk. A business faces several risks in regards to data. These include the risk of theft and the risk of loss. Data theft can occur in several ways. While hacking is a common issue, sometimes employees can leak data as well. On the other hand, data theft can be due to system crashes and other such issues. ...
Hey Friends! Hope you are doing well. Today, I am going to give you a detailed Introduction to Arduino Pro Mini. It's a microcontroller board developed by Arduino.cc and is based on the Atmega328 microcontroller. Arduino Pro Mini is quite similar to Arduino UNO in overall functionality however the main difference lies in its size and built-in programmer. Arduino Pro Mini is very small in size & it lacks a built-in programmer & USB Port. Arduino Uno comes with two onboard voltage regulators (i.e. 5V and 3.3V) while Arduino Pro Mini comes with a single voltage regulator. There are two versions of Arduino Pro Mini available, first one operates at 5V & runs at 16MHz while the second one is of 3.3V runs at 8MHz. Arduino boards are mainly used for the development of automation, robotics, embedde ...
Hi Guys! Hope you are doing great. Today, I am going to unlock the details on the Introduction to POS system . The POS stands for point of sale which is a process where a transaction is made when customers select some product and finalize it after checking out from the main window. It is very useful for keeping the track record of inventory and the number of sales made per day. There are many benefits of using this method including better user experience, retention of customers, price customization of every product, and keeping the track record of the previous purchase history of the customers. This process refrains you from using old traditional methods of carrying out sale process in which cash registers were used. I'll try to cover each and everything related to POS, why it has become p ...
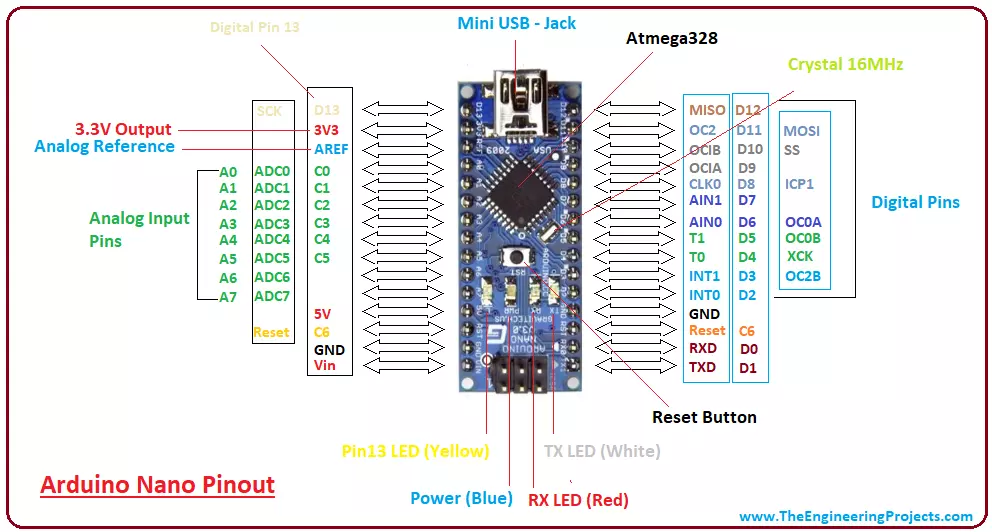
Hi Friends! I hope you are doing fine. Today, I am going to give you a detailed Introduction to Arduino Nano . We will also discuss Arduino Nano Pinout, datasheet, drivers & applications. It is a Microcontroller board developed by arduino.cc and based on Atmega328p / Atmega168 . Arduino boards are widely used in robotics, embedded systems, automation, Internet of Things(IoT) and electronics projects. These boards were initially introduced for students and non-technical users but nowadays Arduino boards are widely used in industrial projects. Any kind of technical support and help is readily provided by the Arduino community . I have also designed this video tutorial on Arduino Nano: Here's the figure showing the key points of Arduino Nano: Here's the table showing important features of Ard ...
Hi Friends! Hope you are doing great. Today, I am going to give you a detailed Introduction to Arduino Uno . It is a microcontroller board developed by Arduino.cc and is based on Atmega328 Microcontroller . The first Arduino project was started in Interaction Design Institute Ivrea in 2003 by David Cuartielles and Massimo Banzi with the intention of providing a cheap and flexible way for students and professionals to learn embedded programming. Arduino UNO is a very valuable addition in electronics that consists of a USB interface, 14 digital I/O pins(of which 6 Pins are used for PWM), 6 analog pins and an Atmega328 microcontroller. It also supports 3 communication protocols named Serial, I2C and SPI protocol. You should also have a look at this video presentation on Arduino UNO: Few main ...
Hey Fellas! Hope you are doing fine. Microcontrollers play an important role in the development of embedded systems . They are used where automation is an integral part of the system. Today, I am going to unlock the details on the Introduction to Atmega16. It is a 40-pin low power 8-bit microcontroller which is developed using CMOS technology and based on AVR architecture. This is the most commonly used AVR microcontroller which belongs to Atmel Mega family. You must have a look at microcontroller called Atmega328 that also belongs to the mega family. Other microcontrollers that are readily available and fall under AVR category are Atmega 8 and Atmega 32. All these controllers perform similar tasks, however, they are only different in terms of their memory size and cost. I'll discuss each ...
Hello Friends! Hope you are doing great. I am back to give you a daily dose of valuable information so you can excel and grow in your relevant field and keep coming back for what we have to offer. Today, I am going to unlock the details on the Introduction to 8051 Microcontroller. This is an 8-bit Microcontroller developed by Intel in the 1980s. It is considered as a small system on an integrated chip that comes with CPU, I/O ports, timers, counters, RAM and ROM. The Microcontroller is a one step forward to a microprocessor. Both Microcontrollers and microprocessor work in a similar way with some exceptions. Microcottler comes with everything required to run an embedded system like CPU, I/O ports and inbuilt peripherals like timers, counters, and interrupts. While processor comes with the ...
Hey Friends! This is a platform where we keep you updated with useful information so you keep coming back every now and then. Today, I am going to give a quick review about one of the best PCB solution providers called WellPCB. Developing electronic project becomes easy when you know all components will be produced as per your requirement. You can't compromise anything when you need accurate and precise results. The breadboard is useful for developing the electronic project, but it provides a temporary solution and takes a lot of your time because misplacement of one wire can put you in trouble. However, when things go complex and require a permanent solution, breadboards fail to fulfill the requirement. In that case, you switch your mode of operation from breadboard to PCB that provides a ...
The internet is a dynamic miraculous world that has virtually become the lifeline of the world today. Most aspects of human life are now dependent on technology, which is mostly driven by the internet and the world can become dysfunctional if we subtract the cyberspace from the equation of life. Every single minute million of terabytes worth of data get transferred from every corner of the world to every corner of the world. Despite that, almost every single user gets a smooth and seamless experience without many hurdles. Videos are loaded, and the information is relayed within seconds. Ever wondered how on earth things run so smoothly without networks getting crashed? The internet itself cannot handle the data transfer of this magnitude. At the backend, the real job is carried out by a ne ...