Hello friends, I hope you all are doing great. In today's tutorial, I am going to do an Arduino 74HC165 Interfacing and we will have a look at How to increase Input Pins of Arduino. 74HC165 is a shift register and works on the principal of Parallel In Serial Out. In my previous tutorial Arduino 74HC595 Interfacing: Increase Output Pins, we have seen How to increase the output pins of Arduino and today we are gonna do exact the opposite and we will increase the input pins.
74HC165 will take 8 parallel inputs from different sensors or buttons etc and will send them to serial OUT Pin, which will be connected to Arduino. So, if you are working on a project where you want to get data of 15 or 20 digital sensors then you can use this shift register and ...
Hello friends, I hope you’re all well and healthy. In today’s tutorial, we will be going through a simple, yet effective practice to design a 4-way traffic light simulation in Proteus software. This project is designed for undergrad engineering students with majors in electronics, electrical and mechatronics engineering. It is also useful for people that want to learn the basics of circuit design and Arduino programming.
4-Way Traffic Light Control using Arduino:
Traffic lights are an integral part of the world’s transportation systems. Over the years a number of different algorithms regarding traffic lights have been developed. The algorithm being used at any place for the purpose of controlling traffic takes into account of various factors, such ...
Hey Fellas! I am back to give you a daily dose of useful information. Today, I'll uncover the details on the Introduction to Arduino Due. It is a microcontroller board based on Atmel SAM3X8E, 32-Bit ARM microcontroller. It is developed by Arcuino.cc with the intention to provide an easy pathway for the beginners to get a hands-on experience with the module without any prior technical knowledge. You can just plug the device into the computer through a USB cable and start playing with it right away.
Arduino Modules are a step ahead of a single microcontroller. If your project is mainly based on a microcontroller, you need to buy external peripherals and connect them with the controller in order to lay out an automation into your project. Arduino Bo ...
In today's post we are gonna see how to connect Arduino YUN with Putty and access the files on Linux OS in Arduino YUN. In my last post Getting Started With Arduino YUN, I have explained in detail about basics of Arduino YUN. I am recall few important things here. Arduino YUN is a very powerful board with two processors on it. One is Arduino microcontroller used to control the output / input pins. The other processor is named as Atheros and it has Linus operating system on it, so one can easily run python scripts on it and can do any server or client side coding in it.
So, today we are gonna see ow to access this Linux operating system of Arduino YUN using Putty software in Windows. Putty is a third party software used for accessing serial termina ...
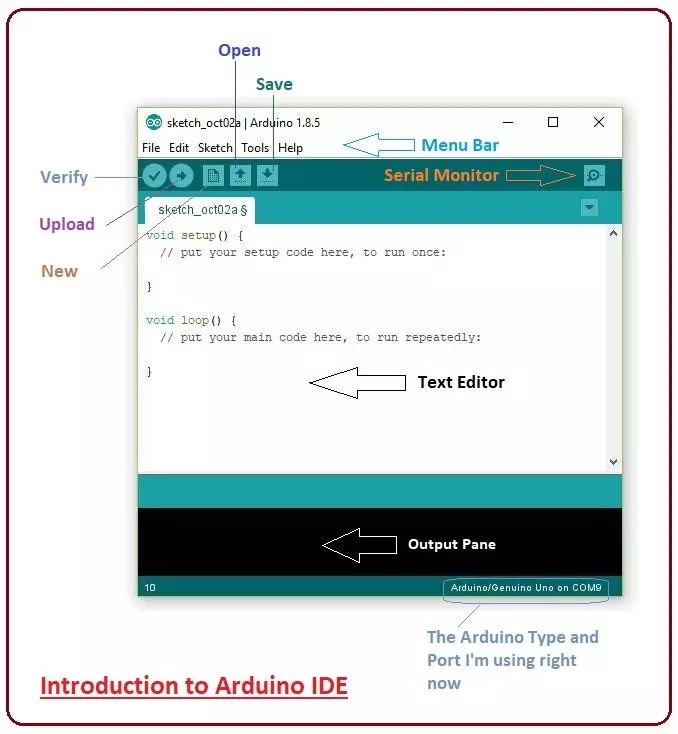
Hey Guys! Hope you are doing well. Today, I'll discuss the detailed Introduction to Arduino IDE, where IDE stands for Integrated Development Environment - An official software introduced by Arduino.cc, that is mainly used for writing, compiling and uploading the code in almost all Arduino modules/boards. Arduino IDE is open-source software and is easily available to download & install from Arduino's Official Site.
In this post, I'll take you through the brief Introduction of the Software, how you can install it, and make it ready for your required Arduino module. Let's dive in and get down to the nitty-gritty of this Software.
Introduction to Arduino IDE
Arduino IDE is an open-source software, designed by Arduino.cc and mainly used for wri ...
Hello everyone! hope you all will be fine. In this article I am going to share the knowledge about displaying Scrolling Text on LCD with Arduino. A Liquid Crystal Display is usually known as LCD in the market. It is a display unit made up of liquid crystal. When we want to made electronics based projects, we need a device on which we can show the system’s output and the desired messages. There are a lot of such devices which are helpful to display the output messages and the most common is a seven segment display.
Alternate good option is LCD, which are now available in different size having different qualities. 16×2 LCD Module is a most frequently used device for the electronic projects out of all the other types of LCD’s available in the marke ...
Hello friends, hope you all are fine and enjoying life. Today's post is about removing a small error named as Recognition Failed in EasyVR, which I encountered while working with EasyVR shield with Arduino UNO. I have posted a complete project on EasyVR shield around a year ago in which I haven't mentioned this error because at that time I didn't encountered it. But today while working with EasyVR shield, I encountered this problem so I thought to share it with you guys.
EasyVR shield is a voice recognition module which is used for recognizing voices and operating accordingly. Using this module, one ca quite easily control anything using voice. In the previous project, I have controlled a robot using voice commands like when I say Forward then it ...
Hi Friends! Hope you’re well today. I welcome you on board. In this post today, I’ll walk you through the Introduction to Arduino Beetle.
Arduino beetle is the smallest Arduino board that comes with the functionality of Arduino Leonardo. This board is a remarkable addition to the minimalistic Arduino technology. It is based on the microcontroller Atmel Atmega32u4.
With the inception of innovations in modern technology, electronic devices are becoming light, more compact that happen to perform a lot of functions. These devices are economical and require little to no prior knowledge to get your hands dirty with them.
All Arduino boards are microcontrollers but not all microcontrollers are Arduino board. While using the Arduino board, you don’t ne ...
Hello friends, I hope you all are doing great. In today's tutorial, we are gonna have a look at detailed Introduction to Atmega32. ATmega32 is eight-bit higher enactment microcontroller, it is manufactured by an Atmel (it is a designer and builder of different semiconductors materials). It is founded on enriched RISC which stands for (Reduced Instruction Set Computing) design which consists of 131 (one thirty-one) potent commands.
Mostly commands implement in one mechanism sequence. The maximum frequency at which it operates sixteen MHz. It delivers a subtle equilibrium among enactment and balance. It is the Pico Power sort of the normal ATmega328 kind which permits it to work below lesser voltage and power necessities, nearly 1.62 volts. In today’s post, we will have a look at its fort ...
Today, we are gonna have a look on How to Interface Ultrasonic Sensor with Arduino. Few days ago, I have posted a complete tutorial on How to Use Ultrasonic Sensor Library in Proteus and later I have posted different examples on How to Simulate Ultrasonic Sensor in Proteus. Those posts were about Proteus Simulations and weren't about hardware interfacing, so I thought today let's interface it in hardware.
Simulation is a good starting point for projects but they are really far away from real world. It happened to me a lot of times that my simulations are working perfectly fine but when I design the same circuit in hardware then it says no I am not gonna work. :) So, the bottom line is never trust simulations, unless you properly test it on hardwar ...