Hey Fellas! Hope you are doing fine. Microcontrollers play an important role in the development of embedded systems. They are used where automation is an integral part of the system. Today, I am going to unlock the details on the Introduction to Atmega16.
It is a 40-pin low power 8-bit microcontroller which is developed using CMOS technology and based on AVR architecture. This is the most commonly used AVR microcontroller which belongs to Atmel Mega family.
You must have a look at microcontroller called Atmega328 that also belongs to the mega family.
Other microcontrollers that are readily available and fall under AVR category are Atmega 8 and Atmega 32. All these controllers perform similar tasks, however, they are only different in terms of ...
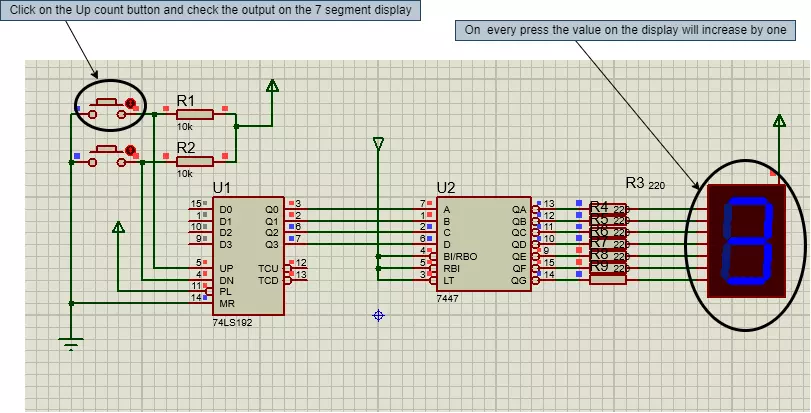
Hello geeks, welcome to our new project. In this project, we are going to make a very interesting project. I think most of us have seen the scoreboards in sports, after looking at that, have you ever wondered about the working of it. Therefore, this time, we will be making something like that only with some extra features. So basically that score board is nothing but a counter which counts the scores. Most of the geeks who have an electronics background or have ever studied digital electronics must have heard about the counter.
Here, in this project, we are going to make an Up-Down counter. A simple counter counts in increasing or decreasing order but the Up-Down counter counts in increasing and decreasing order, both depending upon the input it h ...
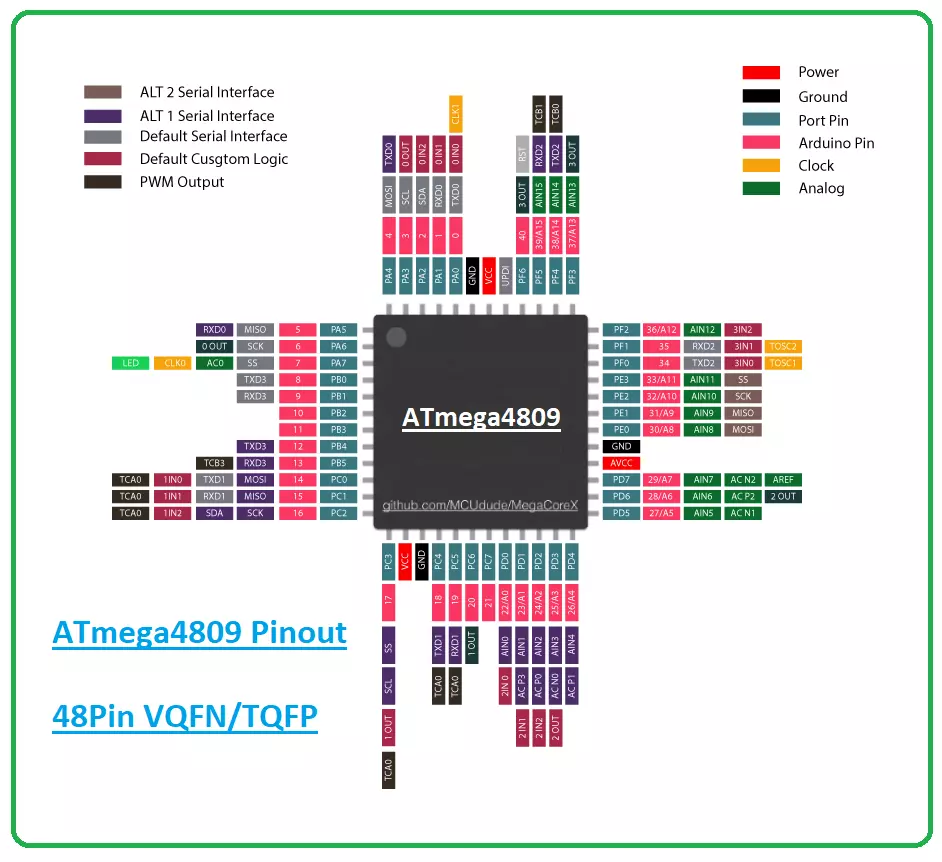
Hi Guys! I welcome you on board. Happy to see you around. In this post today, I’ll walk you through the Introduction to ATmega4809.
The ATmega4809 is a type of microcontroller that belongs to the megaAVR® 0-series. It features an AVR® processor with a clock speed running at up to 20 MHz. It comes with a Flash memory size up to 48 KB, 256 bytes of EEPROM, and 6 KB of SRAM. It is available in 28-, 32-, 40-, or 48-pin packages.
I suggest you buckle up as I’ll detail the complete Introduction to ATmega4809 covering datasheet, pinout, features, power ratings, and applications.
Let’s get started.
Introduction to ATmega4809
The ATmega4809 microcontroller belongs to the megaAVR® 0-series that contains an AVR processor.
The series carries low power ...
Hello everyone! I hope you all will be absolutely fine and having fun. Today, we will have a look at the DHT11 Arduino Interfacing. DHT11 is an embedded sensor, used to measure both temperature and humidity of the surroundings. It is made up of two different parts i.e. capacitive humidity sensor and a thermistor. DHT11 is a slow sensor but is quite efficient for the applications where we need to do some basic analog data exchange. There is a small chip inside this sensor which performs the function of analog to digital to analog conversion and gives the results for temperature as well as for humidity in digital form. This digital signal can be read easily through any micro-controller.
LM335 is another temperature sensor and to understand today's p ...
Hello friends, hope you all are fine and having fun with your lives. Today I am going to share a problem and also its solution with you guys. A few days ago, I bought new NRF24L01 modules as they were needed for a project. So, today when I started working on them, I encountered a very strange problem. When I interfaced my NRF24L01 with Arduino and uploaded the transmitting and receving codes in them, I couldn't get anything on my serial terminal as I explained in my previous post Interfacing of NRF24L01 with Arduino. That was quite strange for me as I have worked on this module many times and it never troubled me before. So I keep on working on it but no luck. I even changed my RF modules as I thought may be they are faulty modules but still no lu ...
Hello geeks, Welcome to our new project. As most readers have already seen the coffee vending machine or maybe you are drinking coffee while reading this article and if you are a tinker or a geek, it must have come to your mind how to make a coffee vending machine on your own. In today's tutorial, we are going to learn how to make a Smart Coffee Vending Machine using Arduino with Proteus Simulation for the same.
We can use this project for an engineering project’s showcase for electronics, electrical engineering students, and can be used in offices as well.
Coffee is the second most popular drink in the world and it is one of the oldest beverages of the world. According to Wikipedia, more than 2 billion cups of coffee are consumed every day in the ...
Hello friends, hope you all are fine and having fun with life. Today, I am going to share DC Motor Direction Control with Arduino. I have designed a complete simulation in Proteus, which will help you in understanding the controlling of DC motor. I would recommend you to first read How to Control relay in Proteus ISIS which will help you in understanding the functionality of relays because in today's tutorial, I have used relays to do the DC Motor Direction Control. I have already posted a tutorial on DC Motor Drive Circuit in Proteus ISIS.
So, for DC Motor Direction Control, I have used Arduino UNO baord, so you should also download this Arduino Library for Proteus so that you can use Arduino boards in Proteus software. I have also provide the si ...
In today’s post, as the name suggests, we will see how to get data from online webserver using Arduino Wifi in simple steps. Getting data from web server using Arduino Wifi Shield has always remained a problem for the engineers. Its not much difficult task as its usually considered to be. In today’s post, I will create a small project in which I will control two simple LEDs via online web server. It’s really a very interesting project and when I completed it, I felt like Hurrah!!!
Arduino Wifi Shield is used to connect Arduino board with Wifi. After connectivity with Wifi, one can perform many tasks using this shield. We can built a complete server on it and can also use it as a client. Server designed on an Arduino Wifi Shield are usually quite si ...
Hello geeks, welcome to our new project. We are going to make an important project which will be very useful for us in our daily life which is a variable DC power supply. As engineers who work with electronics need different voltage ranges of DC power supply for different electronic projects and components. It becomes very clumsy and hard to manage different power supplies because of wires which are connected to it and each power supply consumes an extra power socket as well.
So in this project, we will overcome this issue and learn to make an adjustable DC power supply, in which we will get a wide range of voltages.
Software to install
We will make this project in the simulation, as it is a good practice to make any project in the simulation fir ...
Hi Friends! Hope you’re well today. I welcome you on board. In this post today, I’ll walk you through the Introduction to Arduino Beetle.
Arduino beetle is the smallest Arduino board that comes with the functionality of Arduino Leonardo. This board is a remarkable addition to the minimalistic Arduino technology. It is based on the microcontroller Atmel Atmega32u4.
With the inception of innovations in modern technology, electronic devices are becoming light, more compact that happen to perform a lot of functions. These devices are economical and require little to no prior knowledge to get your hands dirty with them.
All Arduino boards are microcontrollers but not all microcontrollers are Arduino board. While using the Arduino board, you don’t ne ...