Hello everyone! I hope you all will be absolutely fine and having fun. Today, I am going to share my knowledge with all of you guys about DC Current Sensor ACS712 Arduino Interfacing. First of all, I would like to tell you about importance of current sensing/measuring. Sensing the amount of current passing through any circuit can be useful in a lot of applications. For example, in low power consuming equipment, current sensing will be helpful to understand the system's impact on its battery life. The current sensing can also be used to make the decisions regarding safety in over current protection circuits.
Simply, we can say that sensing and controlling the flow of the current through the circuits is now a fundamental requirement e.g. over curr ...
In today’s post, as the name suggests, we will see how to get data from online webserver using Arduino Wifi in simple steps. Getting data from web server using Arduino Wifi Shield has always remained a problem for the engineers. Its not much difficult task as its usually considered to be. In today’s post, I will create a small project in which I will control two simple LEDs via online web server. It’s really a very interesting project and when I completed it, I felt like Hurrah!!!
Arduino Wifi Shield is used to connect Arduino board with Wifi. After connectivity with Wifi, one can perform many tasks using this shield. We can built a complete server on it and can also use it as a client. Server designed on an Arduino Wifi Shield are usually quite si ...
In the previous post we have seen the project description of Voice Recognition Project using EasyVR shield. Today we will have a look at Getting started with EasyVR commander. EasyVR shield is a module which is used for voice recognition. First of all, we save our commands in the EasyVR shield and then we use these commands to control anything. In this project, I need to control the robot with voice commands like when someone says FORWARD then the robot start moving in forward direction.
Now first of all what I need to do is to save this FORWARD voice in the shield, which we will see today how to save the command in the shield and after that I will show you the Interfacing of EasyVR shield with Arduino UNO. So that when I say Forward the motor sta ...
Hello everyone, in today's post we are gonna have a look at how to interface temperature sensor Dallas 18B20 with Arduino. There are many temperature sensors available in market like LM35, DHT11 etc but personally I like Dallas18B20 most of all, as it gives the most accurate result up to four decimal points. It operates on single wire and sends all data through this wire. Another advantage of this wire is you can interface multiple sensors with a single data line. You should also have a look at How to use 18B20 in Proteus ISIS.
In today's post, we are gonna get value from this sensor and then print it over the Serial Terminal as well as LCD. We will get the values in degree centigrade. Its not much difficult to interface 18B20 with arduino and als ...
Hello friends, I hope you all are fine and having fun with your lives. In today's post we are gonna see Interfacing of EasyVR with Arduino UNO. In the previous post, we have seen Getting Started with EasyVR Commander. It was quite simple and if you follow the steps carefully you wont stuck anywhere but still if you into some trouble i am here.
Now this tutorial is quite a quick and important one as it contains the real code using which we will control our robot. After adding the voice commands, now close the EasyVR Commander and open the Arduino Software. Connect the arduino board with computer and double check that your jumper J12 in on position SW. You should also read Training Error: Recognition Failed in EasyVR, if you got such error while ...
Hello everyone! I hope you all will be fine and having fun. Today I am going to tell you that how can you make a simple program for Interfacing Flame Sensor with Arduino. Flame sensor is used in offices, home and at different places to detect the fire. First of all I would like to tell you about the working principle of the flame sensor. Flame sensor is a device designed for the detection of the fire and to respond it. They are usually designed for the detection of most frequently used industrial fuel e.g. diesel, gasoline, karosene, ethylene, hydrogen etc. They are designed in way to distinguish between the radiations from the sunlight and the actual flames.
There different types of flame sensors e.g. Ultraviolet (UV) detectors, Infrared (IR) f ...
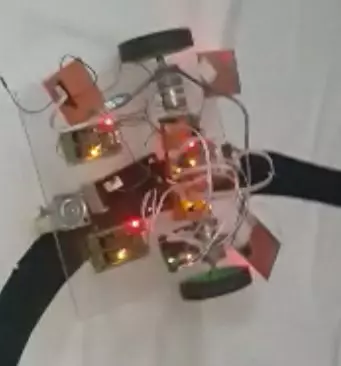
Hello everyone, I hope you all are fine and having fun with your lives. Today, I am going to share a very basic project named as Line Following Robot using Arduino. I have designed a three wheeler robot and have placed IR sensors beneath it to detect the black line and then I have made it move over this Black Line.
This Line Following Robot is not doing any extra feature i.e. turning or rotating back. It will just simply move in the straight line. I have also posted a short video at the botton of this tutorials which will give you better idea of how this robot moves. You should first read this tutorial and design the basic robot and once you are successful in designing the basic Line Following Robot then you should have a look at my recent Project ...
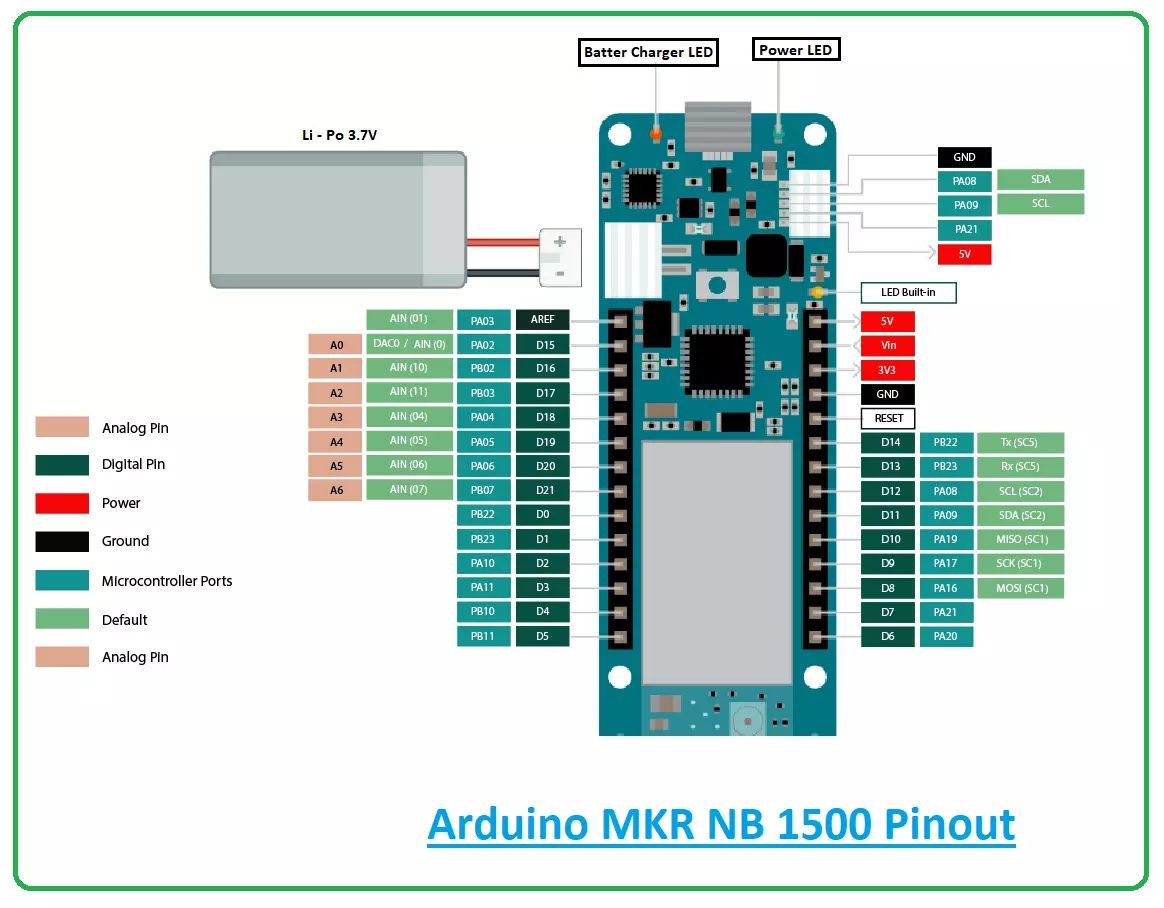
Hi Guys! Hope you’re well today. Happy to see you around. In this post today, I’ll walk you through the Introduction to Arduino MKR NB 1500.
The Arduino MKR NB 1500 is mainly developed for working in remote areas where no power or internet connection is available. This board is based on a SAMD21 Cortex-M0+ 32bit low power microcontroller and comes with an operating voltage of 3.3V.
Admit it.
The Arduino board is a remarkable addition to the development of many automation and embedded projects. These boards are incorporated with a series of digital and analog pins that can be connected with the expansion boards or other breadboards.
Most of the Arduino boards are integrated with 8-bit Atmel AVR microcontrollers. And all these boards incorporate ...
Hey Fellas! I am back to give you a daily dose of useful information. Today, I'll uncover the details on the Introduction to Arduino Due. It is a microcontroller board based on Atmel SAM3X8E, 32-Bit ARM microcontroller. It is developed by Arcuino.cc with the intention to provide an easy pathway for the beginners to get a hands-on experience with the module without any prior technical knowledge. You can just plug the device into the computer through a USB cable and start playing with it right away.
Arduino Modules are a step ahead of a single microcontroller. If your project is mainly based on a microcontroller, you need to buy external peripherals and connect them with the controller in order to lay out an automation into your project. Arduino Bo ...
In today's post we are gonna have a look at How to Train Pixy Camera with Computer. We have yet posted three tutorials in the Pixy Camera series. In the first tutorial, we have seen How to Get Started with Pixy Camera in which we have studied the basics of Pixy Camera. After that that we have seen the Installation of Pixy Camera Software which is named as PixyMon and in the third tutorial we have covered How to Upload the Latest Firmware in Pixy Camera because its always the best strategy to deal with latest tools. So until now we have configured our Pixy Camera in all possible ways now the next thing is to train our Pixy Camera with Computer using PixyMon software.
Let's first discuss How the Pixy Camera works. Pixy Camera has on board NXP microc ...