Hi Friends! Hope you’re well today. Today, I am going to share the Proteus Library of Current Sensor WCS1600. This sensor is not available in the Proteus Components Library and we’re sharing it for the first time. The Current Sensor WCS1600 is used to measure the current flowing through the circuit and is used in embedded systems and robotics projects. If you are new to this sensor, you must first design its simulation before playing with the hardware.
Before we move further, let’s have a brief overview of WCS1600 Current Sensor:What is WCS1600 Current Sensor?
WCS1600 comes with a drift linear hall sensor IC which gives precise and accurate values. The hall sensor IC is 9.0 mm in diameter through the hole and is incorporated with a temperature compensation circuit. To measure the p ...
Hello Learner! I hope you are doing great. Welcome to another tutorial at The Engineering Projects. This blog is the part of series we have stated about the Digital Logic Circuits. Previous to this, we learned Implementation of SK Flip Flops in Proteus. at the present day, we'll seek the knowledge about the following points:
What are Flip Flops?
What are JK Flip Flops?
How can we record the Truth Table of JK Flip Flops?
What is the Procedure to Construct the circuit of JK Flip Flop through Logic Gates and IC circuit?
Moreover, we'll also have some useful bits of Information in Did you know Sections. Let' see the explanation of the concepts given above.
Flip Flops
The Flip Flops are the building blocks of many of the Electronic Circuits. ...
Hello friends, I hope you all are fine and having fun with your lives. In today's tutorial, I am going to share a new Flame Sensor Library for Proteus. This Flame Sensor is not available in Proteus and its library is not yet developed anywhere. We are the first ones designing this new Flame Sensor Library for the first time. I am quite excited while sharing it as it's our team efforts that we are able to design new Proteus Libraries which are helpful for students.
We are planning to share more sensor libraries this week. I hope you guys are going to enjoy them and share them with your friends so that they can also know about them. Other bloggers are warmly welcome to share this library on their blogs but do mention our blog link in it as a favor. ...
Hello friends, today I am going to post the next lecture of Proteus Tutorial. I am receiving quite a positive response about this Proteus tutorial. In the previous post, we have seen How to use Virtual Terminal in Proteus and today I am going to explain How to use Oscilloscope in Proteus ISIS. This oscilloscope is just the same which you have seen in your electronic or electrical labs. Oscilloscope is basically used to monitor signals or waveforms. Particularly when you are not much aware of the circuit and you need a little debugging then you use oscilloscope.
In oscilloscopes, we can visualize the electrical properties of waveforms, like we can check whats the frequency of electrical signal, what's its voltage or current. Digital oscillosco ...
Hello Learners! Welcome to The Engineering Projects. In the previous tutorial, we discussed the first universal gate i.e. NOR Gate and simulated it in Proteus. Today, we are going to focus on the second universal gate i.e. NAND Gate. We will also derive basic logic gates from the NAND gate, to prove its universality.
Today, we'll seek the answers to the following questions:
What is a NAND Gate?What is a Universal Gate?
NAND as a Universal Gate.
NAND Gate as Universal Gate in Proteus ISIS.
Let's get started:
What is a NAND Gate?
A NAND Gate is designed by inverting the output of AND Gate and thus it gives a LOW output when all of its inputs are HIGH, otherwise, it's HGIH.In order to design a NAND gate, simply place a NOT gate in ...
Hi readers! I hope you are having a creative day. Today, I am sharing the list of the top embedded proteus libraries in V1.0 especially designed for engineering students. Till now, you have seen blogs on different projects, components, libraries, and simulations. Yet, I am sharing the list of the first versions of these embedded libraries that will help the students throughout multiple projects. These libraries are highly useful in multiple domains of engineering, and if you don’t know how to download the new libraries
, then you must see the link provided.
This is the list of all new proteus libraries for engineering students
. The zip files are present in the link to the related manual, which has details on how to download, install, and use these libraries. Now, let’s start learning ...
Hello Everyone! Happy to see you here. I welcome you on board. In this tutorial, I’ll walk you through the Water Sensor Library for Proteus. You won't find this library in the proteus software, and we are introducing it for the very first time. It will help you to better understand the working/ operation of the water sensor.
If you want a proteus library of any sensor, that is not available in proteus already, you can share it in the comments below, I’ll try my best to create and share that library asap.
Before I go further, it’s better to scratch and get a hold of what is a water sensor? A water sensor is an electronic sensor, used to detect the presence of water. It detects the water by measuring the water's electrical conductivity. These sen ...
Hello friends, hope you all are fine and having fun with your lives. Today's post is about How to increase Workspace in Proteus. It's our 3rd tutorial in Proteus series. Its quite a simple tutorial and along with this trick, I will also share few commonly used features or Proteus. Once, I was working on a simulation project in which I have to design a complete load management system in Proteus and it was quite messy as I have to include a lot of components and the area of Proteus got quite small for that and then I encountered this problem i.e. where to place the components.
You have seen in Proteus software that there's a blue rectangle which is considered as the workspace in Proteus. This area is constant and doesn't increase or decrease on its ...
Hello friends, today's the last post of this Proteus tutorial. I have tried my best to explain everything but knowledge is limitless so explore this software, play with it and you will know many new things. Today's topic is about the PCB designing in Proteus. When you install Proteus, you have seen that along with ISIS there's also another package named as Proteus ARES. This Proteus ARES is used for PCB designing. You should also check the Arduino UNO PCB Design for Proteus ARES.
In order to design the PCB in Proteus ARES, first you need to make the circuit of that PCB in Proteus ISIS. You can also make PCB directly but I recommend that use Proteus ISIS first, its quite the easy approach as you don't need to do anything in it and the software in ...
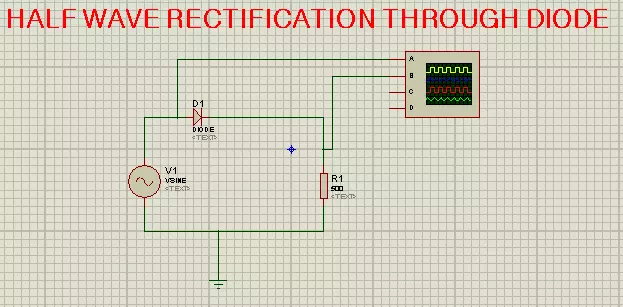
Hello friends, I hope you all are doing great. In today's tutorial, I will show you how to perform Simplest Half Wave Rectification in Proteus. In this tutorial, we will design a simple Proteus simulation, where we will use a diode for half-wave rectification.
Before designing the Proteus simulation, we will first have a theoretical overview of Half Wave Rectification as it's always the best approach to read theory before practical (Proteus Simulation). So, let's get started:
What is Rectification ???
Rectification is an electrical process, used to convert Alternating(AC) Voltage into Direct(DC) Voltage using a circuit called rectifier.
The Rectification process is always carried out using diodes, as we know diodes allow the current to flow in one direction only, thus t ...