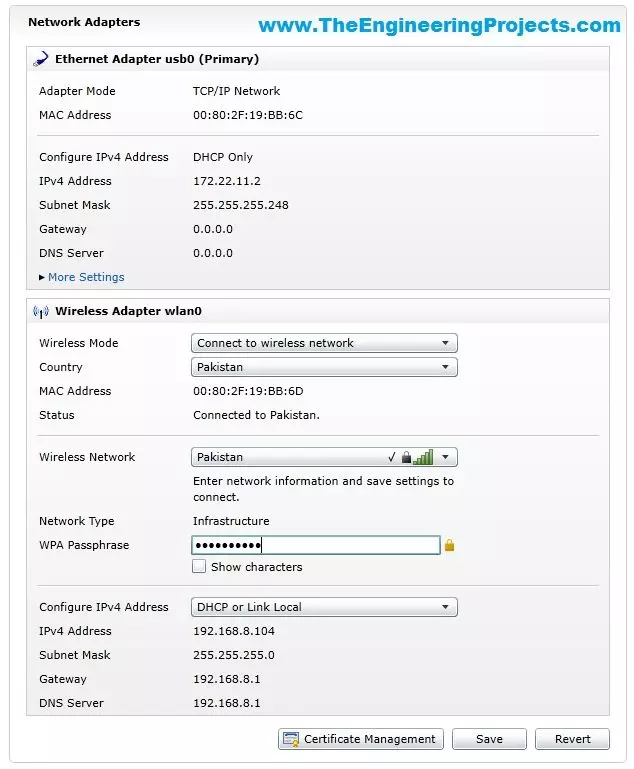
Hello Friends, hope you all are fine and having fun. In today tutorial i am going to elaborate How to Automatically Connect with Wifi SSID using Arduino YUN. If you recall one of my previous tutorials named Getting started with Arduino YUN , in which i gave a brief introduction about Arduino YUN, its working and features. In that tutorial, I have explained How to connect Arduino YUN with Wifi manually. A little problem encounters while connecting Arduino manually to available wifi networks that if wifi connection drops then, then Arduino will also disconnect automatically and if wifi connection is energized again, it will still remain disconnected unless you reconnect it by yourself. This thing has very serious drawbacks in industrial projects, wh ...
Hello friends, hope you all are fine and enjoying good health. Today I am posting the next part of Proteus tutorial which is Interfacing of LCD with PIC Microcontroller. . In the previous post of this tutorial, we have seen the basics of Proteus and discussed various functions of Proteus ISIS. If you are new to Proteus then I would recommend that before starting this tutorial, you should first read the first part so that you get the better idea of Proteus as I wont go in detail in today's post. Today, we will first design a circuit of LCD with PIC on Proteus ISIS which includes PIC Microcontroller and then we will see how to burn the microcontroller in Proteus and at the end we will run our circuit and will display some text on the LCD. It will ...
Buy This Project
Hello friends, I hope you all are fine and enjoying. Today i am going to share a new project which is Fault Detection of Gas Turbine in MATLAB. In this project, i will try to elaborate that, What is a Gas Turbine? What are the operating parameters of a Gas Turbine? Mostly what type of Faults and Vibrations comes in Gas Turbine system during its operation? Gas Turbine is also called a Combustion Turbine. It has Four Basic components which includes Compressor, Combustion Chamber, Turbine and Alternator.
Generally compressor is installed upstream and the Rotating turbine is connected downstream and the Combustion Chamber is connected in between both of them and at the end of line we have Alternator which is also connected on the sa ...
Hello friends, hope you all are fine and having fun with your lives. Today, I am going to share a new project which is Motion Detection in MATLAB. In this project, I am gonna detect the motion in MATLAB. This project was designed for security purposes and the condition was to use MATLAB instead of PIR Sensor. We all know that PIR sensor is used for motion detection but for that we have to design a hardware but using this software we can easily detect any motion using MATLAB.
In this project, I have used the webcam and then applied a simple image processing algorithm, designed in MATLAB. Using this algorithm I have detected the motion in the environment. That's a quite simple project and you are gonna like this one. The code and complete simulation ...
Hi Friends! Hope you are doing well. I am back to give you a daily dose of useful information so you can excel and improve as per your technical needs and requirements. Today, I'll uncover the details on the Introduction to ATmega8. It is an 8-bit AVR microcontroller that is based on RISC CMOS technology and comes with a 28-pin interface for the PDIP package. The Program memory is 8K Flash while RAM and EEPROM are 1K and 512 bytes respectively.
Microchip has been the main source for producing PIC and AVR microcontrollers that are mainly used in embedded and industrial automation systems. These modules can perform a number of functions on a tiny chip, preventing you from spending too much and purchasing external components for laying out automation ...
Hey Fellas! Hope you are doing fine. Microcontrollers play an important role in the development of embedded systems. They are used where automation is an integral part of the system. Today, I am going to unlock the details on the Introduction to Atmega16.
It is a 40-pin low power 8-bit microcontroller which is developed using CMOS technology and based on AVR architecture. This is the most commonly used AVR microcontroller which belongs to Atmel Mega family.
You must have a look at microcontroller called Atmega328 that also belongs to the mega family.
Other microcontrollers that are readily available and fall under AVR category are Atmega 8 and Atmega 32. All these controllers perform similar tasks, however, they are only different in terms of ...
Hello friends, hope you all are fine and having fun with your lives. In today's tutorial, I am gonna show you How to Configure NI MyRio on Wifi. In our previous tutorial, Getting Started with NI MyRio I have show you how to get started with NI MyRio and control LEDs of NI MyRio but you have seen that we have done that over USB. In simple words, we have controlled the LEDs and gyroscope of MyRio over USB but in today's tutorial, first of all, we are gonna configure NI MyRio on Wifi and then we are gonna control all those things over Wifi instead of USB.
If you have a project on MyRio then its my recommendation to use Wifi instead of USB for upload and testing your codes because Wifi is quite flexible in use and you no more restricted to use the USB ...
Hi Everyone! Glad to have you on board. Today, I am going to share a new version of Arduino Mega 1280 Library for Proteus V2.0. I have already shared its previous version i.e. Arduino Mega 1280 Proteus LibraryV(1.0). I have recevied many bug reportings from engineering students(for previous version), so I have tried to improve its performance in this newer version, but still if you find any bug/error, use the comments section.
We have already shared numerous Proteus Libraries of Embedded sensors and these days, we are in the the process of upgrading their versions.
First, we will download Proteus library zip file and then will add it in our Proteus software to simulate Arduino Mega 1280. Before moving further, first we’ll learn what is Arduino M ...
Hello friends, hope you all are fine and having fun with your lives. Today, I am going to share a simple tutorial on Image zooming with bilinear Interpolation in MATLAB. We have seen many software in which there's an option of zooming an image. For example, if you have used paint or photoshop then you have seen that you can zoom your image quite easily by clicking a button. Today's we are gonna do the same thing but in MATLAB and we will have a look at the code behind this feature.
Now, when we are zooming some image then in fact we are increasing the pixels of that image and in order to do that we have to fill those extra pixels with the color of their neighbor pixel. This thing is know as interpolation. There are many different techniques for in ...
Hello Learners, Welcome to another useful tutorial at The Engineering Projects. In the world of electronics and circuits, many useful devices are designed that can minimize the requirement of large and complex circuits. At the Present time, we are working at such a device works very near to the base of many circuits i.e, IRFZ44N MOSFET. We'll approach to the answers of following Questions:
What is IRFZ44N MOSFET?
How is the Structure of IRFZ44N MOSFET?
What is the working mechanism for the IRFZ44N MOSFET?
How can we find the characteristics of IRFZ44N MOSFET in Proteus ISIS?
You will have some important chunks of information about the topic in DID YOU KNOW sections.
What is IRFZ44N MOSFET
As you can see, MOSFET is a acronym of Metal Oxid ...