Hello friends, I hope you all are doing great. In today's tutorial, we will have a look at How to Create a Registration Form in ASP.NET Core. It's our 13th tutorial in ASP.NET Core series. In our previous lecture, we have seen How to use Tag Helpers in ASP.NET Core and have also discussed link, image & environment Tag Helpers.
Today, we will have a look at Form Tag Helpers and with their help we will design a simple Registration Form in ASP.NET Core. It will be a quite lengthy tutorial so if you got into any trouble, then ask in comments. So, let's create our Registration Form:
Create a Registration Form in ASP.NET Core
Let's create a new action method named Registration, in our Home Controller clas ...
Hello everyone, hope you all are fine and having fun with your lives. In today's post, I am going to share How to generate PWM in 8051 Microcontroller. PWM is an abbreviation of Pulse Width Modulation and is used in many engineering projects. It is used in those engineering projects where you want an analog output. For example, you want to control the speed of your DC motor then you need a PWM pulse. Using PWM signal you can move your motor at any speed from 0 to its max speed. Similarly suppose you wanna dim your LED light, again you are gonna use PWM pulse. So, in short, it has numerous uses. If you are working on Arduino then you should read How to use Arduino PWM Pins.
PWM, as the name suggests, is simply a pulse width modulation. We take a pu ...
Hello everyone, hope you all are fine and having fun with your lives. Today, I am going to share 8051 Microcontroller Projects. Recently, I have shared quite a lot of tutorials on 8051 Microcontroller which are not much arranged as a whole. So, today, I thought to arrange all those tutorials and place them here so that you can get all of them quite easily. I will upload more 8051 Microcontroller Projects and I am gonna add their links in this post so stay subscribed to this post if you are interested in learning 8051 Microcontroller.
8051 Microcontroller, as we all know, is another Microcontroller series just like PIC Microcontroller or Arduino etc. The benefit of 8051 Microcontrollers is that they are quite cheap and easily available so if you ar ...
Hello friends, hope you all are fine and having fun with your lives. In today's tutorial, we will see LED Blinking Project Using 8051 Microcontroller. I haven't yet posted any project or tutorial on 8051 Microcontroller. I have posted quite a lot of tutorials on Arduino and PIC Microcontroller, so today I thought of posting tutorials on 8051 Microcontroller. Its my first tutorial on it and I am gonna post quite a lot of tutorials on 8051 Microcontroller in coming week.
So, as its our first tutorial on 8051 Microcontroller that's why its quite a simple one and as we did in Arduino we will first of all have a look at LED Blinking Project Using 8051 Microcontroller. In this project, we will design a basic circuit for 8051 Microcontroller which invol ...
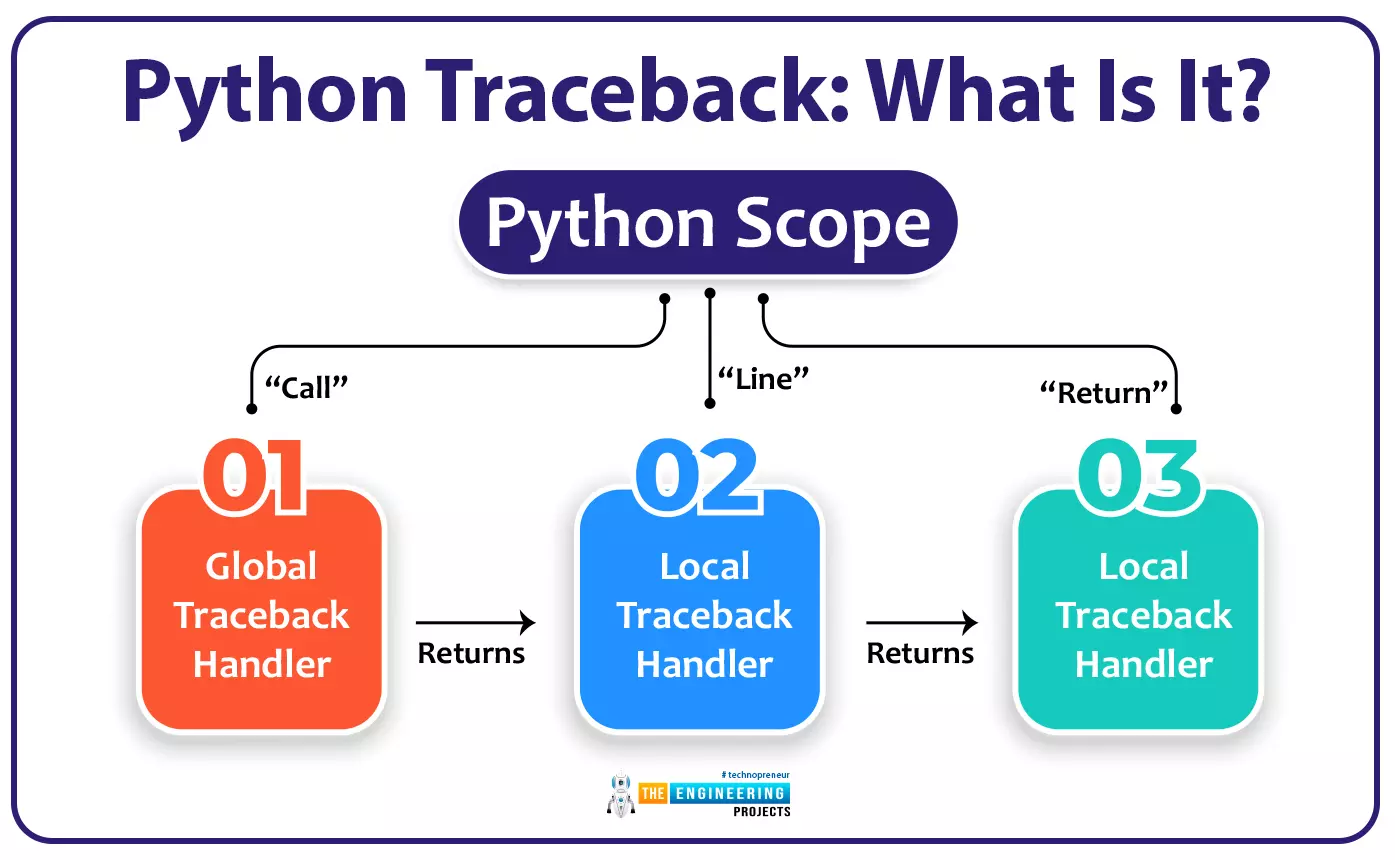
Welcome to the tenth lesson of our python course. In the previous tutorial, you learned about syntax errors in Python, and in this lesson, we will look at one more error notice that is given by Python when there is an error in your code. So, without further ado, let's get started.
Any time an exception is thrown in your code, Python shows you the stack trace. If you don't know what the traceback output is showing you, it can be a little overwhelming. Python's traceback, on the other hand, provides a goldmine of information that can assist you in figuring out why an exception was triggered in your code and fix it. It's essential to learn how to use Python traceback to become a better coder.
After completi ...
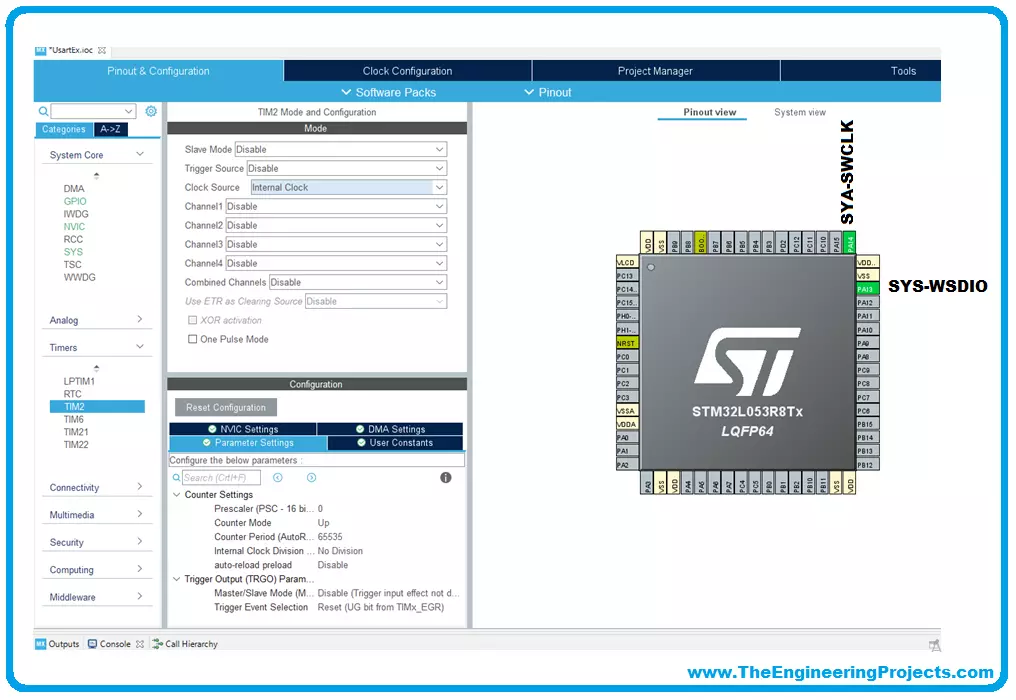
We will use for our examples STM32CubeIDE released by ST and completely free. STM32CubeIDE is a development tool and supports multi operative system (SO), which is part of the STM32Cube software ecosystem. STM32CubeIDE allows using a single platform to configure peripherals, to generate/compile/debug the code for STM32 microcontrollers and microprocessors. The framework used is Eclipse®/CDT, as tool-chain for the development is used GCC toolchain and GDB for the debugging.
To start the project, you must first select the MCU and then initialize and configure the peripherals the user wants to use. At this point, the initialization code is generated. At any time, the user can go back and change initializations and configurations, without affecting t ...
Hello friends, hope you are having fun. In today's post, we will have a look at Serial Communication with 8051 Microcontroller in Proteus ISIS. In the previous post, we have seen a detailed post on LED Blinking Project using 8051 Microcontroller in Proteus ISIS, which was quite a simple tutorial. And I hope if you are new to 8051 Microcontroller then from that post you must have got some idea about C Programming of 8051 Microcontroller.
Now, today we are gonna go a little further and will have a look at Serial Communication with 8051 Microcontroller and we will also design the simulation of this project in Proteus ISIS software. 8051 Microcontroller also supports Serial port similar to Arduino and PIC Microcontroller. And the communication protoco ...
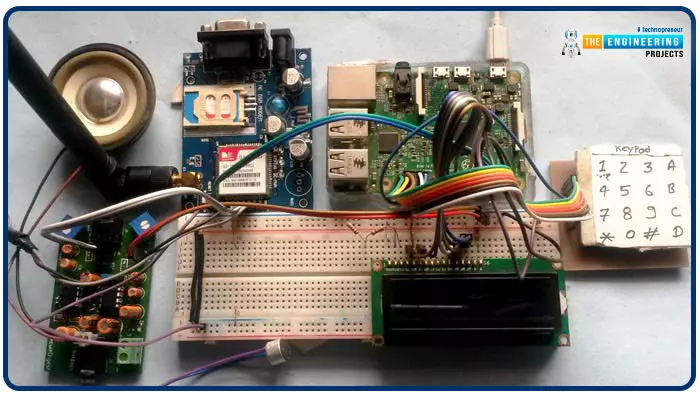
Greetings, and welcome to another tutorial in our series on the raspberry pi 4 Python programming. The previous guide covered the basics of transmitting data over the radio using the nrf24l01 chip in Pi 4. We also learned about interfacing Arduino and raspberry pi 4 and sending radio signals between the two devices. However, this tutorial will walk you through building a Raspberry Pi-based mobile phone with a microphone and speaker for making and receiving calls and reading text messages (SMS). This Project also serves as a proper GSM Module for the Raspberry Pi interface, with all the necessary Code to run the most fundamental features of any modern smartphone. First, we will understand what gsm is, its architecture and how it works, then we will learn how to program it in our pi 4; there ...
Introduction
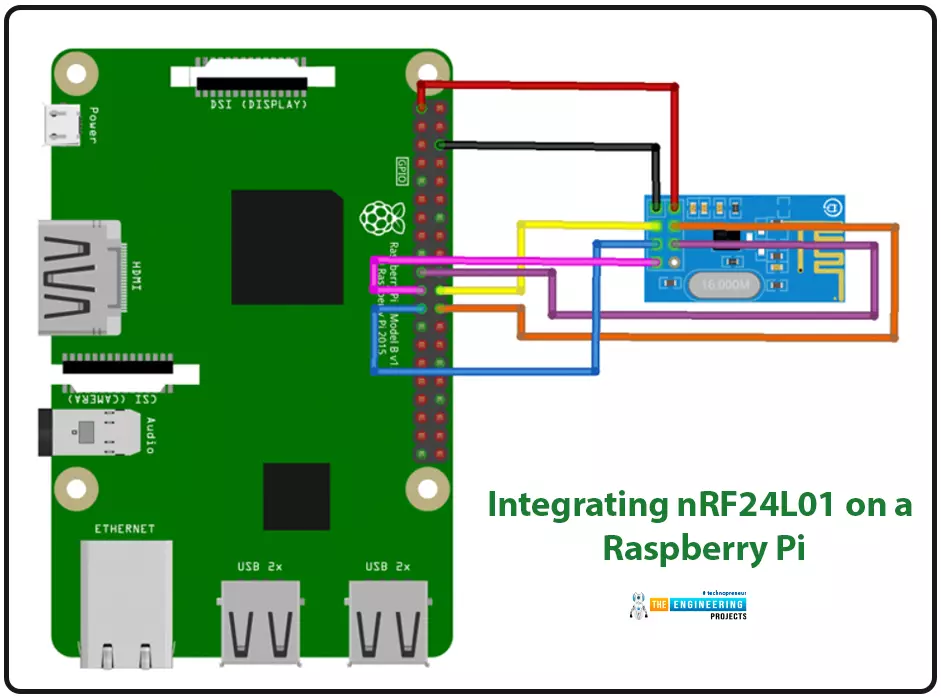
We're glad you could join us for another lesson in our series on programming for the Raspberry Pi 4. The previous chapter covered how to interface the USB barcode scanner with raspberry pi 4. We looked at different types of barcodes and what each stripe represents as well as the different types of barcode scanners available today. We also built a python program for the intelligent shopping cart and now our familiarity with barcodes and scanners and how they function has significantly increased. The benefits and drawbacks of its use were also discussed, but what we're interested in for this article is the transmission of radio frequency signals using the nrf24l01 Module in a raspberry pi 4.
Components
nRF24L01 RF module
Raspberry pi 4
Arduino Uno
Jumper wires
Power suppl ...
Hello friends, hope you all are fine and having fun with your lives. In today's post, I am going to share Interrupt based Digital clock with 8051 Microcontroller. In the previous post, I have explained in detail How to use Timer Interrupt in 8051 Microcontroller. We have seen in that post that we can use two timers in 8051 Microcontroller which are Timer0 and Timer1. Using these timers we can easily generate interrupts. So, before going into details of this post, you must read that timer post as I am gonna use these timer interrupts in today's post.
After reading this post, you will also get the skilled hand on timer interrupt and can understand them more easily. In today's post, I am gonna design a digital clock which will increment after every o ...