Hi Guys! Hope you all are doing great! We always feel happy when you come back again and again for useful information so you can excel and grow in your relevant field. Today, I am going to unlock the details on the Introduction to 2n2219. It is an NPN (negative-positive-negative) bipolar junction transistor (BJT) which is specially designed for a small signal general purpose and switching applications. It contains P doped semiconductor that lies between the two layers of N doped material.
You can also check an Introduction to 2n2905 which is a complementary PNP transistor of this NPN transistor.
I'll try to cover every aspect related to this transistor so you don't need to go anywhere and you find all information in one place. Let's dive in and ...
Hello everyone! I hope you all will be absolutely fine and having fun. Today, I am going to explain you about Introduction to LM386. Its a power amplifier specially designed for low voltage consuming applications. The gain of LM 386 is set around 20 internally. But the gain could be increased due to the insertion of external resistor and capacitor between the pin number 1 and 8. The gain could increase to any value from 20 to 200.
The LM-386 inputs are ground referenced. The output are biased to the half of the input voltage levels automatically. When LM 386 operates on 6V, its quiescent power drain is around 24mW. This property of LM-386 makes it ideal for the battery operation. Its major features include battery operation, minimum external p ...
Hello friends, I hope you’re all well and healthy. In today’s tutorial, we will be going through a simple, yet effective practice to design a 4-way traffic light simulation in Proteus software. This project is designed for undergrad engineering students with majors in electronics, electrical and mechatronics engineering. It is also useful for people that want to learn the basics of circuit design and Arduino programming.
4-Way Traffic Light Control using Arduino:
Traffic lights are an integral part of the world’s transportation systems. Over the years a number of different algorithms regarding traffic lights have been developed. The algorithm being used at any place for the purpose of controlling traffic takes into account of various factors, such ...
Hi Guys! Hope you’re well today. I welcome you on board. In this post, I’ll walk you through How a Hobbyist Can Work on Electronic Projects in America.
Working on electronic projects is a bit inundating.
From selecting the topic to research work and development to execution, you need to hustle, grind and drill to keep your final product up and running.
When you are new to the electronic field, you must not be afraid to get your hands dirty in diving deep into the nitty-gritty of the project. This means that no matter what kind of technical project you pick, you need to spend a significant amount of your time and money to reach your final goal. It's not just about making sure that whatever it is you're looking for is done well—it's also about making sure that your project is done ri ...
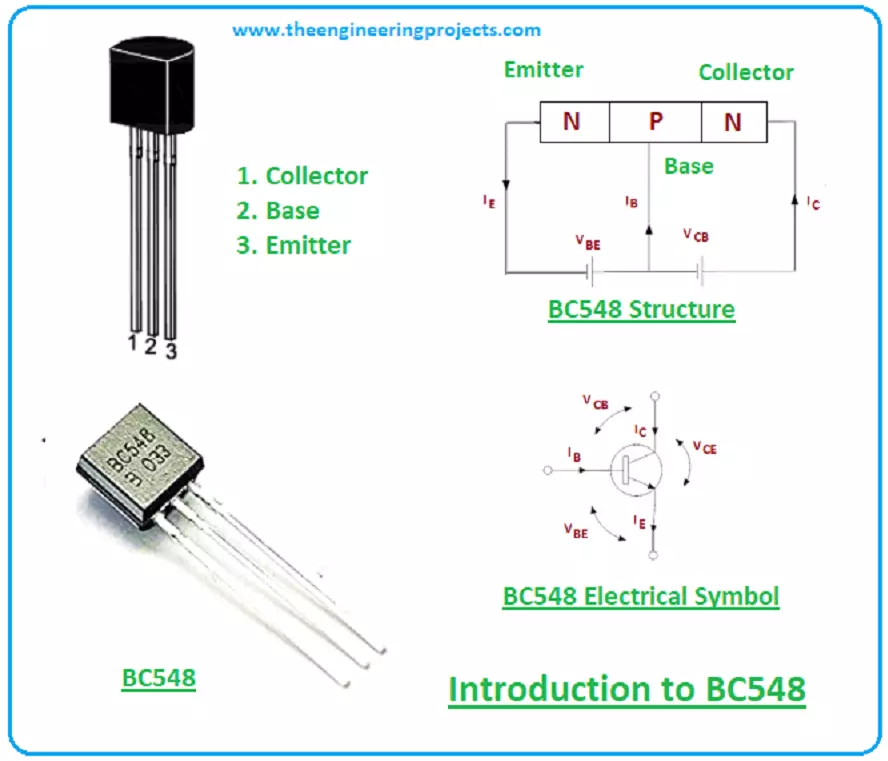
Hi Friends! Glad to see you here. I hope you’re well today. In this post, I’ll walk you through the Introduction to BC548. BC548 is a general-purpose transistor that falls under the family of NPN transistors. It carries three pins that are mainly used for external connection with the circuit. The small current at one terminal is used to control the large current at other terminals. Moreover, it can drive loads under 500mA and is available in TO – 92 package.
I suggest you read this post all the way through as you’ll get to know all nuts and bolts of BC548 transistor i.e. pinout, working principle, power ratings, applications, and physical dimensions. Let’s jump right in.
Introduction to BC548
BC548 is an NPN general-purpose transistor, comes w ...
Hi Friends! Hope you’re well today. Thank you for clicking this read. In this post today, I’ll walk you through the Introduction to BD135.
BD135 is a general-purpose medium-power transistor that falls under the category of NPN transistors. It is mainly used for switching and audio amplification purposes. It comes with a collector current 1.5A, indicating it can drive loads under 1.5A. Total power dissipation is 12.5W with storage temperature ranging from -55 to 150C.
Bear with me for a couple of minutes as in this post I’ll be discussing the complete introduction to BD135 covering pinout, datasheet, working principle, power ratings, applications, and physical dimensions of transistor BD135.
Let’s jump right in.
Introduction to BD135
BD135 i ...
Hi Friends! Hope you are doing great. Today, I am going to give you a detailed Introduction to Arduino Uno. It is a microcontroller board developed by Arduino.cc and is based on Atmega328 Microcontroller. The first Arduino project was started in Interaction Design Institute Ivrea in 2003 by David Cuartielles and Massimo Banzi with the intention of providing a cheap and flexible way for students and professionals to learn embedded programming.
Arduino UNO is a very valuable addition in electronics that consists of a USB interface, 14 digital I/O pins(of which 6 Pins are used for PWM), 6 analog pins and an Atmega328 microcontroller. It also supports 3 communication protocols named Serial, I2C and SPI protocol. You should also have a look at this vid ...
Hello friends, i hope you all are fine enjoying. Today i am going to share a new project tutorial which is Getting Started with Arduino Programming. In the previous tutorial, which was titled as Getting started with Arduino Software, I have explained in detail the basics of Arduino software. How this software is installed and run.
Today's post is also related to arduino software but, the difference is that, in previous post we learn How to use the arduino software, What are the function keys of this software and Where to write the code(sketch) and after writing the sketch, how it is debugged. Now in today's post which is ' Getting started with Arduino Programming', we will see How a Code is written in Arduino software? What are the built-in functi ...
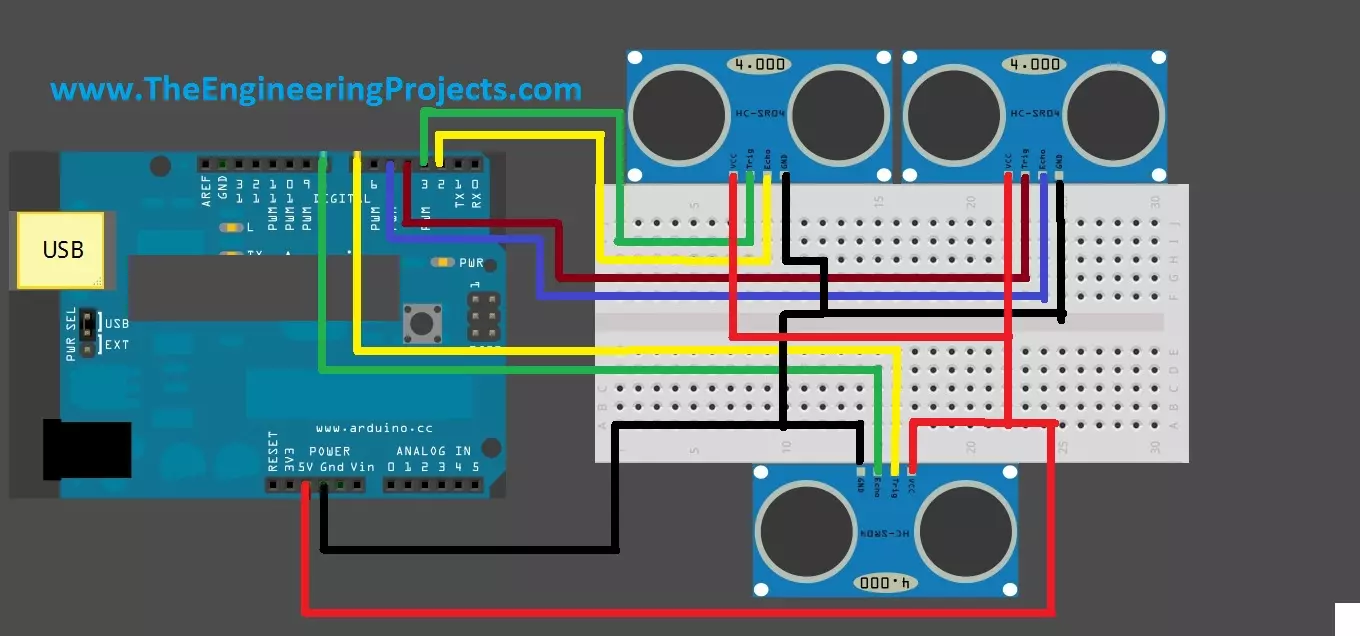
Hello friends, hope you are having fun and enjoying life. Today, I am gonna post about interfacing of multiple Ultrasonic sensor with Arduino. In the previous post, we have seen Interfacing of Ultrasonic Sensor With Arduino and in this post I have interfaced single ultrasonic sensor but in projects especially related to robotics, we have to interface multiple ultrasonic sensors. For example you have an obstacle detection robot, now in order to detect obstacle in front of robot you have to place once sensor on the front side but now you can't detect any object present on left or right side of your robot, so you have to place two sensors one on the left side of robot and one on the right side so in this project you need to use total three ultrasonic ...
Hello everyone! I hope you all will be absolutely fine and having fun. Today, I am going to provide a detailed discussion on 2 Relay Module Interfacing with Arduino. First of all I would like to explain you that what is relay and how to use it and then we will move forward towards 2 relay module interfacing with Arduino. I have already controlled relay with 555 timers. 2 relay module consists of two relays. Relay is basically an electronic device or a switch which is used to open and close the circuits electronically.
A relay controls an electric circuit by opening and closing contacts in another circuit. When the relay contact is normally open (NO), there will be an open connection when the relay is not energized. When the relay contact is norm ...