Hello everyone, Welcome to our new project. Our new project plays a very important role in our daily life as it is directly connected to our lives. In this project, we are going to design an Accident Detection module. Accidents are the most common thing we hear about in the news, and in social media. Everyone here or there has seen accidents or has been with one. So when any such incidents happen, we inform respective stations or hospitals in that emergency situation. But what about the accidents that happen at night, or in places where there is very less crowd or you are alone. So, to address this issue and provide a potential solution for that, we are going to learn how to detect an accident automatically and inform nearby aid/help stations.
We ...
Hi Folks! I welcome you on board. Thank you for clicking this read. In this post today, I’ll detail the Introduction to MUR460.
The MUR460 is a switch-mode rectifier used in inverters, switching power supplies, and as a freewheeling diode.
Just stay with me for a little while as I’ll be discussing the complete introduction to MUR460 covering pinout, features, working, and applications of this component.
Let’s get started.
Introduction to MUR460
The MUR460 is a diode used as a rectifier in high frequency and freewheeling applications, in switching mode converters, and as an inverter in telecommunication.
When this p-n junction diode is used as a rectifier it coverts AC signals to DC signals. The rectifier diode provides an alternating volta ...
Hey Fellas! Hope you are doing great and having fun in your lives. We always try to keep you updated with useful information that resonates with your needs and expectations so you can grow and excel in your relevant field. I am back to give you a daily dose of useful information that may help you resolve your queries and problems related to engineering and technology field. Today, I am going to unlock the details on the Introduction to 2n6547. It is an NPN bipolar junction transistor that comes with high voltage and current capability and fast switching speed, mainly used in switched mode power supplies and flyback and forward single transistor low power converters. I'll try to cover each and everything related to this NPN transistor, so you don't ...
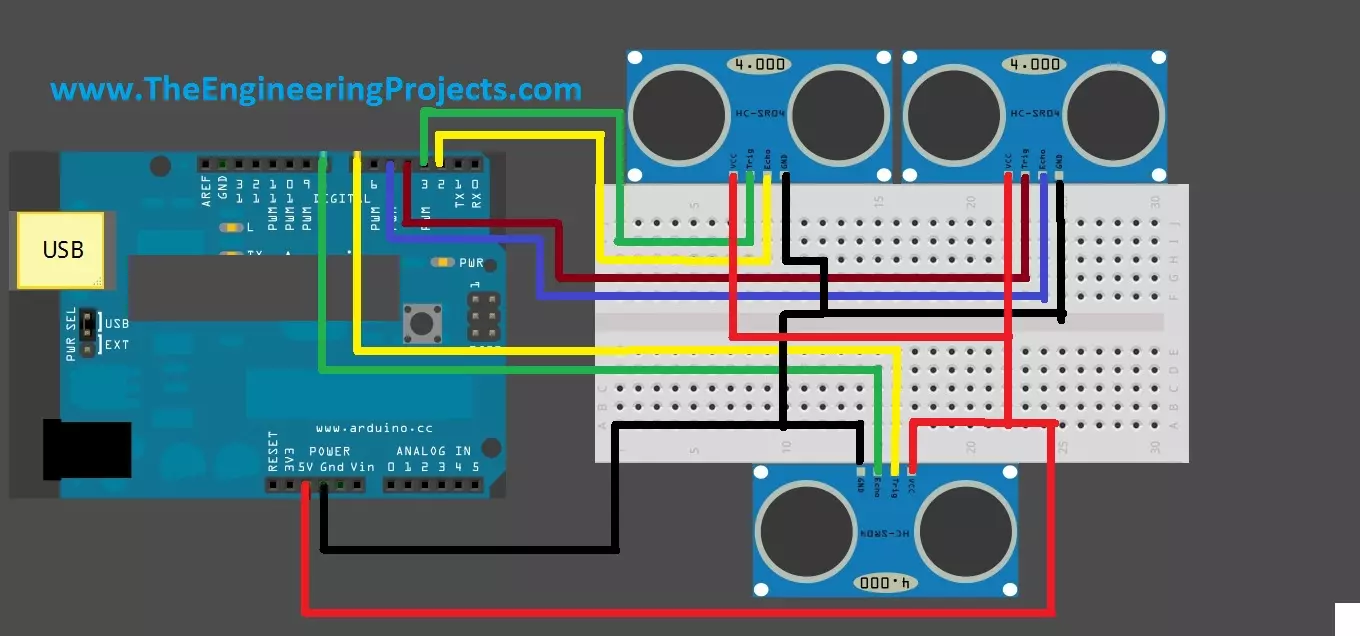
Hello friends, hope you are having fun and enjoying life. Today, I am gonna post about interfacing of multiple Ultrasonic sensor with Arduino. In the previous post, we have seen Interfacing of Ultrasonic Sensor With Arduino and in this post I have interfaced single ultrasonic sensor but in projects especially related to robotics, we have to interface multiple ultrasonic sensors. For example you have an obstacle detection robot, now in order to detect obstacle in front of robot you have to place once sensor on the front side but now you can't detect any object present on left or right side of your robot, so you have to place two sensors one on the left side of robot and one on the right side so in this project you need to use total three ultrasonic ...
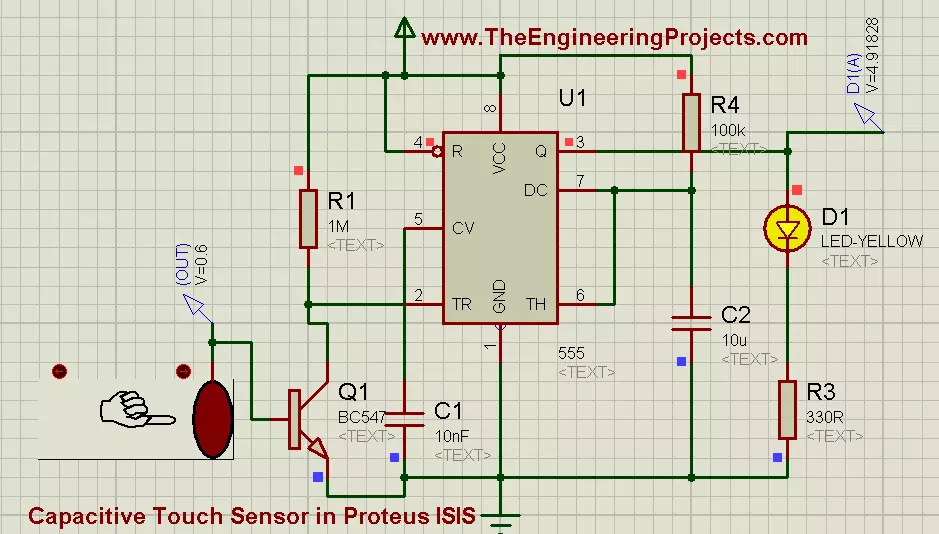
Hello friends, I hope you all are fine and enjoying. Today i am going to share my new project's tutorial which is How to use Capacitive Touch Sensor in Proteus ISIS. It is a very interesting project, and we will be using a 555 Timer while designing this project. If you recall our previous project tutorial which was Angle Control of Servo Motor using 555 Timer in Proteus ISIS, in which 555 timer was generating PWM and was controlling the rotating angle of servo motor.
Now in this project, we have a little different context and now we will be using a 555 Timer in collaboration with Capacitive Touch Sensor. First of all, lets have a little introduction of Capacitive Touch Sensor. Well, if we talk broadly then, in Electrical Engineering Capacitive Tou ...
Hi Folks! I welcome you on board. Happy to see you around. In this post today, I’ll detail the Introduction to TDA2030. This device incorporates a TDA2030 audio amplifier chip that produces 18 W output power with low harmonic distortion.I suggest you read this post till the end as I’ll walk you through the complete Introduction to TDA2030 covering pinout, datasheet, features, and applications.
Let’s get started.
Introduction to TDA2030
TDA2030 is a monolithic integrated circuit that comes in a Pentawatt package, mainly used as a low-frequency class AB amplifier.
The audio amplifier is a basic circuitry used to amplify the audio signal obtained through a device like a microphone.
Audio amplifiers are widely used in scores of app ...
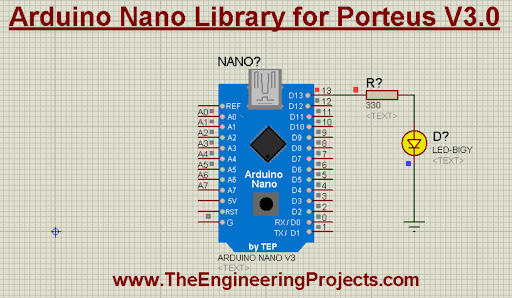
Hello friends! I hope you are doing great. In this tutorial, we are discussing the upgraded version of the Arduino Nano. Before this, we discussed the Arduino Nano library for Proteus and the Arduino Nano library for Proteus V2.0. The new version of the Arduino Nano library for Proteus V3.0 has a better structure and is working better. We will discuss it in detail in just a bit.
In this article, I will discuss the basic introduction of Arduino Nano. We will learn how to download and install this library in Proteus and will create a simple project with this library. Let’s move towards our first topic:
What is the Arduino Nano?
The Arduino Nano was released in 2008 by Arduino. cc and it is an open-source microcontroller board that has a great scope in the embedded industry.This boar ...
Hey Everyone! Hope you are getting along with life pretty well. I always strive to keep your technical appetite filled with the recent and valuable development in engineering and technology. Today, I'll unravel the detailed Introduction to USB.
The USB stands for Universal Serial Bus which is an industry standard mainly developed for laying out the communication between a computer and peripheral devices. The first USB was developed in 1996 by the collaborative effort of seven companies - DEC, Microsoft, Compaq, Nortel, IBM, Intel, and NEC
The USB device not only helps in establishing a flawless communication but also assists to power up the connected peripheral devices, setting you free from the parallel ports and the external power charg ...
Hello friends, hope you all are fine and having fun with your lives. Today's post is about interfacing of RFID module RC522 with Arduino. RC522 is very simple yet effective module. It is an RFID module and is used for scanning RFID cards. Its a new technology and is expanding day by day. Now-a-days it is extensively used in offices where employees are issued an RFID card and their attendance is marked when they touch their card to rfid reader. We have seen it in many movies that when someone places ones card over some machine then door opens or closes. In short, its a new emerging technology which is quite useful.
I recently get a chance to work on a project in which I have to use RFID reader to scan cards. In this project I have used it for for s ...
Hello friends, hope you all are fine and having fun with your lives. In today's post, I am going to share a new DS1307 Library for Proteus. Recently, I have shared the GSM Library for Proteus, which was really appreciated by the readers so I got quite excited and have designed another new Proteus Library. Currently I am working on many Proteus Libraries. In future, I am gonna design almost all the sensors in Proteus. So stay tuned with us.
Anyways coming to today's post, today we are gonna have a look at DS1307 Library for Proteus. Using this library, now you can quite easily simulate DS1307 module in Proteus in a quite stylish way. ;) I have designed it in red color because its available in red color in market. DS1307 module is already available ...