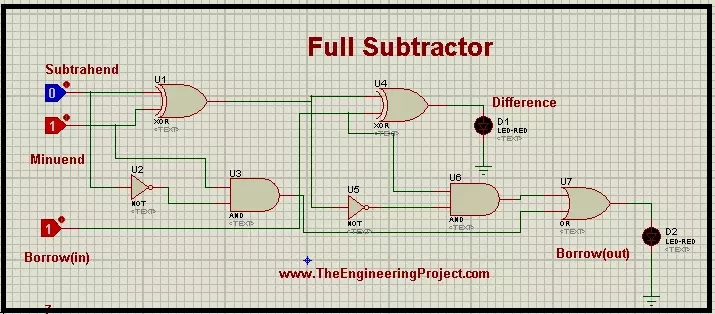
Hello mentees! Welcome on the behalf of The Engineering Projects. We are here with a new lesson about the Digital Logic Circuits. Logic Circuits work as heart in many electronic Circuits. The topic of today is Full Subtractor in Proteus and you will find the answers of the following questions:
What are 2 bit Full Subtractors?
How can we design the Truth Table of 2 bit Full Subtractor?
How can we implement the 2 bit Full Subtractor in Proteus ISIS?
You will also learn some important chunks of information in the DID YOU KNOW sections.
2 bit Full Subtractors
A full Subtractor works really well in the processor. We’ll talk about it function but before that have a look at its definition:
2 bit Full Subtractor is a Combinational Logic that co ...
Hi Friends! Hope you’re well today. I welcome you on board. Thank you for clicking this read. In this post today, I’ll detail the Introduction to SB560.
The SB560 is a Schottky diode, also known as a hot-carrier diode, mainly incorporated in extremely fast switching applications. It comes with low forward drop voltage and is used in the high-frequency operation. A highly reliable and efficient device, SB560 is a high forward surge capability component available in the DO-201AD package. This device carries a maximum RMS voltage of 42V while the maximum repetitive peak reverse voltage is 60V.
I suggest you go through this entire post till the end, as I’ll detail the Introduction to SB560 covering datasheet, pinout, features, and applications.
Let ...
Hey Fellas! We always strive to keep you updated with best and valuable information so you keep coming back for what we have to offer. Today, I am going to uncover the details on the Introduction to 7805. It is a positive voltage regulator used for providing constant output voltage over a wide range of input voltage.
Before we move on, you must be clear what is voltage regulation? Voltage regulation is referred as the measure of voltage change between input and output.
The IC 7805 does the same thing. It provides constant output voltage when a range of different voltage is applied at the input terminal. This component comes with three terminals called input, ground, and output.
This is called positive voltage regulator because it generates posi ...
Hello Friends, hope you all are fine and having fun. In today tutorial i am going to elaborate How to Automatically Connect with Wifi SSID using Arduino YUN. If you recall one of my previous tutorials named Getting started with Arduino YUN , in which i gave a brief introduction about Arduino YUN, its working and features. In that tutorial, I have explained How to connect Arduino YUN with Wifi manually. A little problem encounters while connecting Arduino manually to available wifi networks that if wifi connection drops then, then Arduino will also disconnect automatically and if wifi connection is energized again, it will still remain disconnected unless you reconnect it by yourself. This thing has very serious drawbacks in industrial projects, wh ...
Hello friends, I hope you all are fine and having fun with your lives. In today's post we are gonna see Interfacing of EasyVR with Arduino UNO. In the previous post, we have seen Getting Started with EasyVR Commander. It was quite simple and if you follow the steps carefully you wont stuck anywhere but still if you into some trouble i am here.
Now this tutorial is quite a quick and important one as it contains the real code using which we will control our robot. After adding the voice commands, now close the EasyVR Commander and open the Arduino Software. Connect the arduino board with computer and double check that your jumper J12 in on position SW. You should also read Training Error: Recognition Failed in EasyVR, if you got such error while ...
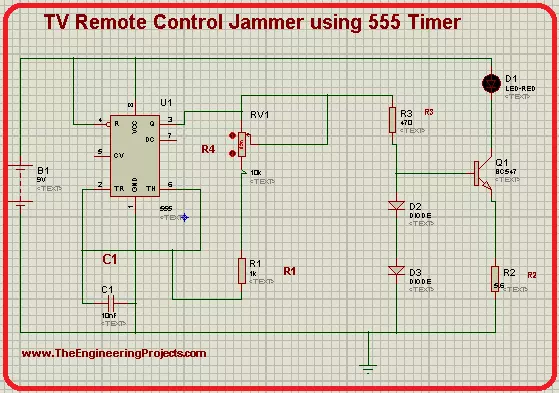
Hey pupils, welcome to The Engineering Projects. We hope you are doing great. In today's simulation in Proteus ISIS, we'll seek the knowledge of an interesting topic. We are going to design a Television remote jammer in Proteus. We all are familiar with the TV Remote controller device and know it works when a light signal emitted by it is sensed by the television. Have a glance at the topics we will see in detail today:
Introduction to 555 Timer TV Remote Control Jammer.
Components of the circuit.
Working principle of 555 Timer Jammer.
Simulation of the Jammer of TV Remote Control using 555 Timer.
Moreover, you will also learn some interesting facts about the topic in DID YOU KNOW sections. let's jump to our first topic.
555 Timer TV R ...
Hello friends, I hope you all are doing great. In today's tutorial, we are gonna have a look at detailed Introduction to DS1307. DS1307 is a real-time clock. It is a low power device and also has battery backup, which provides power when its external power supply not working or is off. It works on the I2C protocol. It is a bidirectional device and it can send and receive data on both sides.
DS1307 is used in industrial projects where constant time and date of some projects or working is required. I will give you a detailed overview of this time and date indicator IC. In today's post, we will have a look at its pinout, working, basic circuit, protocol, etc. I will also share some links of projects where I have interfaced it with Arduino and some other Microcontrollers. Friends, if y ...
Hello friends, hope you all are fine and enjoying. Today we are going to share our new project’s tutorial which is Angle Control of Servo Motor using 555 Timer in Proteus ISIS. It is a very simple but a bit technical project. This project has various applications both in industry and in small educational projects.
Servo motor is a DC operated motor and it is available in various sizes and powers. Generally the servo motor used in basic projects, is named as micro servo motor. It is of small size and low power rating. But as I stated earlier that it needs dc supply to operate but it also needs a continuous pulse train to operate and this pulse is commonly generated by some sort of timers or micro controllers. Since my today’s project tutorial (Angl ...
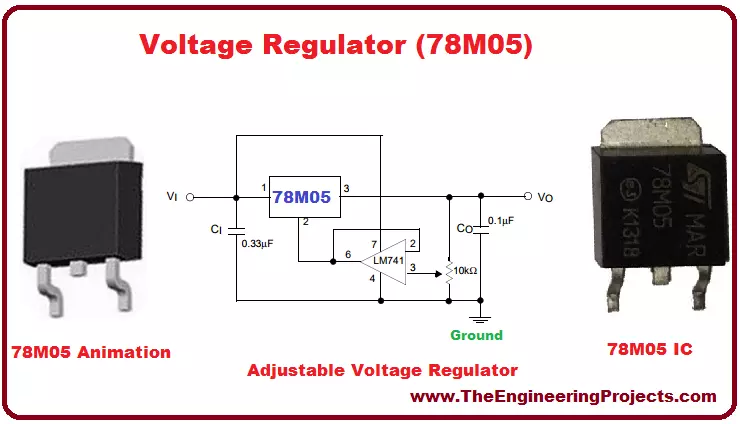
Hello everyone! I hope you will absolutely fine and having fun. Today, I am going to give you a detailed discussion on the topic Introduction to 78M05. I have already shared information about different IC's e.g. Introduction to UA741, MMBD914, LM224, LM386 and LM317. You must have a look at all these tutorials for the better understanding of this article. 78-M05 is basically a three (3) terminal. These terminals include input, output and the common terminal.
78-M05 is commonly available in TO-220 package having different fixed voltages at the output. Its construction process is based on planar epitaxial technology. These regulators are used for the employment of the process of internal limitation of the current. Safe area compensation as well a ...
Hello friends, I hope you all are doing great. In today's tutorial, I am going to do an Arduino 74HC165 Interfacing and we will have a look at How to increase Input Pins of Arduino. 74HC165 is a shift register and works on the principal of Parallel In Serial Out. In my previous tutorial Arduino 74HC595 Interfacing: Increase Output Pins, we have seen How to increase the output pins of Arduino and today we are gonna do exact the opposite and we will increase the input pins.
74HC165 will take 8 parallel inputs from different sensors or buttons etc and will send them to serial OUT Pin, which will be connected to Arduino. So, if you are working on a project where you want to get data of 15 or 20 digital sensors then you can use this shift register and ...