Hello everyone! I hope you all will be absolutely fine and having fun. Today, I am going to provide a detailed discussion on 2 Relay Module Interfacing with Arduino. First of all I would like to explain you that what is relay and how to use it and then we will move forward towards 2 relay module interfacing with Arduino. I have already controlled relay with 555 timers. 2 relay module consists of two relays. Relay is basically an electronic device or a switch which is used to open and close the circuits electronically.
A relay controls an electric circuit by opening and closing contacts in another circuit. When the relay contact is normally open (NO), there will be an open connection when the relay is not energized. When the relay contact is norm ...
Hello everyone! I hope you all will be absolutely fine and having fun. Today, I am going to give you an elaboration about Introduction to Pixy Camera. It is basically is an electronic device or sensor having fast vision. It is also known as fast vision sensor most of the time. Using this device we can teach to find objects in a very less time duration. It is an image sensor having a very powerful processor. Pixy is easy to interface with the micro-controllers e.g. Arduino. We can make different programs only to send the desired data from the device to micro-controller. In this way micro-controller can not overwhelm.
Pixy camera is able to communicate with the micro-controller in several different ways e.g. serial communication, I2C protocol, dig ...
Hello everyone! I hope you all will be absolutely fine and having fun. Today, I am going to provide a detailed discussion on Introduction to Laser Sensor. Laser sensor is basically an electronic device which we often use for the detection of accurate positions as well as small objects. Laser sensors transmit or radiate laser light. This laser light consists of light waves having same wave length. Due to this fact laser light travels in a parallel direction from the source emitting this light. Due to its travel in parallel direction it can be transmitted over long distances. This light is dangerous for the human beings.
We must avoid by looking directly into the light. It causes serious eye damaging effect and even can make anyone blind. As we ...
Hello everyone! I hope you all will be absolutely fine and having fun. Today, I am going to provide the detailed discussion on PIR Sensor Arduino Interfacing. PIR basically stands for Passive Infrared Sensor. Basically PIR is an electronic equipment which is often used to measure the infrared light radiating from the different objects in their field of view. It detects the infrared energy released from animals as well as from human beings, when this energy is higher than the certain threshold level PIR sensor shows an indication correspondingly. The energy detected by PIR sensor is usually in the form of heat i.e. emitted by humans as well as from animals.
We can also test and verify our results in Proteus using PIR sensor. I have already shared ...
Hello everyone! I hope you all will be absolutely fine and having fun. Today, we will have a look at the DHT11 Arduino Interfacing. DHT11 is an embedded sensor, used to measure both temperature and humidity of the surroundings. It is made up of two different parts i.e. capacitive humidity sensor and a thermistor. DHT11 is a slow sensor but is quite efficient for the applications where we need to do some basic analog data exchange. There is a small chip inside this sensor which performs the function of analog to digital to analog conversion and gives the results for temperature as well as for humidity in digital form. This digital signal can be read easily through any micro-controller.
LM335 is another temperature sensor and to understand today's p ...
Hello everyone! I hope you all will be absolutely fine and having fun. Today, I am going to provide a detailed discussion on Flame Sensor Arduino Interfacing. Flame sensor is an electronic device which is capable of sensing/detection of fire or a high temperature zone. It gives an indication through an LED attached at its top, just after sensing the fire. These type of sensors are usually used for short ranges. They are able to detect the fire up to 3 feet. Flame sensors is the most common device available in the market these days due to its good results and cost efficiency. You should also have a look at Flame Sensor Library for Proteus.
Flame sensors are available in the market in two types one having three pins and the other having four pins ...
Hello everyone! I hope you all will be absolutely fine and having fun. Today, we are going to work on Arduino Keypad Interfacing. First of all, I would like to tell you a bit about the keypad. After getting the basic idea about the keypad, we will start our discussion about Arduino Keypad Interfacing. You should also have a look at Interfacing of Keypad with PIC Microcontroller.
In this tutorial, I am going to use a 4×4 keypad. It has sixteen buttons having four alphabetic characters. Let's have a look at the Arduino Keypad Interfacing:
What is Keypad?
The keypad consists of multiple buttons, arranged in the form of a matrix(rows & columns) and is used in embedded projects.
They are cost-efficient and are easily available from online el ...
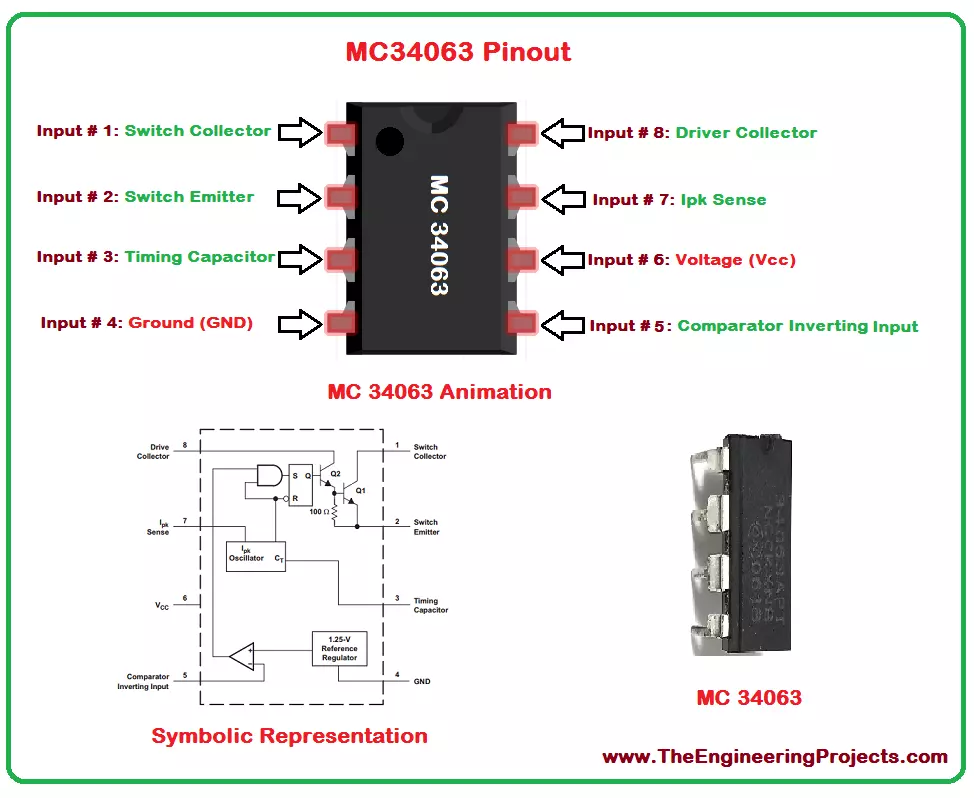
Hello everyone! I hope you all will be absolutely fine and having fun. Today, I am going to share a detailed Introduction to MC34063. It's normally required for the construction of DC to DC converters. MC34063 has a high current output switch, Pulse Width Modulation (PWM) controller with current limiting, compensated reference of internal temperature, a comparator and a driver.
For the inverting, boost and buck applications there is no need of a huge complicated external components, instead they can be performed using minimum external components. MC 34063 operates properly in the temperature ranging from 0 to 70 degree celsius. MC34063 ha s wide range of applications in real life e.g. portable equipment, Human Machine Interface (HMI), test and m ...
Hello everyone! I hope you all will be absolutely fine and having fun. Today, I am going to explain you about Introduction to LM386. Its a power amplifier specially designed for low voltage consuming applications. The gain of LM 386 is set around 20 internally. But the gain could be increased due to the insertion of external resistor and capacitor between the pin number 1 and 8. The gain could increase to any value from 20 to 200.
The LM-386 inputs are ground referenced. The output are biased to the half of the input voltage levels automatically. When LM 386 operates on 6V, its quiescent power drain is around 24mW. This property of LM-386 makes it ideal for the battery operation. Its major features include battery operation, minimum external p ...
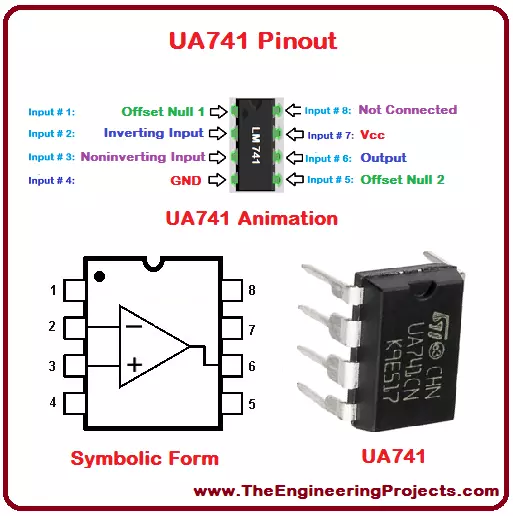
Hello everyone! I hope you all will be fine and having fun. Today, I am going to give you an elaboration on Introduction to UA741. UA 741 is basically a general purpose operational amplifier. This amplifier is considered to be ideal for the voltage follower applications because latch-up operations are no there in its case and it moreover it has High Common Mode Input Voltage Range (HCMIVR). UA-741 is a high performance operational amplifier made up of single silicon chip.
UA 741 is stable without using external components, due to the internal frequency compensation and this device is safe from the short circuiting. In order to cancel the effect of offset voltages we can use a small valued potentiometer/resistor. UA-741 can operate in a temperat ...