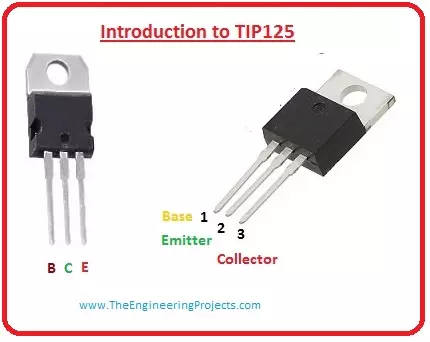
Hello friends, I hope you all are doing great. In today's tutorial, we are gonna have a look at detailed Introduction to TIP125. It is a bipolar PNP transistor, which is created for swapping and intensification submissions. It is the corresponding of transistor TIP121. The transistor is such a constituent which shows a very significant imperative on diverse electrical and electronic constituents and circuits.
There is no electronic expedient which doesn't have a transistor in its circuitry. The transistor is available in NPN and PNP configuration according to their uses. These instruments also show a significant regulation in the adaptation of current and intensification of an input signal. In today’s post, we will have a look at its protection, d ...
Hello Everyone, hope you all are fine and having fun with your lives. Today, I am going to interface GPS Module with Arduino in Proteus ISIS software. Recently, I have shared this amazing GPS Library for Proteus, using which you can quite easily simulate your GPS Module in Proteus software. Today, I am going to interface this GPS Module with the Arduino UNO board and will simulate the result in Proteus software. I am going to use TinyGPS Library and will get Longitude and Latitude out of this GPS Module.
So, if you are new to GPS and you haven't yet installed the GPS Library for Proteus, then you must first download that library and install it. I am using Arduino board in today's tutorial but you can use any other microcontroller as well like PIC ...
Hello Friends! Hope you’re well today. I welcome you on board. In this post today, I’ll be discussing the Introduction to 1n5408.
The 1n5408 is a component where current flows in one direction only. It comes with two pins named anode and cathode. The Anode side is positive from where the current enters the diode and the cathode is negative from where the current leaves the diode. The colored band side is the indication that the side is the cathode and the other side without the colored band is the anode of the diode.
Just stay with me for a little while as I’ll walk you through the 1n5408 power diode pinout, datasheet, features, equivalents, and applications.
Let’s get started.
Introduction to 1N5408
The 1n5408 is a power diode where current ...
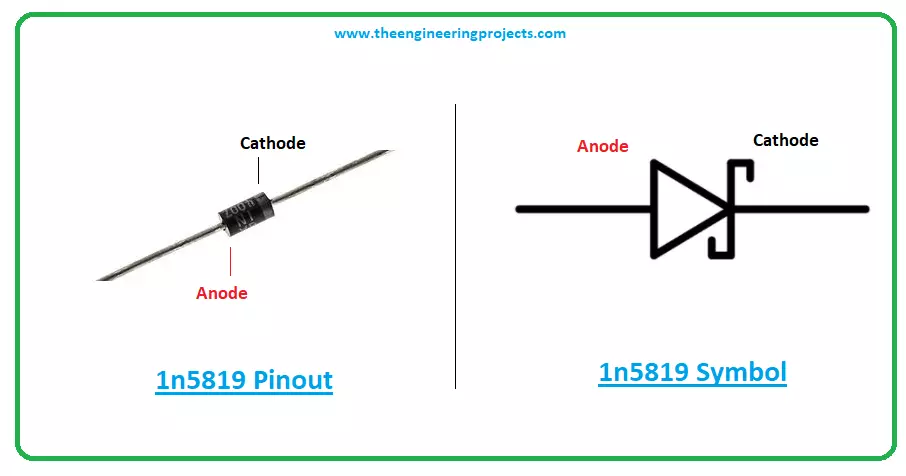
Hello Friends! Happy to see you around. Thank you for clicking this read. In this post today, I’ll document the Introduction to 1n5819.
The 1n5819 is a Schottky diode, also called hot-carrier diode, employed for extremely fast switching. This diode is formed when the metal material is combined with the semiconductor material. This combination results in the formation of a barrier that blocks the flow of electrons. The reason this is also called a hot-carrier diode.
I suggest you read this post all the way through, as I’ll walk you through the complete introduction to 1n5819 covering datasheet, pinout, features, equivalents, and applications.
Let’s get started.
Introduction to 1N5819
The 1n5819 is a Schottky diode used for fast switching appl ...
Hello everyone! I hope you all will be absolutely fine and having fun. Today, we will have a look at the DHT11 Arduino Interfacing. DHT11 is an embedded sensor, used to measure both temperature and humidity of the surroundings. It is made up of two different parts i.e. capacitive humidity sensor and a thermistor. DHT11 is a slow sensor but is quite efficient for the applications where we need to do some basic analog data exchange. There is a small chip inside this sensor which performs the function of analog to digital to analog conversion and gives the results for temperature as well as for humidity in digital form. This digital signal can be read easily through any micro-controller.
LM335 is another temperature sensor and to understand today's p ...
Hello Everyone! Happy to see you around. Thank you for clicking this read. In this post today, I’ll document the Introduction to MJE13007.
MJE13007 is an NPN bipolar junction transistor that is a semiconductor device made of silicon material. This chip is mainly used for amplification and switching purposes. The collector-base voltage is 700V while the collector-emitter voltage is 400V. The power dissipation at temp 25C is 80W. This means 80W is released during the working of this device. This device can support load up to 8A because the current at the collector side is 8A.
I suggest you read this entire post till the end as I’ll include the complete Introduction to MJE13007 covering datasheet, pinout, working principle, power ratings, applications, and physical dimensions.
Let’s ...
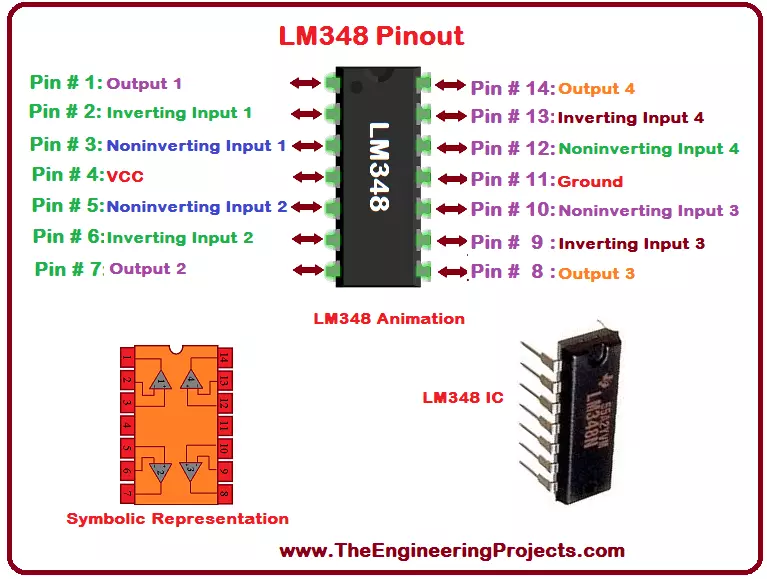
Hello everyone! I hope you all will be absolutely fine and having fun. Today, I am going to share my knowledge on Introduction to LM348. LM-348 i basically a General Purpose (GP) Operational Amplifier. It is an independent and quadruple operational amplifier. LM 348 has similar characteristics in comparison to uA741. It is an internally compensated amplifier having high gain.
LM-348 has four internal amplifiers. We can achieve isolation between these amplifiers by biasing each of the amplifier independently. This isolation can be done using different techniques e.g. layout technique. It can be used at several different places where amplifier matching is needed. LM 348 has very low supply current drain as compared to the standard 741. Moreover, I ...
Hello friends, hope you all are fine and having fun with your lives. Today I am going to share a problem and also its solution with you guys. A few days ago, I bought new NRF24L01 modules as they were needed for a project. So, today when I started working on them, I encountered a very strange problem. When I interfaced my NRF24L01 with Arduino and uploaded the transmitting and receving codes in them, I couldn't get anything on my serial terminal as I explained in my previous post Interfacing of NRF24L01 with Arduino. That was quite strange for me as I have worked on this module many times and it never troubled me before. So I keep on working on it but no luck. I even changed my RF modules as I thought may be they are faulty modules but still no lu ...
Hello Everyone! Hope you’re well today. Happy to see you around. In this post today, I’ll walk you through the Introduction to FR107.Fr107 is a fast recovery diode mainly used for converting alternating current to direct current. It can support loads under 1A and carries a peak inverse voltage of 1,000 V.Read this post all the way through as I’ll detail the complete Introduction to FR107 covering datasheet, pinout, features, characteristics, and applications. Let’s get started.
Introduction to FR107
Fr107 is a fast recovery diode mainly used in fast-switching applications. It comes with two terminals called an anode and a cathode. The grey-colored band identifies the cathode side while the other side is the anode.
A highly efficient and ...
Hi Friends! Hope you are getting along with life pretty well. Today, I'll uncover the detailed Introduction to 2n5415 which is a PNP transistor mainly used for general purpose low-power amplifying and switching applications.
It comes with three layers: two P semiconductor layers and one doped N-layer where later is encapsulated between other two P-layers.
There are two major types of transistor: Bipolar Junction Transistor and Unipolar Transistor. This transistor falls under the category of Bipolar Junction Transistor as it comes with two charge carriers i.e. electrons and holes where later are the major charge carriers in PNP transistors.
In this post, I'll try to nail down everything related to 2n5415: its main features, working, and applicat ...