Hi Friends! Hope you are doing well. Today, I'll give you a detailed Introduction to Arduino LilyPad. It is an Arduino Microcontroller Board, based on ATmega168/ATmega328 and is introduced by Leah Buechley and SparkFun Electronics.
This board is mainly developed for e-textiles and wearables projects. As per the designed purpose, it can be attached to fabric, sensors, power supplies, and actuators. You may need a conductive thread for joining this board with the required object.
In this post, I'll try to cover each and everything related to Arduino LilyPad, what is this about and how it is used for the development of desired projects. Let's jump right in and get down to the nitty-gritty of this board.
Introduction to Arduino LilyPad
Arduino Lil ...
Hi Guys! Hope you’re well today. I welcome you on board. In this post, I’ll walk you through How a Hobbyist Can Work on Electronic Projects in America.
Working on electronic projects is a bit inundating.
From selecting the topic to research work and development to execution, you need to hustle, grind and drill to keep your final product up and running.
When you are new to the electronic field, you must not be afraid to get your hands dirty in diving deep into the nitty-gritty of the project. This means that no matter what kind of technical project you pick, you need to spend a significant amount of your time and money to reach your final goal. It's not just about making sure that whatever it is you're looking for is done well—it's also about making sure that your project is done ri ...
Hello friends, I hope you all are doing great. In today's tutorial, we are gonna have a look at a detailed Introduction to HC-SR501. HC-SR501 is a motion detector sensor, that uses infrared waves for the detection of an object. It is an automatic control device, and also has large sensitivity and high reliability. It is used in auto-sensing control devices, where we need to perform motion detection.
HC-SR501 is used in industrial projects and buildings for security purposes. In today's post, we will have a look at its pinout, working, protocol, circuit diagram, etc. I will also share some links to projects where I have interfaced it with Arduino and some other microcontrollers. Friends if you have any questions please ask in the comments I will try my best to solve your problems and I w ...
Hello readers, hope you all are doing great. Today, we will discuss interrupts and timers in ESP32 and how to handle internal as well as external interrupts. So, we will discuss What is interrupt, Polling, ESP32 interrupt, Software interrupts, Hardware Interrupts, IRS (Interrupt Service routine), Steps to execute an interrupt or how is an interrupt handled in the microcontroller, Code description for ESP32 interrupts with Arduino IDE, Code description for hardware interrupts, Why is it preferred to use timer to add delay instead of using delay() function. So, let's get started:
What is Interrupt?
Interrupts are used when a micro-controller needs to continuously monitor for an event while the same micro-controller is executing a particular task ...
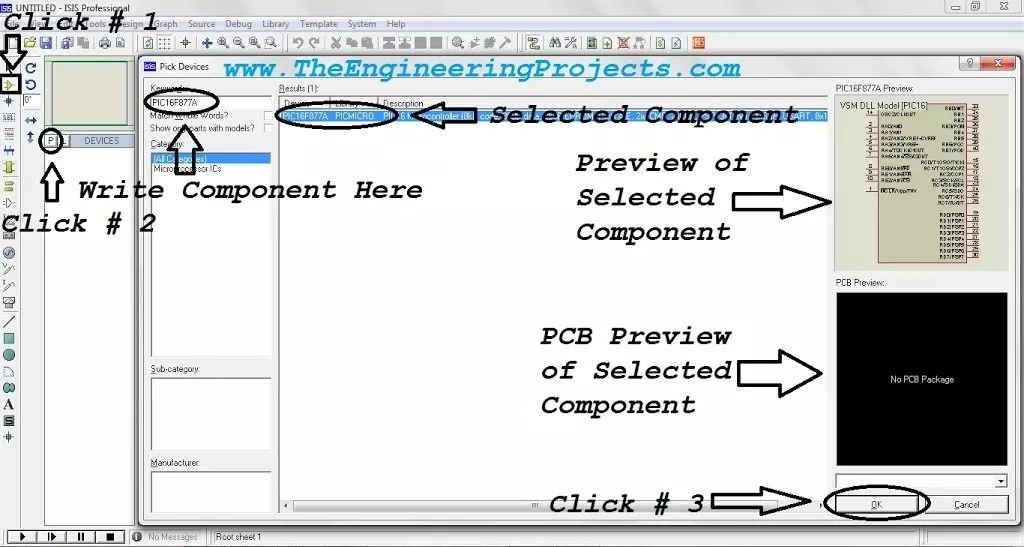
Hello readers, I hope you all are doing great. In today's tutorial, I am going to share a detailed Introduction to Proteus. It's our first tutorial in Proteus series. Today's tutorial is for beginners but still I would suggest you to read it once, as I am going to explain why Proteus?
Throughout our Engineering Course, we have to design a lot of electronics or embedded circuits and it's always a best approach to simulate these circuits first on some simulation software i.e. Proteus, PSPice etc., before assembling them on actual hardware. Among these simulation software, Proteus is my favorite one so let's get started with detailed Introduction to Proteus:
Introduction to Proteus ISIS
Proteus Design Sui ...
Hi Friends! Hope you are doing well. I am back to give you a daily dose of useful information so you can excel and improve as per your technical needs and requirements. Today, I'll uncover the details on the Introduction to ATmega8. It is an 8-bit AVR microcontroller that is based on RISC CMOS technology and comes with a 28-pin interface for the PDIP package. The Program memory is 8K Flash while RAM and EEPROM are 1K and 512 bytes respectively.
Microchip has been the main source for producing PIC and AVR microcontrollers that are mainly used in embedded and industrial automation systems. These modules can perform a number of functions on a tiny chip, preventing you from spending too much and purchasing external components for laying out automation ...
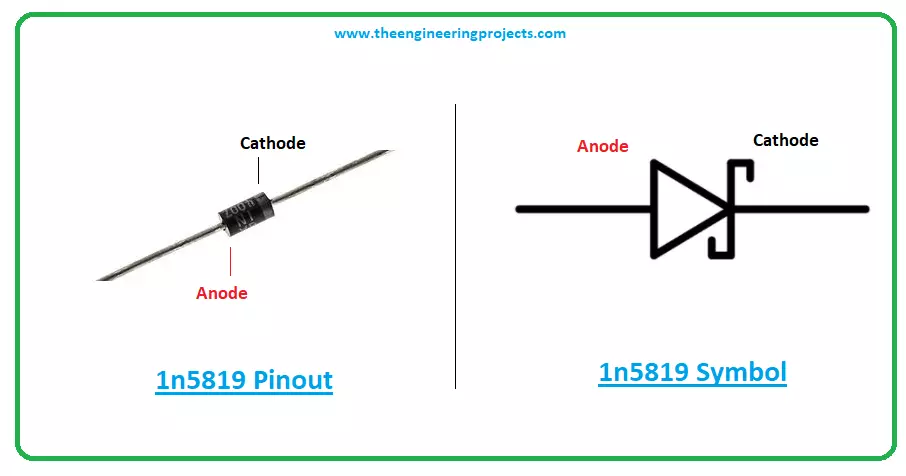
Hello Friends! Happy to see you around. Thank you for clicking this read. In this post today, I’ll document the Introduction to 1n5819.
The 1n5819 is a Schottky diode, also called hot-carrier diode, employed for extremely fast switching. This diode is formed when the metal material is combined with the semiconductor material. This combination results in the formation of a barrier that blocks the flow of electrons. The reason this is also called a hot-carrier diode.
I suggest you read this post all the way through, as I’ll walk you through the complete introduction to 1n5819 covering datasheet, pinout, features, equivalents, and applications.
Let’s get started.
Introduction to 1N5819
The 1n5819 is a Schottky diode used for fast switching appl ...
Hello friends! I hope you are having a good day. Today, I am sharing a new version of Arduino Library for Proteus(V3.0). I have already shared the previous versions of this library i.e. Arduino Library for Proteus(V1.0) and Arduino Library for Proteus(V2.0). This newer version is way better than previous versions because of its realistic design and better performance. I will discuss the comparison in detail in just a bit. This Proteus Library zip file has the following types of Arduino microcontrollers in it:Arduino UNOArduino Mega 1280Arduino Mega 2560Arduino MiniArduino Pro MiniArduino Nano
We will move towards the installation, but before this, let me share the basic introduction of Arduino.
What is Arduino?
Arduino is an open-source family of microcontroller boards that is designe ...
Hello everyone! I hope you all will be absolutely fine and having fun. Today, I am going to share my knowledge about Introduction to LM339. LM339 belongs to the family of devices having 4 independent voltage comparators. Each comparator is designed in such a way that it is capable of operating from a single power source over a wide range of power supplies. It can also operate for split power supplies. There is a unique characteristic of comparators, Input Common-Mode Voltage Range (ICMR) includes a ground even when it is operating from a single power supply voltage.
Basically, LM339 is a comparator IC having four built-in comparators. The basic purpose of a comparator is to rotate the signal between analog and digital domains. At its input termina ...
Hello friends,hope you are fine and enjoying your lives. In today's tutorial, we will know How to Upload Bootloader in Atmega328 using Arduino UNO, which is quite simple and easy and a basic level tutorial. We all know that, Arduino UNO uses Atmega328 as a microcontroller and have you ever thought of using ATmega328 alone instead of using complete Arduino UNO. If you haven't thought yet then think now :) Yes we can use Atmega328 alone instead of using it as a whole with Arduino board. But that's not the topic of today's tutorial and I am gonna cover it soon that How can we use Atmega328 alone.
So now the questions arises that what we are gonna do with the rest of the Arduino board? As we have taken the Atmega328 out of it now there's no use of res ...