Hello friends, I hope you all are doing great. In today's tutorial, I am going to share a new Vibration Sensor Library for Proteus V2.0. It's the second version of the Vibration Sensor Library for Proteus. In this library, we have four vibration sensors.
These vibrations sensors have both digital and analog output pins and can easily be connected with microcontrollers i.e. Arduino, PIC, Atmel etc. Before downloading the Proteus Library zip file, let's first have a look at the brief overview of Vibration Sensor:
What is Vibration Sensor?
A vibration sensor is a small embedded sensor, which is used to detect vibrations on any surface.
These vibration sensors are used for various purposes i.e. fault detection on heavy machinery, placed on doors ...
Hello friends, hope you all are fine. Today, I am going to share a new Bluetooth Library for Proteus. Using this Library, now you can quite easily use Bluetooth modules in Proteus ISIS. I have designed two Bluetooth modules which are HC-05 and HC-06. We all know about these modules. We use these modules for sending data through Bluetooth. Till now, there's no such Bluetooth Library designed for Proteus and we are the first developers of this awesome Bluetooth Library for Proteus. I hope you guys are gonna like it. I have also posted a tutorial in which I have done Arduino Bluetooth Communication using HC05 in hardware. I hope that one will also be interesting to read, if you have planned to start working on Bluetooth Module.
Other bloggers are wel ...
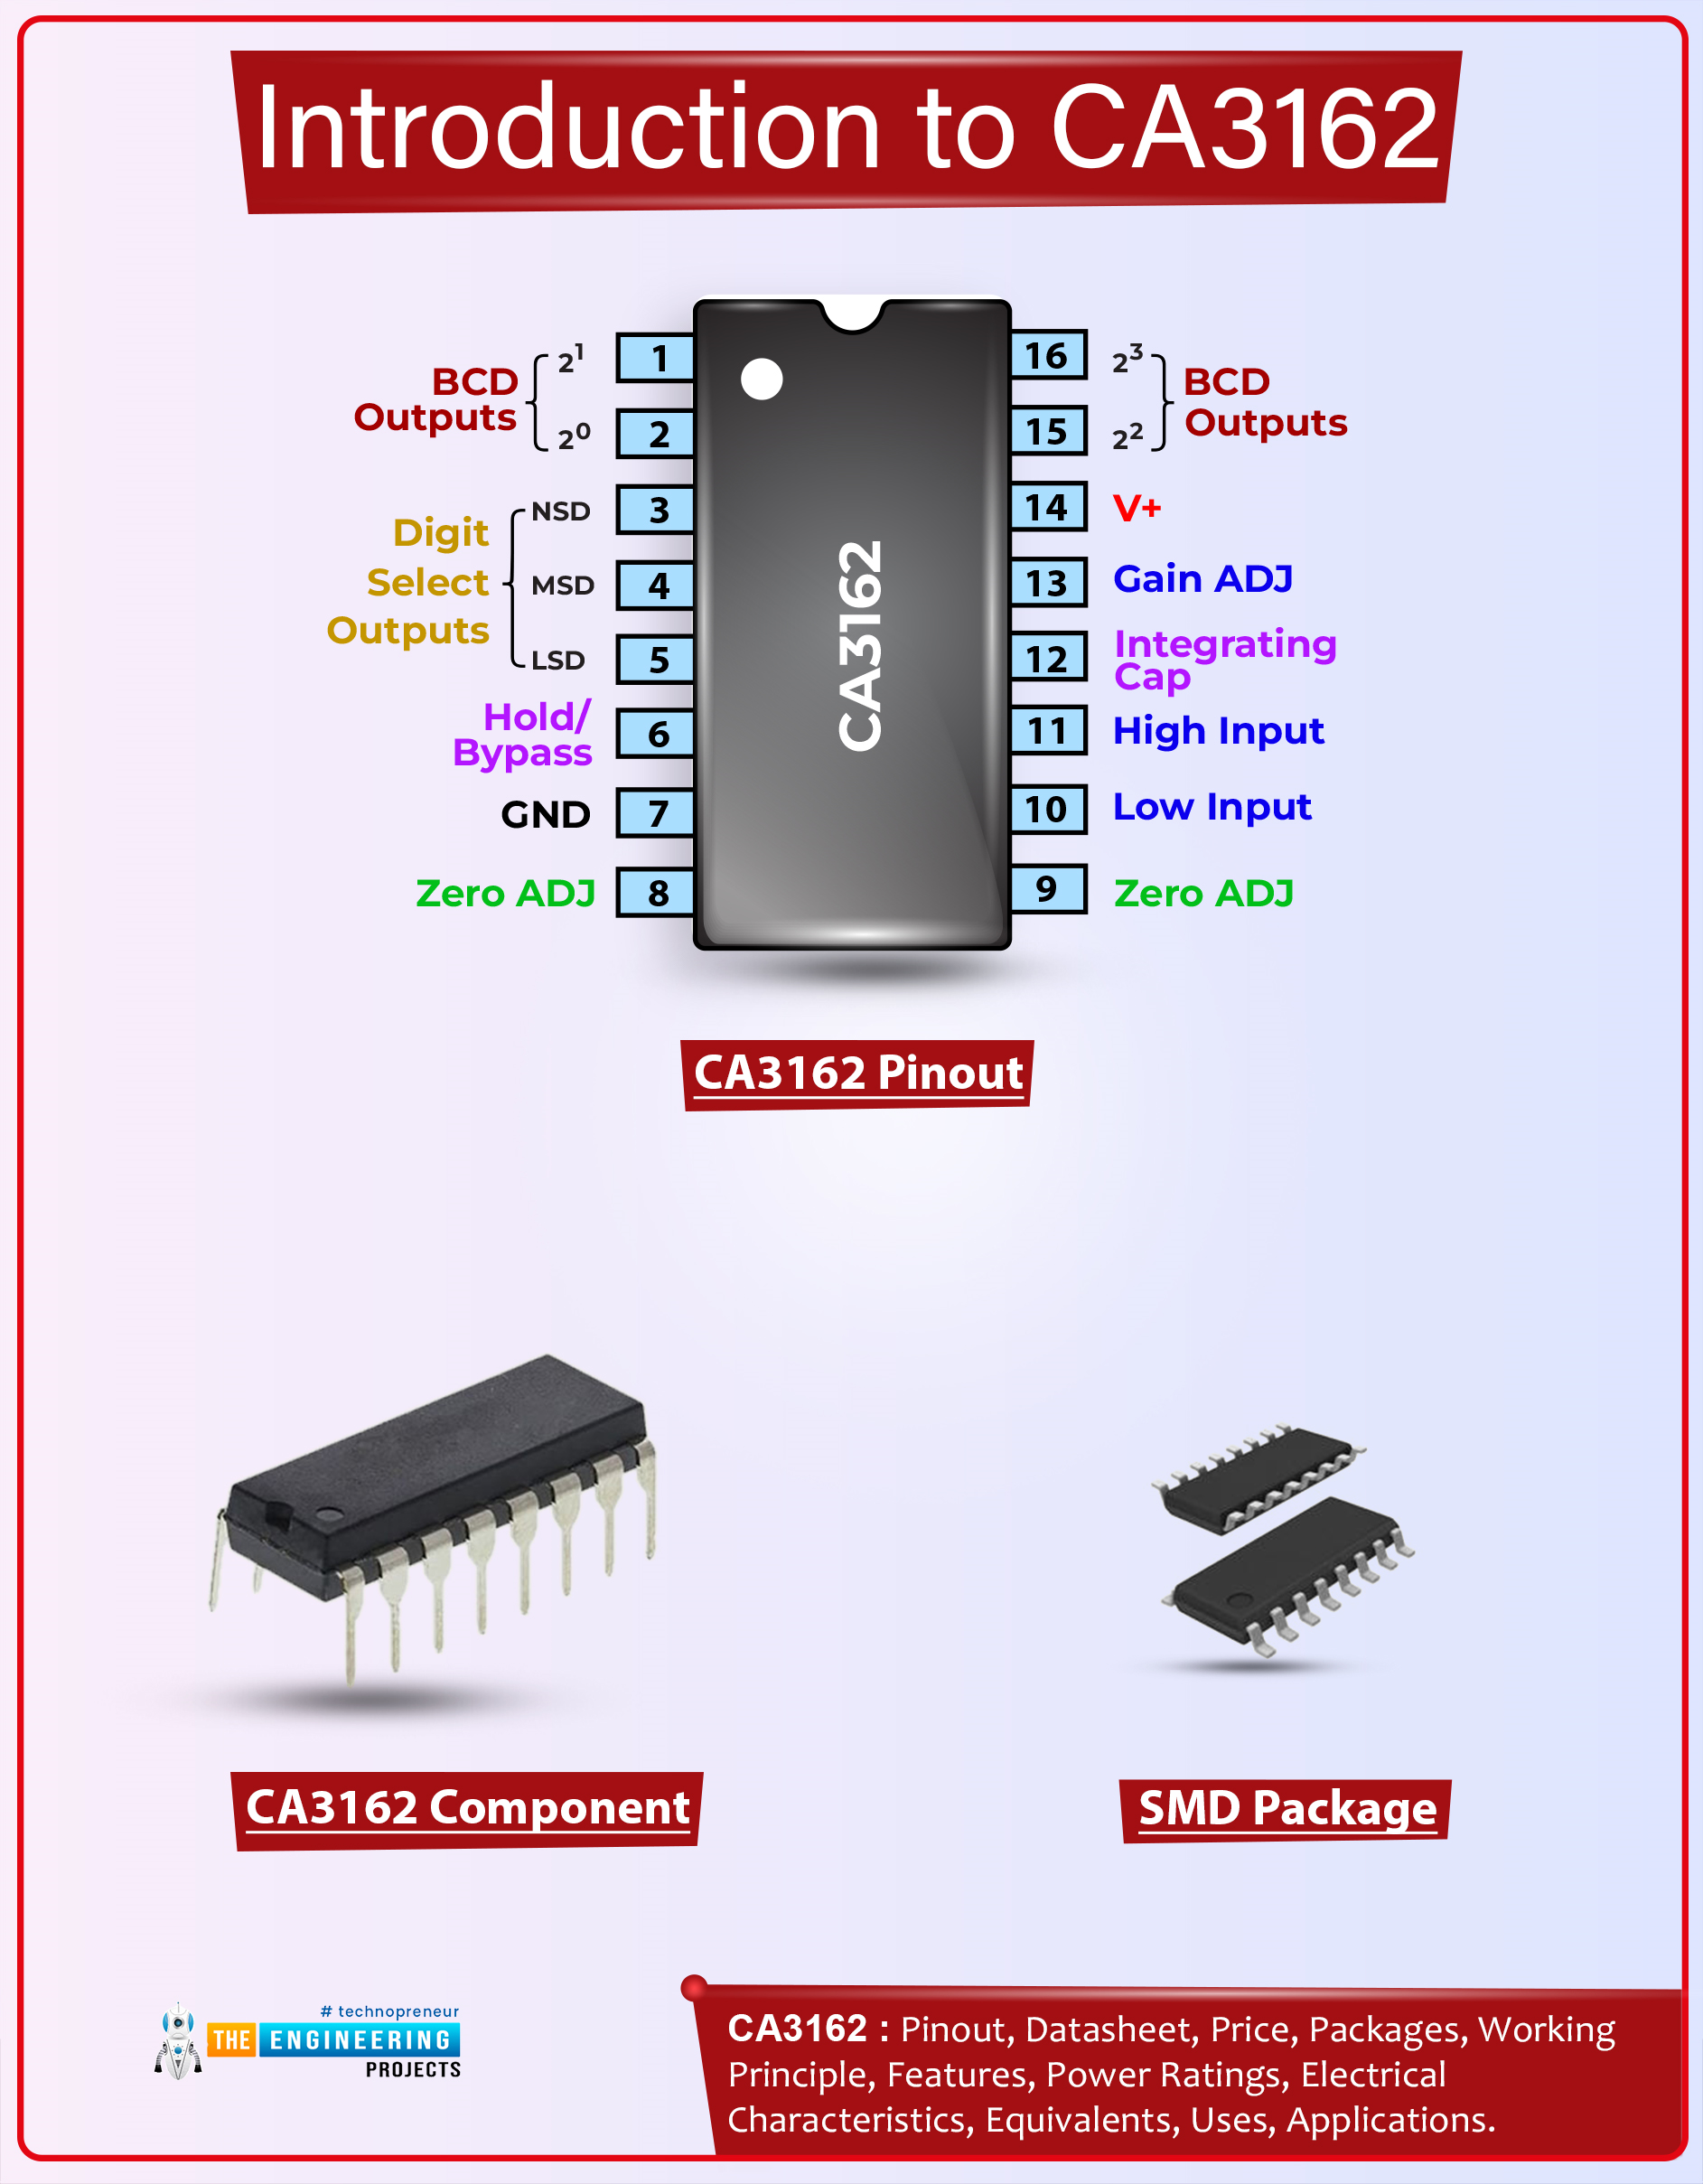
Hi Friends! I welcome you on board. Happy to see you around. In this post today, I’ll detail the Introduction to CA3162.The CA3162 is a monolithic A/D converter, offering a 3-digit multiplexed BCD output. It comes with an ultra-stable internal band-gap voltage reference. With differential input, this device provides a choice of low-speed (4Hz) or high-speed (96Hz) conversion rate. It is a 16-pin device that provides dual slope A/D conversion.
I suggest you buckle up as I’ll walk you through the complete Introduction to CA3162 covering datasheet, pinout, features, and applications. Without further ado, let’s get started.
Introduction to CA3162
The CA3162 is a monolithic A/D converter that offers a 3-digit multiplexed BCD output. It is available with ultra-stable internal bandgap vo ...
Hey Friends! Hope you are doing great. I am here to provide you the technical knowledge that helps you stay ahead of your competitors. Today, I am going to unlock the details on the Introduction to 2n5884. It is a power PNP bipolar junction transistor mainly used for general purpose amplification and switching purpose. This is a complementary silicon epitaxial-base transistor that can support 25 A and 80 V. I'll discuss each and everything related to this transistor i.e. what it does, its pinout, circuit diagram and main applications.
You must have a look at comprehensive read on Introduction to Bipolar Transistor if you are unsure how these bipolar transistors work.
Before we dive into the details of this PNP transistor we must be aware what is ...
Update: I have updated the code and removed the bug. Thanks for informing. Now this code will work perfectly.
Buy This Project
Hello friends, hope you all are fine and having good health. Today, as the name suggests, I am gonna post on how to Receive SMS with AT Commands using Sim900 and Arduino. I have already posted a tutorial on How to Send SMS with Arduino UNO and Sim900, so now we are gonna check the opposite. Sending SMS is quite easy, you just need to write some AT commands and write the message you wanna send and hit the Cntrl + Z and it will be sent. But receiving a text message on your SIM900 shield is a bit difficult because now you need to place a check when user will send a message. So, ideally whenever anyone send a message to yo ...
Welcome to the next tutorial of our Raspberry Pi programming course. Our previous tutorial looked at how to Interface DS18B20 with Raspberry Pi 4. This tutorial will teach us how to create a time-lapse video with still images and understand how phototimer and FFmpeg work.
What is time-lapse?
When photographing something over a lengthy period, "time-lapse" comes to mind. A video can be created by mixing the still photos. Plant development may be tracked with time-lapse movies, as can the changing of the seasons. They can also be utilized as low-resolution security cameras.
Components
Raspberry pi 4B
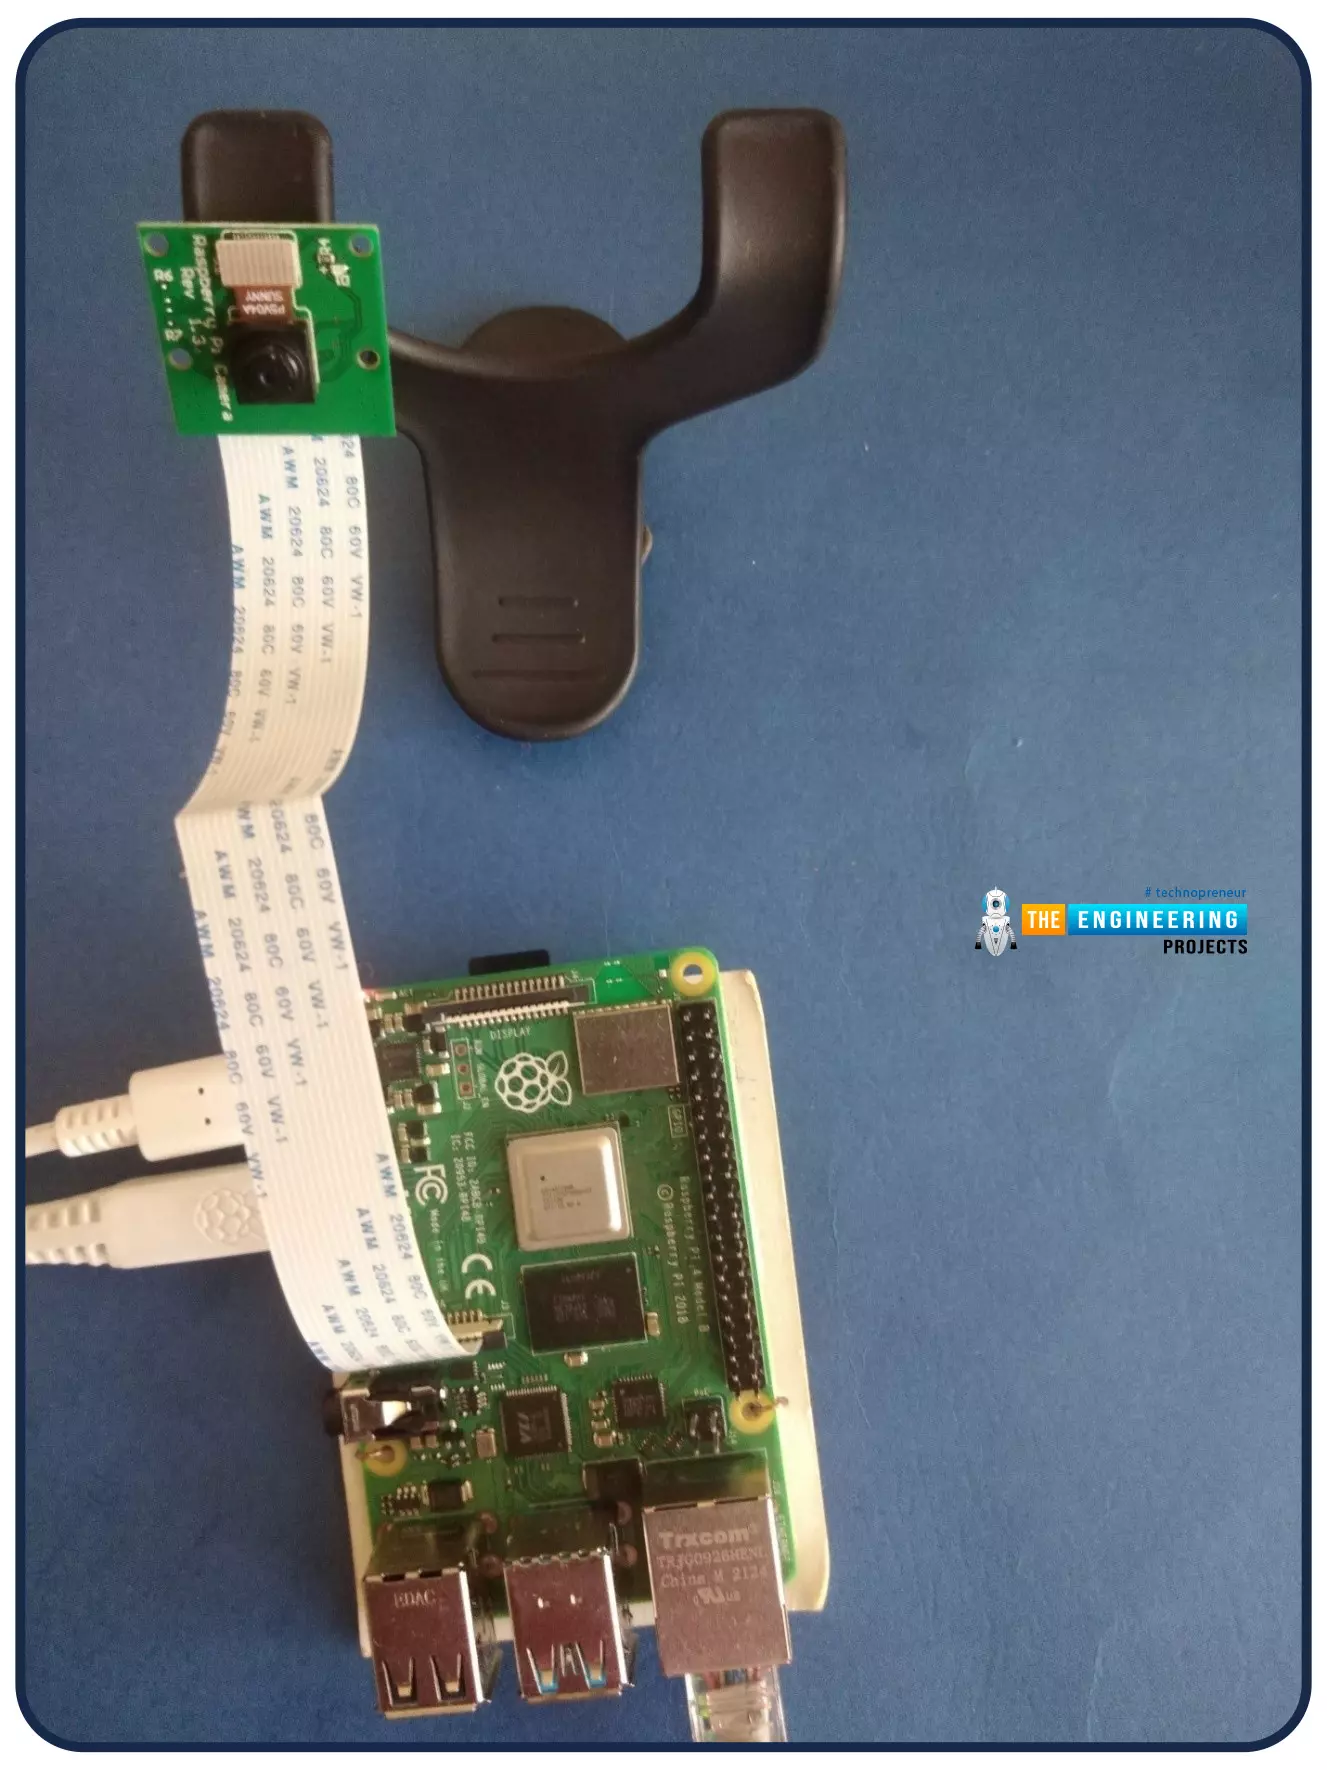
Pi camera
Connect to the Raspberry Pi
Cameras that can be used with the Raspberry Pi are a bit limi ...
Hello friends, I hope you all are doing great. In today's tutorial, we are gonna have a look at a detailed Introduction to nRF52840. nRF52840 is a low-power 2.4 GHz wireless system-on-chip (SoC). It integrates a multi-protocol 2.4 GHz transceiver, an Arm Cortex-M4F CPU and flash memory. It is the best system-on-chip (SoC) for any short-range wireless personal area network or IPv6-enabled automation applications.
nRF52840 supports low energy Bluetooth, 802.15.4, ANT™ and user proprietary 2.4 GHz protocols. nRF52840 is used in different industrial projects such as industrial mesh networks, advanced personal fitness devices, and smart city infrastructure. In today's post, we will have a look at its working, specifications, applications, pinout, etc. I will also share some links where I have ...
Hello Friends! Hope you are doing great. I am back to give you a daily dose of valuable information so you can excel and grow in your relevant field and keep coming back for what we have to offer. Today, I am going to unlock the details on the Introduction to 8051 Microcontroller. This is an 8-bit Microcontroller developed by Intel in the 1980s. It is considered as a small system on an integrated chip that comes with CPU, I/O ports, timers, counters, RAM and ROM. The Microcontroller is a one step forward to a microprocessor.
Both Microcontrollers and microprocessor work in a similar way with some exceptions. Microcottler comes with everything required to run an embedded system like CPU, I/O ports and inbuilt peripherals like timers, counters, ...
Hello friends, hope you all are fine and having fun with your lives. In today's post we will have a look at How to interface keypad with Arduino in Proteus ISIS. Keypad is used almost in every engineering project. If you even look around you will find keypad in many electronic appliances. For example, a simple ATM machine has a keypad on it using which enter our pin code and give commands to the ATM machine. Similarly, calculator also has keypad on it. So, in short there are numerous applications of keypad. You should also read the Real Life examples of Embedded Systems and you will find Keypad in them as well.
Keypad is used where you need to used numerical buttons or you need to use lots of buttons for sending commands so like in some applicatio ...
Hello everyone! I hope you will be absolutely fine and having fun. Today, I am going to give you a detailed Introduction to ULN2003. We will also discuss the ULN2003 Datasheet, Pinout, Circuit Diagram & Proteus Simulation. If you have ever controlled any motor (i.e. DC Motor, Stepper Motor etc.) with a microcontroller (i.e. PIC, Arduino etc.), then you must have heard about drivers. Why do we need to use drivers? We use drivers (to control motors) because of two reasons.
First: Microcontrollers operate at 5V while motors operate at different voltages (5V, 12V, 24V etc.).
Second: Motors are Inductive loads thus they produce back emf, which may damage your microcontroller permanently (if not handled correctly).
Because of these two reasons, we have to use the driver in between t ...