Hi everyone! Thank you for viewing this article, I welcome you on board. In this post I’ll walk you through the detailed Introduction to BC546. BC546 is a low power NPN transistor mainly used for general purpose amplification and switching applications.
In this read you’ll study all nitty-gritty of BC546 transistor i.e. from pinout, pin configuration, and working principle to power ratings, key parameters, physical dimensions and applications. Keep reading.
Introduction to BC546
BC546 is a bipolar junction NPN transistor that finds applications in switching, amplification, impedance, H-bridge and current mirror circuits.
This transistor falls in silicon epitaxial planar transistor category which is generally divided into three groups A, B &am ...
Hey Guys! Hope you all are doing great and having fun with your lives. I am back to feed your stomach with plenty of information so you can progress and grow in real life. Today, I am going to unlock the details on the Introduction to 2n3055. It is a semiconductor NPN (negative-positive-negative) power transistor which comes in TO-3 Casing.
I'll try to cover as many aspects possible related to this device so can get a brief overview about what it does and what are the applications it is used for. Let's get started.
Introduction to 2n3055
The 2n3055 is a semiconductor NPN bipolar transistor which consists of three terminals called emitter, base, and collector.
Unlike FETs(Field effect transistors) it is a current controlled device in which sm ...
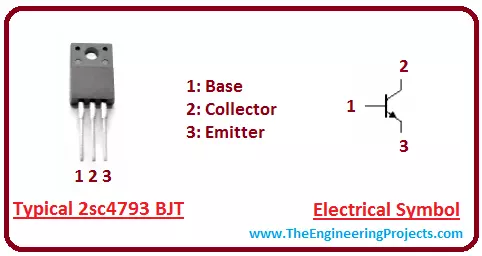
Hey Guys! I aspire you a very happy and promising life. My job is to give you daily dose of information so you can stand out of the party. Today, I am going to uncover the details on the Introduction to 2sc4793. It is an NPN (Negative-positive-negative) bipolar junction transistor (BJT) which is mainly used for amplification and switching purpose. I'll give you a brief details about this transistor and try to cover as many aspects as possible related to this transistor. Let's hop on the board and explore what kind of transistor is this and what are its main applications? Let's get started.
Introduction to 2sc4793
2sc4793 is an NPN bipolar junction transistor where P-doped layer is sandwiched between the two N-doped layer.
It is mainly three t ...
Hey Guys! I hope you are doing great and having fun. Today, I am going to give you the details on the Introduction to 2n3053. It is an NPN bipolar junction transistor which is mainly designed for amplification and switching applications. It consists of P doped semiconductor that exists between the two N doped layers. I'll give you a brief details about this transistor so you don't have to go anywhere to finding information regarding this transistor. Let's get started.
Introduction to 2n3053
2n3053 is an NPN bipolar junction transistor which is mainly used for general purpose amplification and switching purpose.
It consists of three terminals called emitter, base, and collector. and comes in TO-39 Metal Can Package.
This NPN transistor exhib ...
Hello friends, hope you all are fine and having fun with your lives. Today's post is about Interfacing of LCD with 8051 Microcontroller. In my previous post, we have seen How to do Serial Communication with 8051 Microcontroller, which was quite a basic tutorial and doesn't need much hardware attached to it. Now today we are gonna have a look at Interfacing of LCD with 8051 Microcontroller. LCD is always the basic step towards learning embedded as it serves as a great debugging tool for engineering projects.
LCD is also used almost in every Engineering Project for displaying different values. For example, if you have used the ATM machine, which you must have, then you have seen an LCD there displaying the options to select. Obviously that's quite a ...
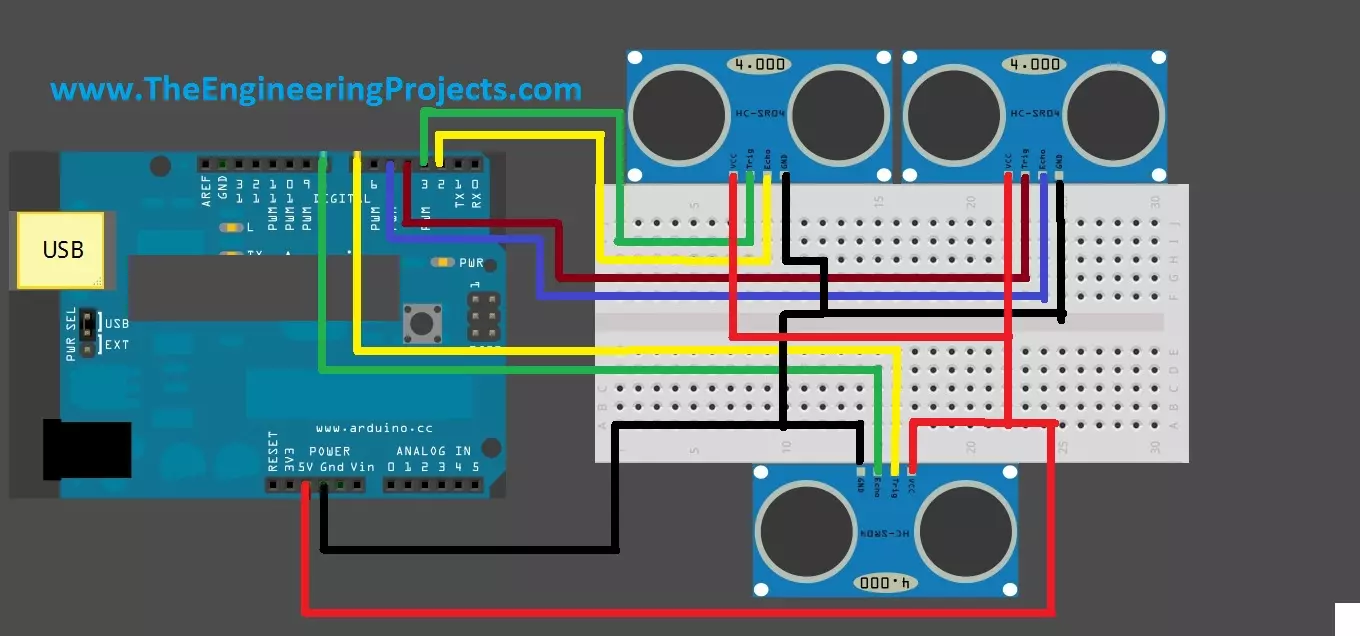
Hello friends, hope you are having fun and enjoying life. Today, I am gonna post about interfacing of multiple Ultrasonic sensor with Arduino. In the previous post, we have seen Interfacing of Ultrasonic Sensor With Arduino and in this post I have interfaced single ultrasonic sensor but in projects especially related to robotics, we have to interface multiple ultrasonic sensors. For example you have an obstacle detection robot, now in order to detect obstacle in front of robot you have to place once sensor on the front side but now you can't detect any object present on left or right side of your robot, so you have to place two sensors one on the left side of robot and one on the right side so in this project you need to use total three ultrasonic ...
Hello friends, I hope you all are doing great. In today's tutorial, we are gonna have a look at a detailed Introduction to HC-SR501. HC-SR501 is a motion detector sensor, that uses infrared waves for the detection of an object. It is an automatic control device, and also has large sensitivity and high reliability. It is used in auto-sensing control devices, where we need to perform motion detection.
HC-SR501 is used in industrial projects and buildings for security purposes. In today's post, we will have a look at its pinout, working, protocol, circuit diagram, etc. I will also share some links to projects where I have interfaced it with Arduino and some other microcontrollers. Friends if you have any questions please ask in the comments I will try my best to solve your problems and I w ...
Hi Guys! Hope you’re well today. Happy to see you around. Today, I’ll walk you through the Introduction to IRF520.The IRF520 is an N-channel power MOSFET mainly used for switching and amplification purposes. It comes with a breakdown voltage of around 100V and a low gate threshold voltage is 4V, making it an ideal pick for microcontroller applications.
I suggest you read this post all the way through as I’ll detail the complete Introduction to IRF520 covering datasheet, pinout, features, and applications.
Let’s get started.
Introduction to IRF520 MOSFET
The IRF520 is an N-channel power MOSFET mainly used for switching and amplification purposes.
It comes with three terminals named: gate, source, and drain and is available in the TO-220 package.
It is important to note t ...
Hello Fellas! I aspire a happy and prosperous life for you. We always enjoy when you keep coming back for what we have to offer. Today, I am going to unlock the details on the Introduction to 2sa1015. It is a low frequency PNP (positive-negative-positive) bipolar junction transistor which is mainly used for general purpose amplification. It mainly consists of N doped semiconductor which exists between the two layers of P doped material. I'll try to cover every aspect of this transistor so you don't have to go anywhere else for finding the information regarding this transistor. Let's hop on the board and explore the details on this PNP transistor.
Introduction to 2sa1015
2sa1015 is a PNP low frequency transistor which is mainly used for genera ...
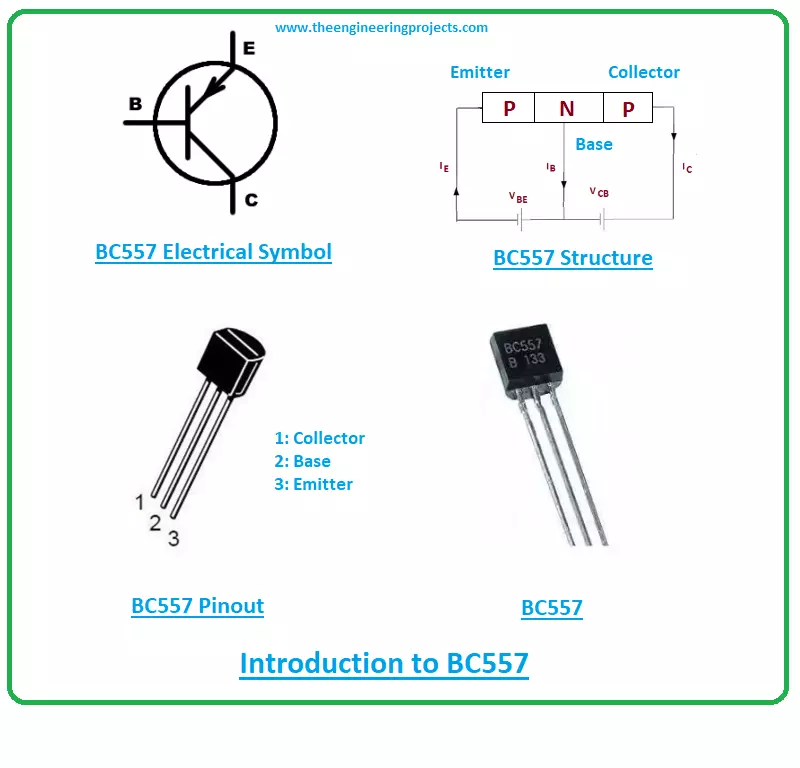
Hi Guys! Hope you’re well. I welcome you on board. Thank you for viewing this read. In this post today, I’ll walk you through the Introduction to BC557.
BC557 is a bipolar junction transistor with DC current gain 300. It falls under the category of PNP transistors where one N-doped layer stands between the two P-doped layers. The continuous collector current is 100mA means it can drive load under 100mA. BC557 comes in the TO-92 package and is mainly used for switching and amplification purpose.
Before I bore you to tears, let’s dive in and read the complete introduction to BC557 covering datasheet, pinout, working principle, power ratings, physical dimensions, and applications.
Continue reading.
Introduction to BC557
BC557 is a bipolar junct ...