Hey Guys! Hope you are doing great. Today, I am going to discuss the details on the Introduction to BJT (Bipolar Junction Transistor). It is an electronic component mainly used for amplification and switching purpose. As the name suggests, it is composed of two junctions called emitter-base junction and collector-base junction.
Don't confuse BJT with regular transistors. A transistor is a semiconductor device, comes with three terminals that are used for external connection with electronic circuits. A transistor is termed as a trans resistor which is used as switch or gate for electronic signals. Small signals applied between one pair of its terminals are used to control much larger signals at the other pair of terminals.
Actually, transistors are divided into two categories called u ...
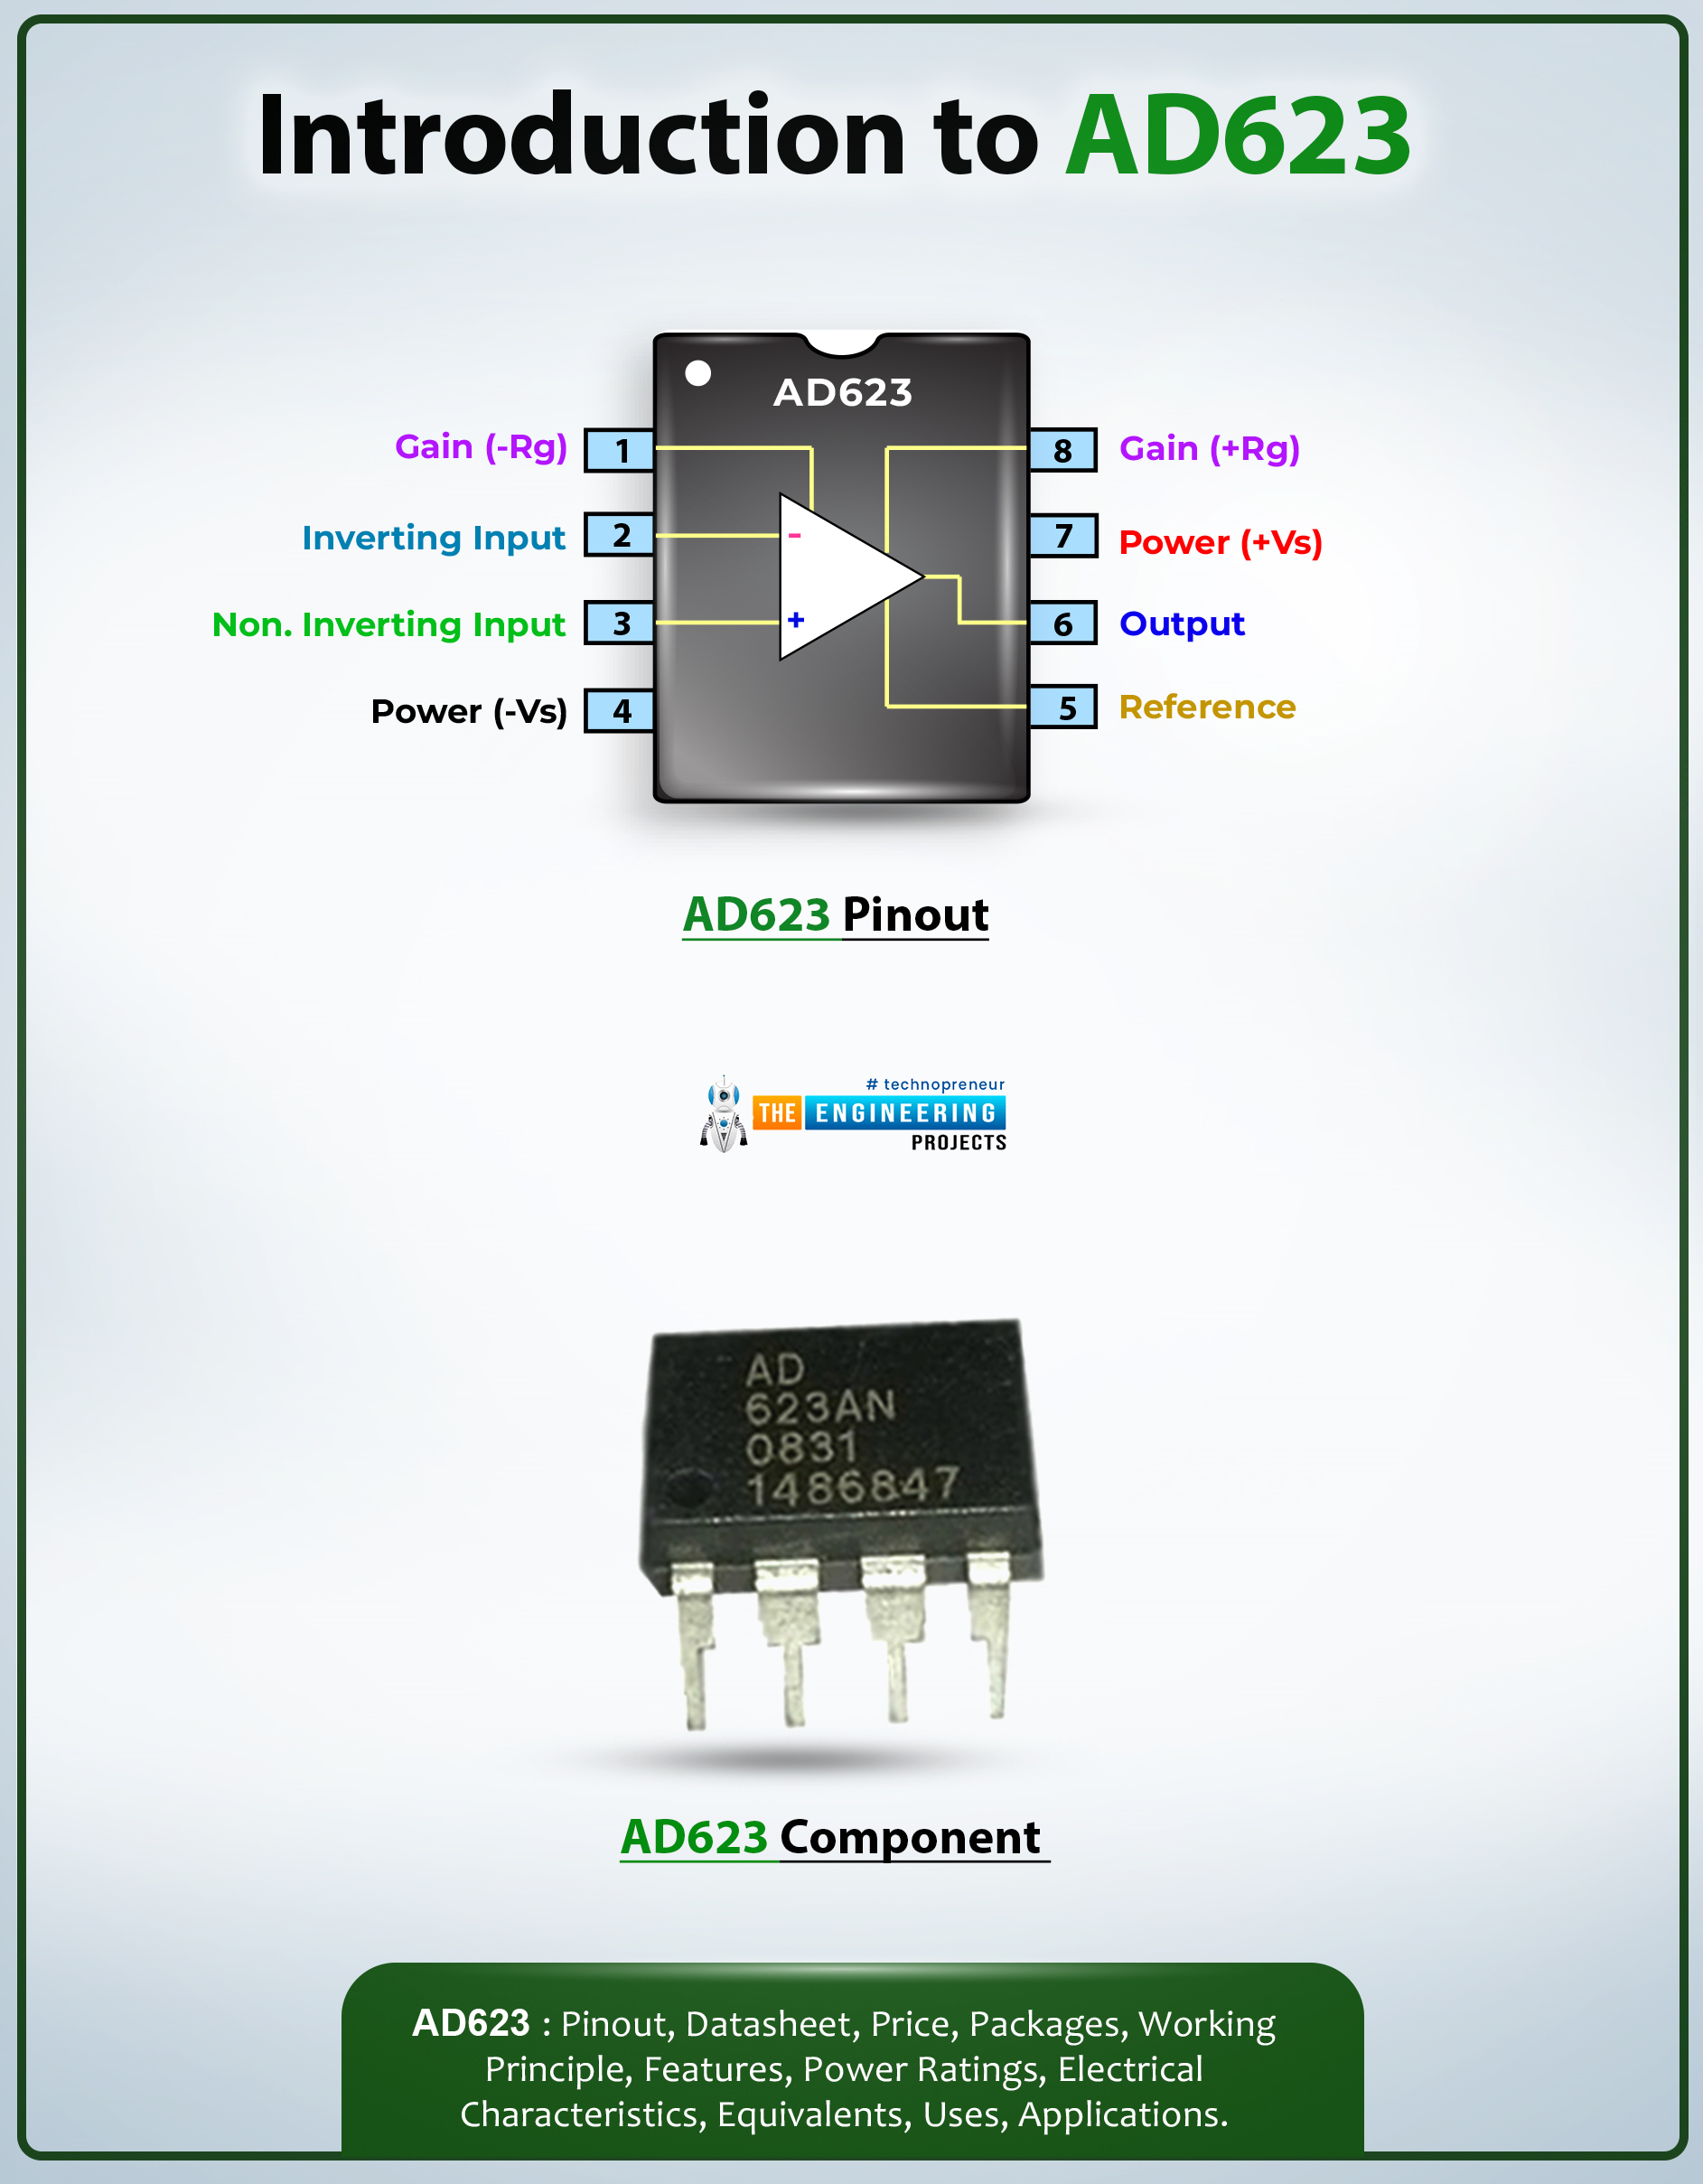
Hi Friends! I welcome you on board. Happy to see you around. In this post today, I’ll walk you through the Introduction to AD623.The AD623 is an instrumentation amplifier integrated with a rail-to-rail feature. It is mainly used in battery-operated applications due to the low current of 500uA.
It features a bandwidth of around 800 kHz which doesn’t require impedance matching since it incorporates buffer amplifiers that are attached to their input pins.
I suggest you buckle up as I’ll detail the complete Introduction to AD623 featuring datasheet, pinout, features, equivalents, and applications.
Let’s jump right in.
Introduction to AD623
The AD623 is an instrumentation amplifier that falls under the category of differential amplifiers that incorporate buffer amplifiers attache ...
Hello friends, I hope you all are doing well. In today's tutorial, we are going to design a Home Security System using Arduino UNO in Proteus software. It's the most commonly designed engineering project, especially in electrical, electronics and mechatronics engineering. Normally engineering students design it as a semester project during their engineering course.
So, today we will design a home security system from scratch in Proteus software. I have given the complete project below to download but I would suggest you to design it on your own so that you could understand it better. So, let's get started:
Home Security System: Project Description
Before going into the detail, let's first download the complete Proteus Simulation with Ardui ...
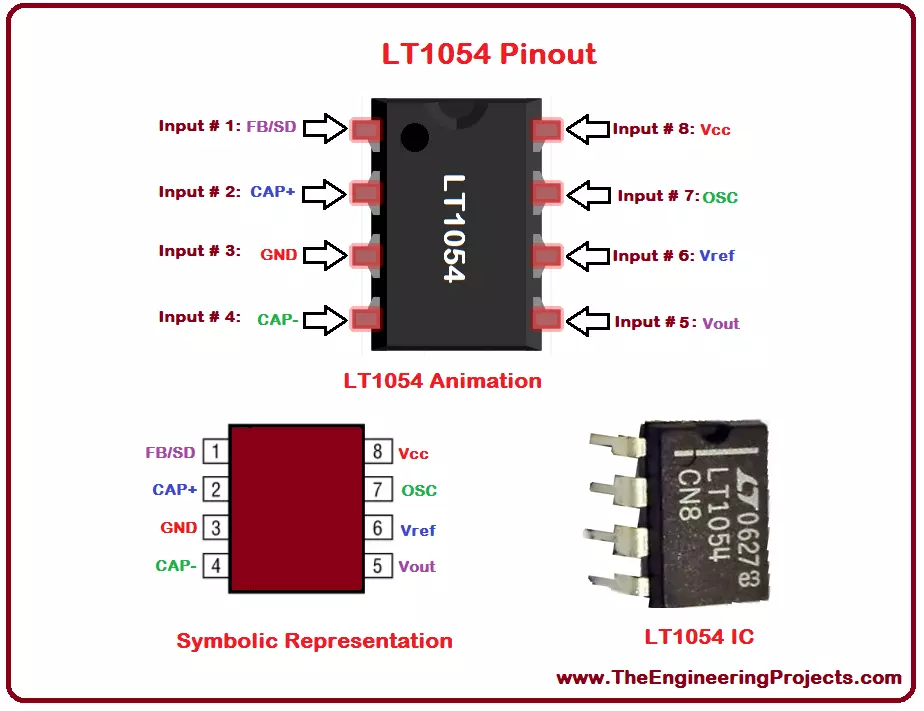
Hello everyone! I hope you all will be absolutely fine and having fun. I am going to elaborate you on Introduction to LT1054. It is a monolithic device. LT-1054 is also known as voltage regulator and bipolar capacitive voltage converter. Its mean feature is that it provides very low voltage losses as compared to the other common converters. LT 1054 also provides large output currents in comparison to general converters. It provides a voltage drop of around 1.1V while operating at 100mA.
LT 1054 provides us with a feature of regulation. This feature was not available in earlier voltage converters. We can get a regulated output just by inserting an external resistance. We can shut down LT-1054, if we ground its feedback terminal. Its internal osci ...
Hi Folks! Hope you’re well today. Happy to see you around. In this post today, I’ll detail the Introduction to SB5100.
The SB5100 is a Schottky diode used in electrical circuits to avoid overvoltage. It is also known as a hot-carrier diode and comes with low forward drop voltage. It is capable of high surge current and is used in power management and automotive applications.
You can go through the Introduction to 1n5822 and Introduction to 1n5821 that I have uploaded recently.
Read this entire post till the end as I’ll walk you through the datasheet, pinout, features, and applications of this tiny component SB5100.
Introduction to SB5100
The SB5100 is a Schottky diode, also known as a hot-carrier diode, mainly employed for extremely fast swi ...
Hi Guys! Hope you’re well today. Happy to see you around. Today, I’ll walk you through the Introduction to IRF520.The IRF520 is an N-channel power MOSFET mainly used for switching and amplification purposes. It comes with a breakdown voltage of around 100V and a low gate threshold voltage is 4V, making it an ideal pick for microcontroller applications.
I suggest you read this post all the way through as I’ll detail the complete Introduction to IRF520 covering datasheet, pinout, features, and applications.
Let’s get started.
Introduction to IRF520 MOSFET
The IRF520 is an N-channel power MOSFET mainly used for switching and amplification purposes.
It comes with three terminals named: gate, source, and drain and is available in the TO-220 package.
It is important to note t ...
Hello friends, I hope you all are doing great. In today's tutorial, I am going to show you How to Interface Arduino with 74HC595 & 74HC165. I have already interfaced these shift registers separately with Arduino. In the first tutorial we have seen Arduino 74HC595 Interfacing in which I have discussed How to increase the output pins of Arduino using 74HC595. After that in second tutorial we have seen Arduino 74HC165 Interfacing where we have increased the input pins of Arduino.
So, now we are gonna interface both of these shift registers with Arduino UNO and will increase both input and output pins of Arduino. I have also given the Proteus simulations for download at the end of this tutorial along with Arduino code. So, lets get started with In ...
Hi Everyone! I hope you are doing great and enjoying your life. I am back to give you daily dose of information so you can grow and progress in your relevant field. Today, I am going to give you the details on the Introduction to 2n4403. It is basically PNP(Positive-negative-Positive) bipolar junction transistor where N doped layer is sandwiched between the two P doped layers. It comes in plastic TO-92 compact casing. I'll try to give you brief details about this transistor so you don't need to go anywhere for finding the information regarding this transistor. Let's get started.
Introduction to 2n4403
2n4403 is a PNP bipolar junction transistor where conduction is carried out by the movement of holes and electrons but majority charge carriers w ...
Today, we are gonna have a look on How to Interface Ultrasonic Sensor with Arduino. Few days ago, I have posted a complete tutorial on How to Use Ultrasonic Sensor Library in Proteus and later I have posted different examples on How to Simulate Ultrasonic Sensor in Proteus. Those posts were about Proteus Simulations and weren't about hardware interfacing, so I thought today let's interface it in hardware.
Simulation is a good starting point for projects but they are really far away from real world. It happened to me a lot of times that my simulations are working perfectly fine but when I design the same circuit in hardware then it says no I am not gonna work. :) So, the bottom line is never trust simulations, unless you properly test it on hardwar ...
Hello friends, I hope you all are fine and having fun with your lives. In today's tutorial, I am going to show you How to use Arduino Serial Monitor. It's not gonna be a very big post but its really very essential if you wanna learn Arduino coding. Because Arduino Serial Monitor is a great debugging tool and it helps a lot in Arduino Projects. In the previous post we have seen How to use digitalRead in Arduino and if you recall that tutorial then you must remember that in it we have used some Serial printing. So that's what we are gonna cover in today's tutorial.
Before going into the details, I must suggest you to first read these two posts because in those tutorials I have shown the serial communication which is essential for Serial Monitor Work ...