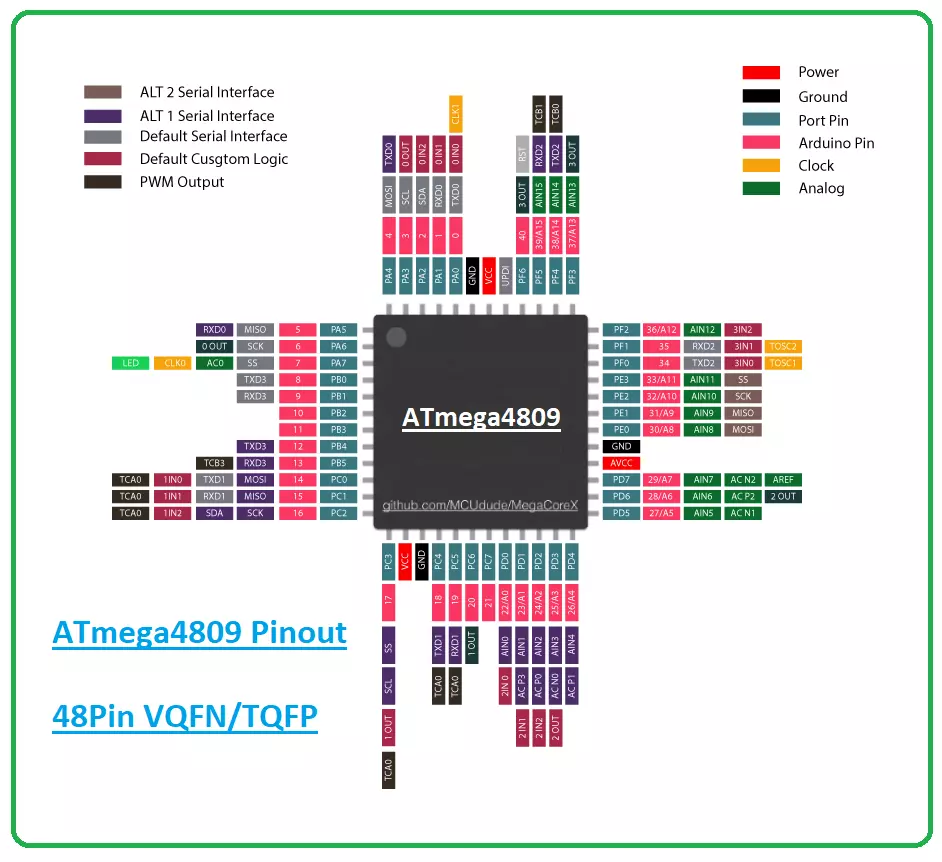
Hi Guys! I welcome you on board. Happy to see you around. In this post today, I’ll walk you through the Introduction to ATmega4809.
The ATmega4809 is a type of microcontroller that belongs to the megaAVR® 0-series. It features an AVR® processor with a clock speed running at up to 20 MHz. It comes with a Flash memory size up to 48 KB, 256 bytes of EEPROM, and 6 KB of SRAM. It is available in 28-, 32-, 40-, or 48-pin packages.
I suggest you buckle up as I’ll detail the complete Introduction to ATmega4809 covering datasheet, pinout, features, power ratings, and applications.
Let’s get started.
Introduction to ATmega4809
The ATmega4809 microcontroller belongs to the megaAVR® 0-series that contains an AVR processor.
The series carries low power ...
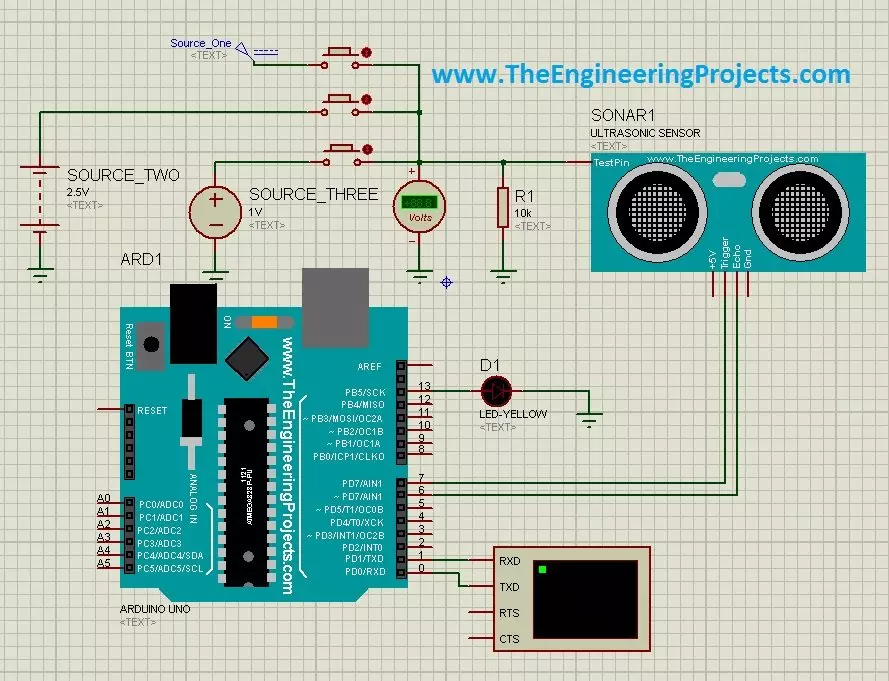
Hello friends, a few days ago I posted an Ultrasonic Sensor Library for Proteus, using which one can easily simulate ultrasonic sensor in Proteus. The post was highly praised by the reader and I have received quite good feedback from the followers. So, I thought of sharing some more examples related to it so that users can get a complete understanding of how to use Ultrasonic sensors in Proteus. Today, we are gonna have a look on different Ultrasonic Sensor Simulation in Proteus. If you haven't read the previous post then first have a look at it because without the installation of Ultrasonic Sensor Library in Proteus, you won't be able to use these examples. Ultrasonic Sensor is used widely in Embedded Systems.Today, I am gonna share three examples of Ultrasonic Sensor Simulation in Proteu ...
[vc_row][vc_column][vc_column_text]
Hello friends, hope you are fine and having fun with your lives. Till now we have seen two tutorials on Pixy Camera module, in the first tutorial we have seen How to Get started with Pixy Camera and after that we have seen How to Install Pixy Camera software which is named as PixyMon. So, now I hope that you have installed the Pixy camera software and have the Pixy Camera module in hand along with USB to Mini USB cable. Because in this tutorial we are gonna plug our Pixy Camera module with moduter and will upload the latest firmware in our Pixy Camera Module, which isn't much difficult and would be a piece of cake if you followed all the instructions carefully.
Pixy Camera comes with some old firmware which is up ...
Hello everyone! I hope you all will be absolutely fine and having fun. Today, I am going to share my knowledge with all of you guys about DC Current Sensor ACS712 Arduino Interfacing. First of all, I would like to tell you about importance of current sensing/measuring. Sensing the amount of current passing through any circuit can be useful in a lot of applications. For example, in low power consuming equipment, current sensing will be helpful to understand the system's impact on its battery life. The current sensing can also be used to make the decisions regarding safety in over current protection circuits.
Simply, we can say that sensing and controlling the flow of the current through the circuits is now a fundamental requirement e.g. over curr ...
Hello everyone, in today's post we are gonna have a look at how to interface temperature sensor Dallas 18B20 with Arduino. There are many temperature sensors available in market like LM35, DHT11 etc but personally I like Dallas18B20 most of all, as it gives the most accurate result up to four decimal points. It operates on single wire and sends all data through this wire. Another advantage of this wire is you can interface multiple sensors with a single data line. You should also have a look at How to use 18B20 in Proteus ISIS.
In today's post, we are gonna get value from this sensor and then print it over the Serial Terminal as well as LCD. We will get the values in degree centigrade. Its not much difficult to interface 18B20 with arduino and als ...
Hello everyone, I hope you all are doing great. In today's post, I am going to share a Final Year Project in detail, named as Real Time Security Control System using XBee and GSM. I will give you all the details so that you can easily design it on your own. I've given the Proteus Simulation to download below. In that zip file, you will get both the Arduino codes and Proteus Simulations.
I have divided this whole project design into four parts. If you got into any trouble in your project, then ask in comments and I will try my best to resolve them. So, today we are gonna have a look at the basics of this Security project. There are a lot of systems introduced in the market these days that are used to transfer sensor data from one node to another ei ...
Hello Geeks, I hope you all are doing great and enjoying your festive seasons. This time, we have come up with a new project which will make your festival a bit brighter so here comes a Christmas tree.
It is said that Christmas is the center of all the celebrations. Did you guys know the scientist who discovered the light bulb, Thomas Edison and his friends were the first to put up the light bulbs on the Christmas tree, and here we are going to keep that tradition forward? Well, it’s time to gear up for the next season of Christmas being tech-savvy. Hence we have decided to brighten up a Christmas tree with the usage of Arduino Uno and LEDs in real life.
Software to Install:
To make our festival a little safer, we will first make our Christmas tree in the simulation and for that, we will ...
[vc_row][vc_column][vc_column_text]
In the previous tutorial, we have seen how to Get Started with Pixy Camera, which was quite a basic tutorial and we have covered just the basic cables required to set up pixy camera. Now along with cables we are also gonna need software for training our Pixy Camera. So in this tutorial we are gonna see how to install Pixy Camera Software which is named as PixyMon. As I explained earlier in previous post that first of all, we need to connect our Pixy Camera with Computer or laptop and then using its software PixyMon we need to train our Pixy Camera so that it can recognize objects present in front of it.
PixyMon is quite a simple software and quite easy to use. In this post, we are not gonna check How to use PixyM ...
Hello friends, today we are gonna have a look on how to interface Seven Segment with Arduino in Proteus. In my last post, I have posted an Arduino Library for Seven Segment Display, which is designed by our team and is quite basic in functionality. So, if you haven't checked that post then first of all check that one and download the Arduino Library for Seven Segment Display as I am gonna use that library in today's post. Moreover, in order to run this library you are also gonna need to download Arduino Library for Proteus, using this library you will be able to use Arduino board in Proteus so also read that post and download this library and install it in your Proteus.
Again I am mentioning that its the first library designed by our team so its i ...
Hello friends, hope you all are fine and having fun with your lives. In today's post, I am gonna share How to get Hex File from Arduino. It's quite a simple post and I have already explained it many times in my posts but still, I am getting a lot of messages regarding it that's why I thought to write a separate post for it. First of all, let's have a little introduction about it. If you have worked on PIC Microcontrollers or Atmel etc then you have seen that you always get hex files from their compilers and then you burn that hex file in the respective Microcontroller using their programmer or burner. But that's not the case with Arduino. In Arduino boards, you simply plug it with your computer and you hit the Upload button and the code automatica ...