Hi Friends! Hope you are getting along with life pretty well. Today, I'll uncover the detailed Introduction to 2n5415 which is a PNP transistor mainly used for general purpose low-power amplifying and switching applications.
It comes with three layers: two P semiconductor layers and one doped N-layer where later is encapsulated between other two P-layers.
There are two major types of transistor: Bipolar Junction Transistor and Unipolar Transistor. This transistor falls under the category of Bipolar Junction Transistor as it comes with two charge carriers i.e. electrons and holes where later are the major charge carriers in PNP transistors.
In this post, I'll try to nail down everything related to 2n5415: its main features, working, and applicat ...
Hello guys! I hope you’re all in a good mood today because we are going to review the design of an interesting project today. We’ll be looking to design 4-way traffic lights in such a way that their delay is variable and is dependent upon the traffic density. This project is of intermediate difficulty level for people studying in undergrad engineering school with electronics, electrical and mechatronics as their major. It is also for the people learning Arduino and basic circuit design on their own or through some course. We have already designed a Simple 4-Way Traffic Light Control using Arduino and today we will make it smart by adding a variable delay.
Variable 4 Way Traffic Light:
As you all already know the importance of traffic lights and t ...
Hello everyone, we are back with a new project and we hope you all are doing well. In this article, we will discuss a project named Smart Irrigation System using Arduino UNO. We will use different sensors to measure the environmental and crop parameters which are responsible for good production. We will also make the water pump system automatic which will open the water valve automatically according to the soil moisture of the crop.
We will discuss all points and concepts briefly in this article and also provide a Proteus Simulation to observe how it will work in the real world. Complete fully explained code and simulation are also provided below as you go ahead in this article. You can download it from there.
Smart Irrigation System using Arduino ...
Hi readers! I hope you are having a creative day. Today, I am sharing the list of the top embedded proteus libraries in V1.0 especially designed for engineering students. Till now, you have seen blogs on different projects, components, libraries, and simulations. Yet, I am sharing the list of the first versions of these embedded libraries that will help the students throughout multiple projects. These libraries are highly useful in multiple domains of engineering, and if you don’t know how to download the new libraries
, then you must see the link provided.
This is the list of all new proteus libraries for engineering students
. The zip files are present in the link to the related manual, which has details on how to download, install, and use these libraries. Now, let’s start learning ...
Hello friends, I hope you all are doing great. In today's tutorial, I am going to share a new Infrared Sensor Library for Proteus. This IR sensor is not available in Proteus and we are sharing this library for the first time. I hope it will help in your Embedded Systems Projects particularly related to robotics and automation. So, if you want to work on this IR Sensor then I would suggest you to first design its simulation and then try your luck with hardware.
There are different types of Infrared Sensors & modules available in the market. Some of these modules have transmitter & receiver on separate chips and are mostly get activated when someone interrupts the light. The one we have designed has a transmitter & receiver on a single c ...
Hey Guys! I hope you all are doing great. In the previous tutorial, we studied the basics of Semiconductors, where we briefly discussed the PN Junction. Today, we are going to have a detailed overview of PN Junction.
But before getting into the details of PN Junction, we need to first recall a few concepts from the previous lecture:
Semiconductor Basics
As we know, the conductive power of a semiconductor material lies between a conductor and an insulator. So, it can act as a pure conductor as well as a pure insulator, depending on the applied conditions. Semiconductors are divided into two types:
Intrinsic Semiconductor.
Extrinsic Semiconductor.
Intrinsic Semiconductor
A semiconductor in its pure form is called an Intrinsic semiconductor. In this state, the outermost valan ...
Hey Fellas! Hope you are doing great. I am here to give you the daily dose of information relating to engineering and technology. Today, I am going to give you the details on the Introduction to 2sc4617. It is an NPN (negative-positive-negative) transistor which is used for general purpose amplification. This component comes in SC-75/SOT-416 sealed package which is mostly used for low power applications. I am going to explain the brief overview of 2sc4617. Let's get started.
Introduction to 2sc4617
2sc4617 is a three terminal NPN silicon transistor which consists of two N doped layers which cover one P doped layer. It is a bipolar transistor which is usually used for amplification purpose.
Small amount of base current is used to handle the la ...
Hello friends, I hope you all are happy, healthy and, content. We have been discussing transistors lately, from the basic definition to the types and characteristics of transistors we have covered it all. If you have a brief idea about transistors, you must be aware of the field effect transistor or you might have heard or read about it somewhere, it is one of the earliest known types of transistors which is our topic of discussion today.
Field Effect Transistors were made to cover up the lacking of previously known transistors which occupied large space and produced a lot of noise, another major problem was the low reliability of previous versions. So, let's get started with the FETs.
Definition of Field Effect Transistor
Let us define field effect transistor first,
"The Field e ...
Hello everyone! I hope you all will be absolutely fine and having fun. Today, I would like to provide a complete discussion on Introduction to C945. You will see a detailed description on the basics of the transistor C-945 and its different parameters. I have already shared Introduction to MMBD914, 74HC245, NE556, LM348 and PIC18F4550. So, must go through these tutorials in order to have better understanding about different IC's. C-945 transistor is basically a Negative Positive Negative (NPN) bipolar junction transistor.
C945 is usually used in the electronic circuits where there is a need of high speed transistor and a low current. C-945 has three semiconductor regions named as emitter, base and collector respectively. Since C-945 is a bipolar ...
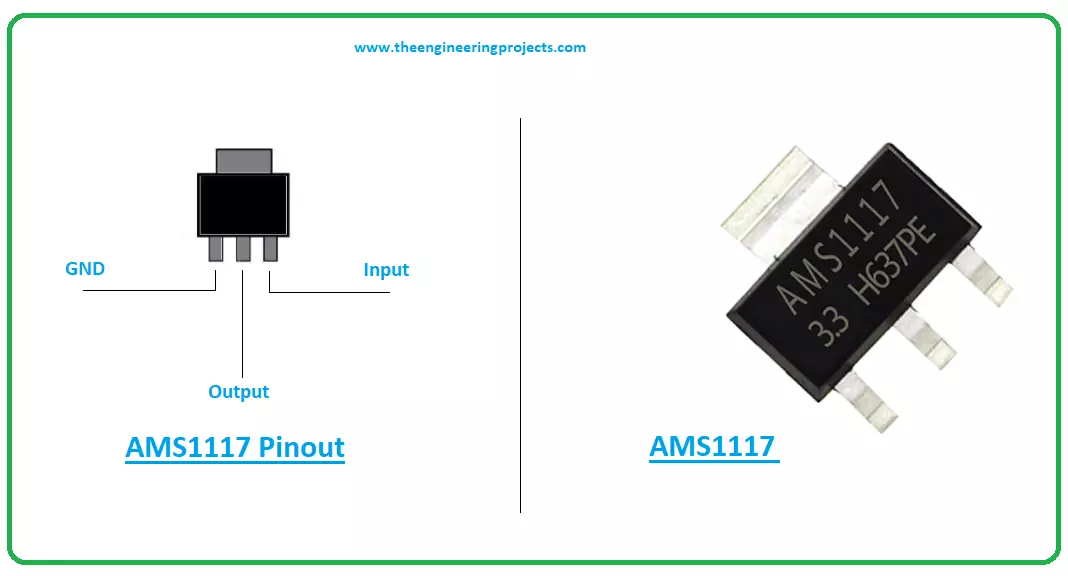
Hello Guys! Hope you’re well today. I welcome you on board. Thank you for clicking this read. In this post today, I’ll walk you through the Introduction to AMS1117.
The AMS1117 is a common voltage regulator that comes with both fixed and customizable voltages. It is a 3-pin device mainly used to drive load under 1A. The output voltage ranges from 1.5V to 5V. When it works at maximum current, it results in a low dropout voltage of 1.3A.
I suggest you read this post all the way through, as I’ll be discussing Pinout, datasheet, features, and applications of this tiny device AMS1117.
Let’s jump right in.
Introduction to AMS1117
The AMS1117 is a common voltage regulator mainly used for high-efficiency linear regulation and post-regulation switchi ...