Hello friends, I hope you all are doing great. In today's tutorial, we are gonna have a look at a detailed Introduction to LM35. LM35 is a type of commonly used temperature sensor, that can be used to measure temperature with an electrical output compared to the temperature in (°C). In can measure temperature in a better way than a thermistor.
LM35 is used in industries and commercial buildings where high accuracy of temperature measuring is needed. I will give you a detailed overview of this temperature sensor in today’s post where we will have a look its pinout, working, protocol, etc. I will also share some links of projects where I have interfaced it with Arduino or other microcontrollers. If you have any questions please ask in the comments, I will resolve your queries and will gu ...
Hello everyone! I hope you all will be absolutely fine and having fun. Today, I am going to give you detailed discussion on Introduction to LM2904. LM 2904 consists of two builtin amplifiers. These amplifiers have high gain and they are internally frequency compensated. These amplifiers are designed for the operation from a single power supply for a large range of voltages. We can also operate them from multiply power supplies as well.
LM-2904 operates on 3.3V power supply, it is the most common power supply in digital systems. LM 2904 is also available in small sizes i.e. they are available in the latest technology DSBGA. LM-2904 has a lot unique features in comparison to the other standard amplifiers. These features include large DC voltage ga ...
Hello friends, I hope you all are doing great and having fun with your lives. In today's tutorial, I am going to share How to interface Arduino with GLCD. I am gonna design a Proteus Simulation in which I will interface Arduino GLCD together. GLCD is also called Graphical LCD so today we are gonna do some designing on the LCD. The GLCD I am going to use is ks0108 and its model in Proteus is LGM12641BS1R and I have shared the complete Simulation along with Arduino Code below for download. But I would suggest you to design it on your own so that you could get the most out of it. If you haven't worked on the LCD before then I would suggest you to read How to Interface Simple LCD with Arduino.
Moreover, I am quite happy to announce that we have starte ...
What is a First Article Inspection?
First article inspections, originally developed for the aerospace and defense industries, are now being used as best practices in other industries. They are an effective way to ensure that the manufacturing process produces an output that meets design specifications. First article inspection helps reduce production delays and waste.
First article inspection is an integral part of the AS9145 process. It is also part of the APQP/PPAP (Advance Product Quality Planning/Production Planning and Control) approval process. The first article inspection report summarizes the design and manufacturing process of the part, including specification requirements, raw materials and associated sub-assemblies.
First article inspections are performed to ensure that t ...
Hello readers, we hope you all are doing great. Welcome to the 1st lecture of Section 4 in the ESP32 Programming Series. In this section, we will interface the ESP32 module with common Embedded modules(i.e. LCD, Keypad, RTC etc.).
In today's tutorial, we will interface ESP32 with a 16x2 LCD and will display data using both Data Mode and I2C Mode. LCD is the most commonly used embedded module in IoT Projects. It is used to display different types of data i.e. sensor readings, warning messages, notifications etc.
Before going forward, let's first have a look at what is LCD and How it works:
16x2 LCD Module
LCD(Liquid Crystal Display) is a type of electronic display module that is used in a wide variety of applications and devices such as calculators, computers, mobile phones, ...
Hello Fellas! I aspire a happy and prosperous life for you. We always enjoy when you keep coming back for what we have to offer. Today, I am going to unlock the details on the Introduction to 2sa1015. It is a low frequency PNP (positive-negative-positive) bipolar junction transistor which is mainly used for general purpose amplification. It mainly consists of N doped semiconductor which exists between the two layers of P doped material. I'll try to cover every aspect of this transistor so you don't have to go anywhere else for finding the information regarding this transistor. Let's hop on the board and explore the details on this PNP transistor.
Introduction to 2sa1015
2sa1015 is a PNP low frequency transistor which is mainly used for genera ...
Hello friends, I hope you all are doing great. In today's tutorial, we are gonna have a look at detailed Introduction to S8550. S8550 is a PNP transistor henceforth during reverse biasing both the collector and emitter will be open and during forward biasing these will be closed. The value of gain is 300 this value governs the magnification ability of the transistor. Its gain is very high therefore it is used for magnification solicitations.
When it is completely biased it can permit a maximum 700mA current to drift crosswise the collector and emitter. This phase is named as Saturation Region and the distinctive voltage permitted across the (VCE) or (VCB) can be 20V and 30V correspondingly. In today’s post, we will have a look at its protection, ...
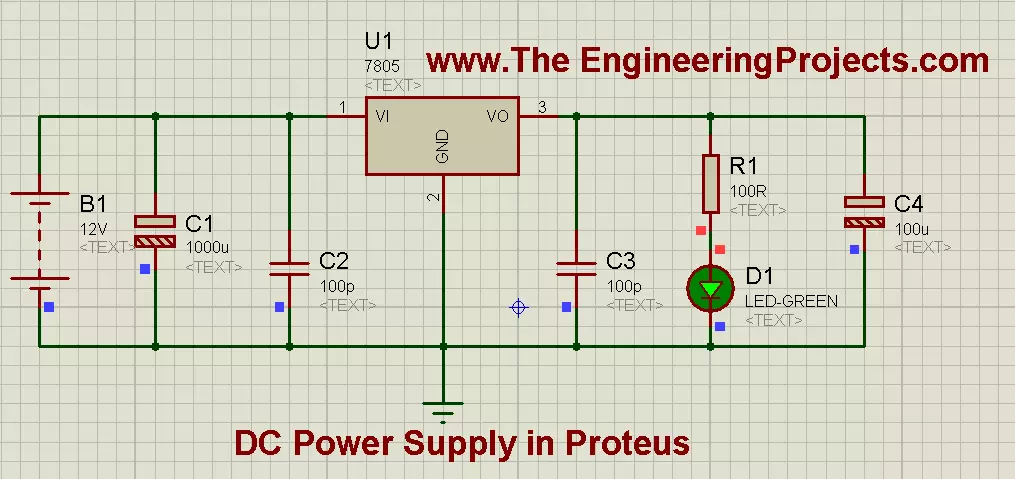
Hello friends, hope you all are fine and enjoying in your life. In the previous post, we have seen How to use Oscilloscope in Proteus ISIS, today I am going share a new and a very important Tutorial which is How to Design a 5V Power Supply in Proteus? This project is very simple and of basic level but importance of this project is that it is used as a base in almost all large electronics project, designed now-a-days. When I start working on any project then the first thing, I need to design is this DC power supply, because without powering up the components, we can't use them. :)
While designing a 5V Power Supply in Proteus ISIS, we will be using Voltage Regulator IC, which is commonly known as 7805. This voltage regulator is used to regulate or c ...
Hello friends, hope you all are healthy, wealthy and wise. Today's topic is about the control of stepper motor. In the last post we have seen How to control DC motor in Proteus, and now we are gonna see How to design a Stepper Motor Drive Circuit in Proteus ISIS. Stepper motors are usually of two types and the main difference between the two is in the number of wires used to control them. Mostly stepper motors use 6 wires to control them but few of them also have 4 wires to control them. Today we will have a look on the 6 wired stepper motor.
In stepper motor, there are electromagnets which gets polarized when we supply voltage to them and depolarized when we remove the voltage. These electromagnets act as a stater and when one side get magnet ...
XBee modules have become a cornerstone for wireless communication in today's electronics and embedded systems projects. Whether you are building a home automation system, an industrial control network, or simple point-to-point communication between devices, XBee offers a reliable and easy-to-use solution. In this comprehensive introduction, we will explore what the XBee module is, how it works, its core features, and how you can integrate it into microcontroller-based projects.
In future tutorials, we’ll delve deeper into specific interfacing guides, including how to interface the XBee module with a computer and connecting XBee to an Arduino. While Arduino will be our primary focus due to its popularity and accessibility, you can also connect XBee modules to other microcontrollers such as ...