Hello friends, hope you all are fine and having fun with your lives. Today's post is about getting started with pixy camera. Now, the first thing comes in mind is what is Pixy Camera so let's first have a little introduction about Pixy Camera on which I recently worked. Pixy Camera is a small camera board which uses NXP microcontroller. Its a very powerful board and can get easily interfaced with simple Arduino UNO board. So, now we can do image processing even on Arduino UNO. Image Processing needs a powerful board that's why we can't interface simple webcam with Arduino UNO or mega etc. Before using pixy camera, when I need to do on board image processing I always used either Arduino YUN, Raspberry Pi or Arduino USB host shield but still it was ...
Hey Guys! Hope you are doing great. Today, I am going to discuss the details on the Introduction to BJT (Bipolar Junction Transistor). It is an electronic component mainly used for amplification and switching purpose. As the name suggests, it is composed of two junctions called emitter-base junction and collector-base junction.
Don't confuse BJT with regular transistors. A transistor is a semiconductor device, comes with three terminals that are used for external connection with electronic circuits. A transistor is termed as a trans resistor which is used as switch or gate for electronic signals. Small signals applied between one pair of its terminals are used to control much larger signals at the other pair of terminals.
Actually, transistors are divided into two categories called u ...
Hey Fellas! Hope you are doing great. I am here to give you the daily dose of information relating to engineering and technology. Today, I am going to give you the details on the Introduction to 2sc4617. It is an NPN (negative-positive-negative) transistor which is used for general purpose amplification. This component comes in SC-75/SOT-416 sealed package which is mostly used for low power applications. I am going to explain the brief overview of 2sc4617. Let's get started.
Introduction to 2sc4617
2sc4617 is a three terminal NPN silicon transistor which consists of two N doped layers which cover one P doped layer. It is a bipolar transistor which is usually used for amplification purpose.
Small amount of base current is used to handle the la ...
In today's post, I am gonna share a new Arduino Library for Seven Segment Display. In my recent project, I got a chance to work on seven segment displays, I have worked on them using PIC microcontroller but haven't got a chance to use them with Arduino. So, now as usual when I started working on them, I started searching for Arduino Library but I kind of got disappointed after getting quite heavy libraries for seven segments, and after a lot of search I thought of designing my own Arduino library for seven segment display, which I am gonna share in this post. :)
It's not very advanced library as we know seven segment displays are not too complex, so its quite simple and using it you can quite easily display any numerical digit on the seven segment ...
Hello friends, I hope you all are doing great. In today's tutorial, we are gonna have a look at detailed Introduction to Atmega32. ATmega32 is eight-bit higher enactment microcontroller, it is manufactured by an Atmel (it is a designer and builder of different semiconductors materials). It is founded on enriched RISC which stands for (Reduced Instruction Set Computing) design which consists of 131 (one thirty-one) potent commands.
Mostly commands implement in one mechanism sequence. The maximum frequency at which it operates sixteen MHz. It delivers a subtle equilibrium among enactment and balance. It is the Pico Power sort of the normal ATmega328 kind which permits it to work below lesser voltage and power necessities, nearly 1.62 volts. In today’s post, we will have a look at its fort ...
Hello everyone! I hope you will be absolutely fine and having fun. Today, I am going to give you an Introduction to 2N2222. It is the most commonly used Negative-Positive-Negative (NPN) Bipolar Junction Transistor (BJT) available in the market now a days. 2N2222 can be used for different purposes e.g. switching and amplification of analog signals. I hope you have enjoyed the previous post on Introduction to ULN2003.
The major functional area of 2N2222 is enclosed in TO-18 package. Due to the low cost and small size it is the most commonly used transistor. One of its key features is its ability to handle the high values of currents as compared to the other similar small transistors. Normally it is capable of switching a load current of 800mA whic ...
Hi Guys! Glad to see you here. I welcome you on board. In this post today, I’ll be discussing Analog Vibration Sensor Library for Proteus. I have already shared the digital Vibration Sensor Library for Proteus, you should check that as well.
I’ve been adding brand new libraries for proteus covering sensors and Arduino boards. I’ve recently discussed Analog PIR Sensor Library for Proteus and Analog Flex Sensor Library for Proteus. You may be stuck into thinking I’ve previously shared those libraries but they were libraries covering digital PIR and digital Flex sensors, here we discussed analog libraries for both PIR and Flex sensors.
Before I pen down how to download and simulate Analog Vibration Sensor Library for Proteus, let’s discuss what is ...
Hi Friends! I welcome you on board. Thank you for clicking this read. In this post today, I’ll detail the Introduction to IRF740.The IRF740 is an N-channel power MOSFET used for extremely fast switching applications. It comes with a power dissipation of around 125W and can support loads up to 400V. The maximum drain current of this device is 10A and the drain-source capacitance is 1450pF.
I suggest you read this post till the end as I’ll describe the complete Introduction to IRF740 covering datasheet, pinout, features, and applications.
Introduction to IRF740
The IRF740 is an N-channel MOSFET that comes with 125W power dissipation. This is the power device that dissipates during the working of this component.
This device is mainly used for fast switching applications and comes ...
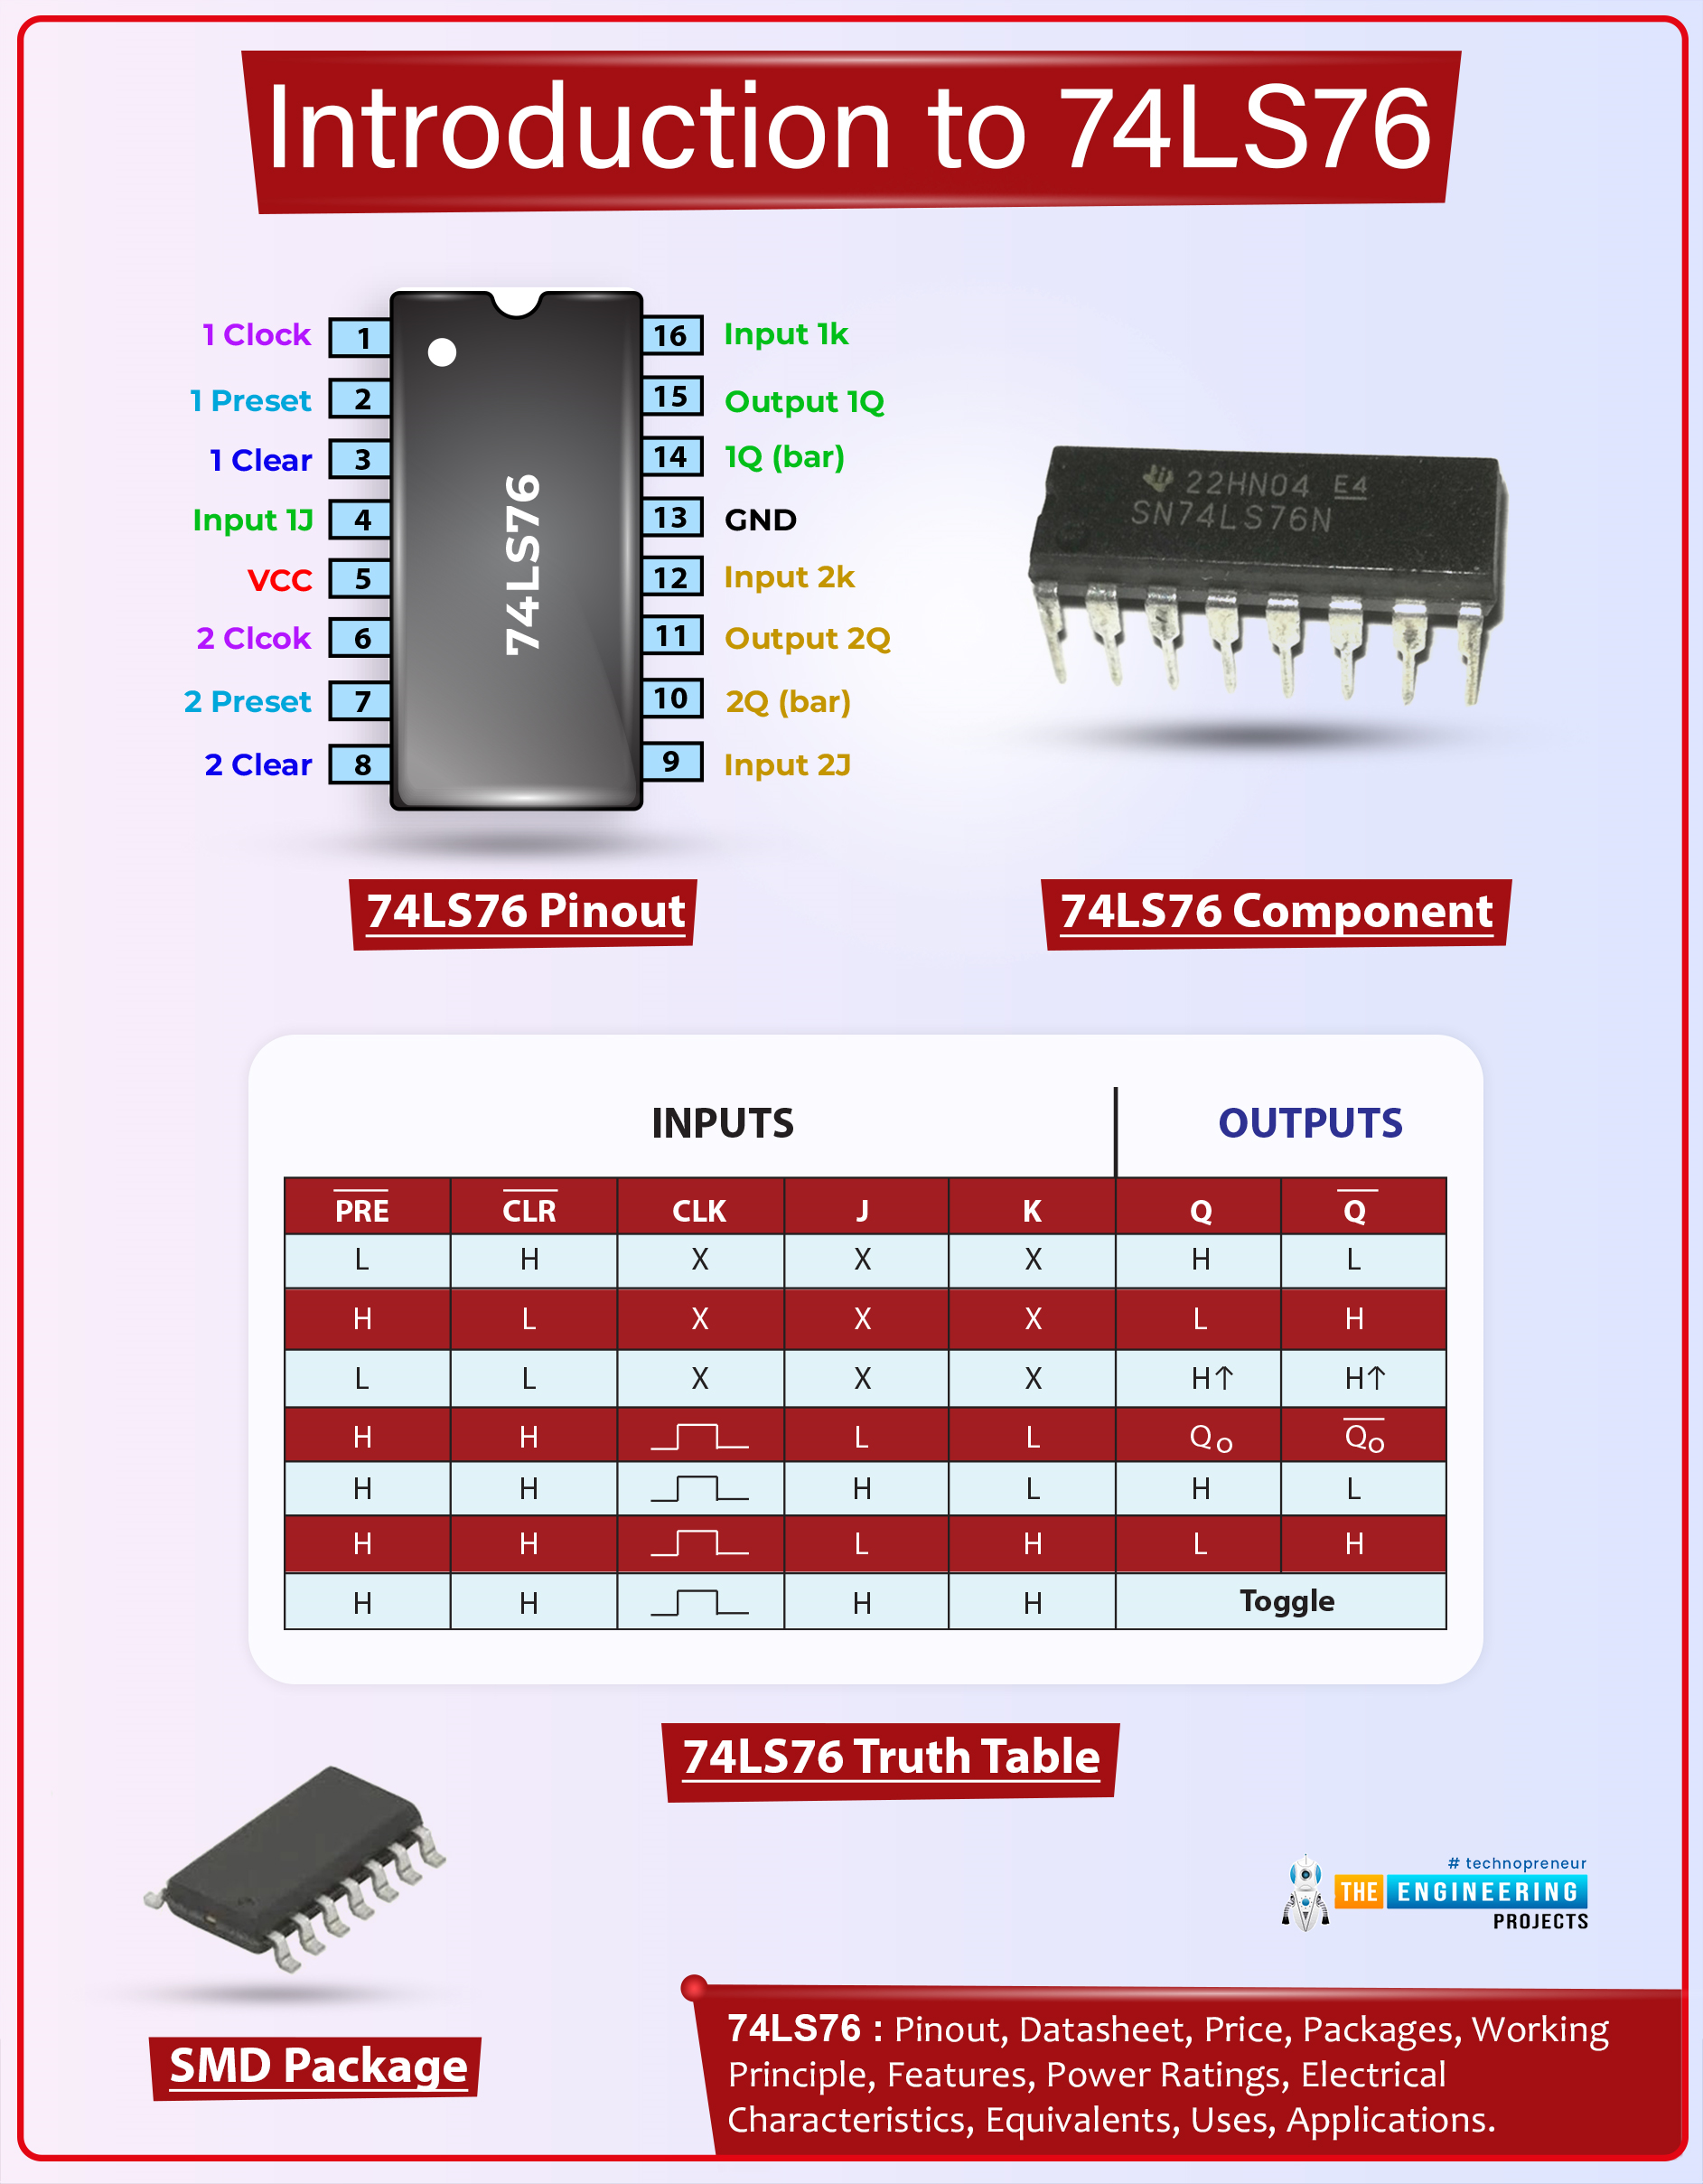
Hi Folks! Hope you’re well today. Happy to see you around. Today, I’ll walk you through the Introduction to 74LS76.The 74LS76 comes with separate J, K, clock pulse, direct clear inputs, and direct set. These flip-flops are developed in such a way when the clock is set HIGH, data will be received enabling inputs.
I suggest you buckle up as I’ll detail the complete Introduction to 74LS76 covering datasheet, pinout, features, alternatives, and applications.
Introduction to 74LS76
The 74LS76 comes with separate J, K, clock pulse, direct clear inputs, and direct set. These flip-flops are developed in such a way when the clock is set HIGH, data will be received enabling inputs.
This IC contains two JK flip-flops and each flip-flop can be utilized individually for the required applica ...
Hello friends! I hope you are doing great. Today, we are presenting another version of the Arduino Pro mini library. We have seen the Arduino Pro Mini library for Proteus and the Arduino Pro Mini library for Proteus V2.0 with you. As expected, the Arduino Mini Library for Proteus V3.0 has a better structure and size that make it even better than the previous ones. We will go through the details of the features to understand the library.
In this article, I will briefly discuss the introduction of Arduino Pro Mini V3.0. You will learn the features of this board and see how to download and install this library in Proteus. In the end, I will create and elaborate on a simple project with this library to make things clear. Let’s move towards our first topic:
Introduction to the Arduino Pro Mi ...