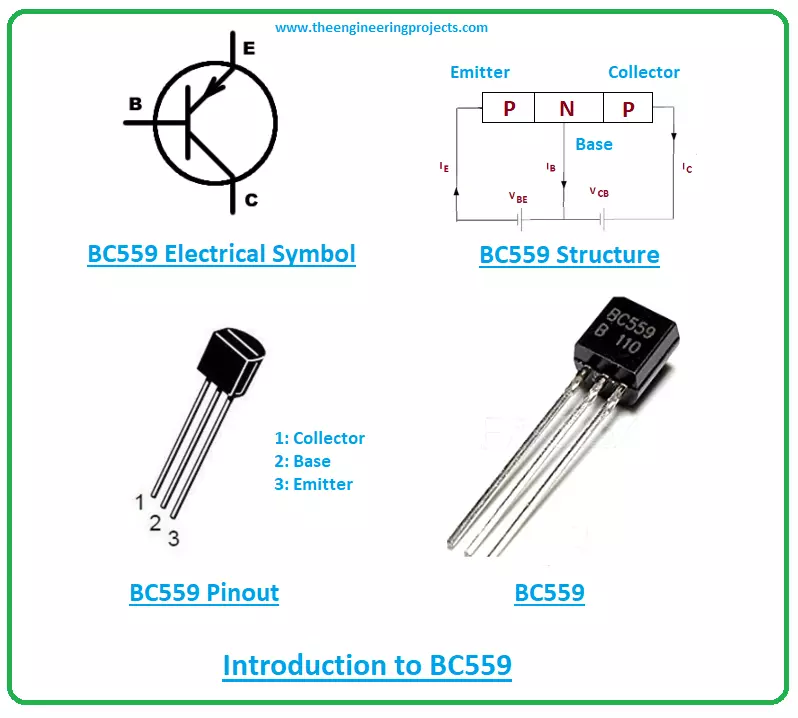
Hi Guys! Hope this finds you well. I welcome you on board. Thank you for clicking this read. In this post today, I’ll be explaining the Introduction to BC559.
BC559 is a bipolar junction transistor used to drive loads under 100mA. It falls under the family of PNP transistors and is mainly known as a current-controlled device. Where small current at one terminal is used to drive large current change at the remaining two terminals.
Read this post all the way through, as I’ll be touching pinout, working, datasheet, physical dimensions, power ratings, and applications of a BC559 transistor.
Let’s get started.
Introduction to BC559
BC559 is a PNP bipolar junction transistor mainly employed for amplification and switching applications.
It is com ...
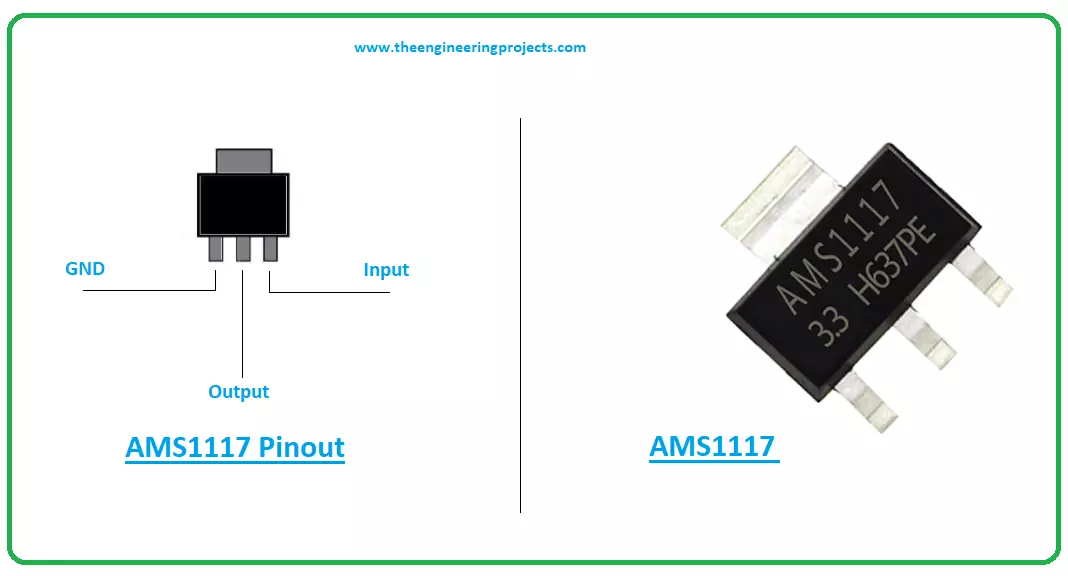
Hello Guys! Hope you’re well today. I welcome you on board. Thank you for clicking this read. In this post today, I’ll walk you through the Introduction to AMS1117.
The AMS1117 is a common voltage regulator that comes with both fixed and customizable voltages. It is a 3-pin device mainly used to drive load under 1A. The output voltage ranges from 1.5V to 5V. When it works at maximum current, it results in a low dropout voltage of 1.3A.
I suggest you read this post all the way through, as I’ll be discussing Pinout, datasheet, features, and applications of this tiny device AMS1117.
Let’s jump right in.
Introduction to AMS1117
The AMS1117 is a common voltage regulator mainly used for high-efficiency linear regulation and post-regulation switchi ...
Hi there! Hope this finds you well. I welcome you on board. Thanks for clicking this read. In this post today, I’ll be discussing the Introduction to D882 transistor.
D882 is a general-purpose transistor mainly famous for its high performance. It falls under the category of NPN transistor and is an ideal pick for commercial, educational, and hobbyists’ electronic projects. It comes in TO-126 with collector current 3A, projecting it can drive loads under 3A. There are three pins incorporated on the transistor which are used for external connections. The collector-emitter and collector-base voltages are 30V and 40V respectively with emitter-base voltage 5V, indicating only 5V are required to bias the component.
Read this post all the way through as ...
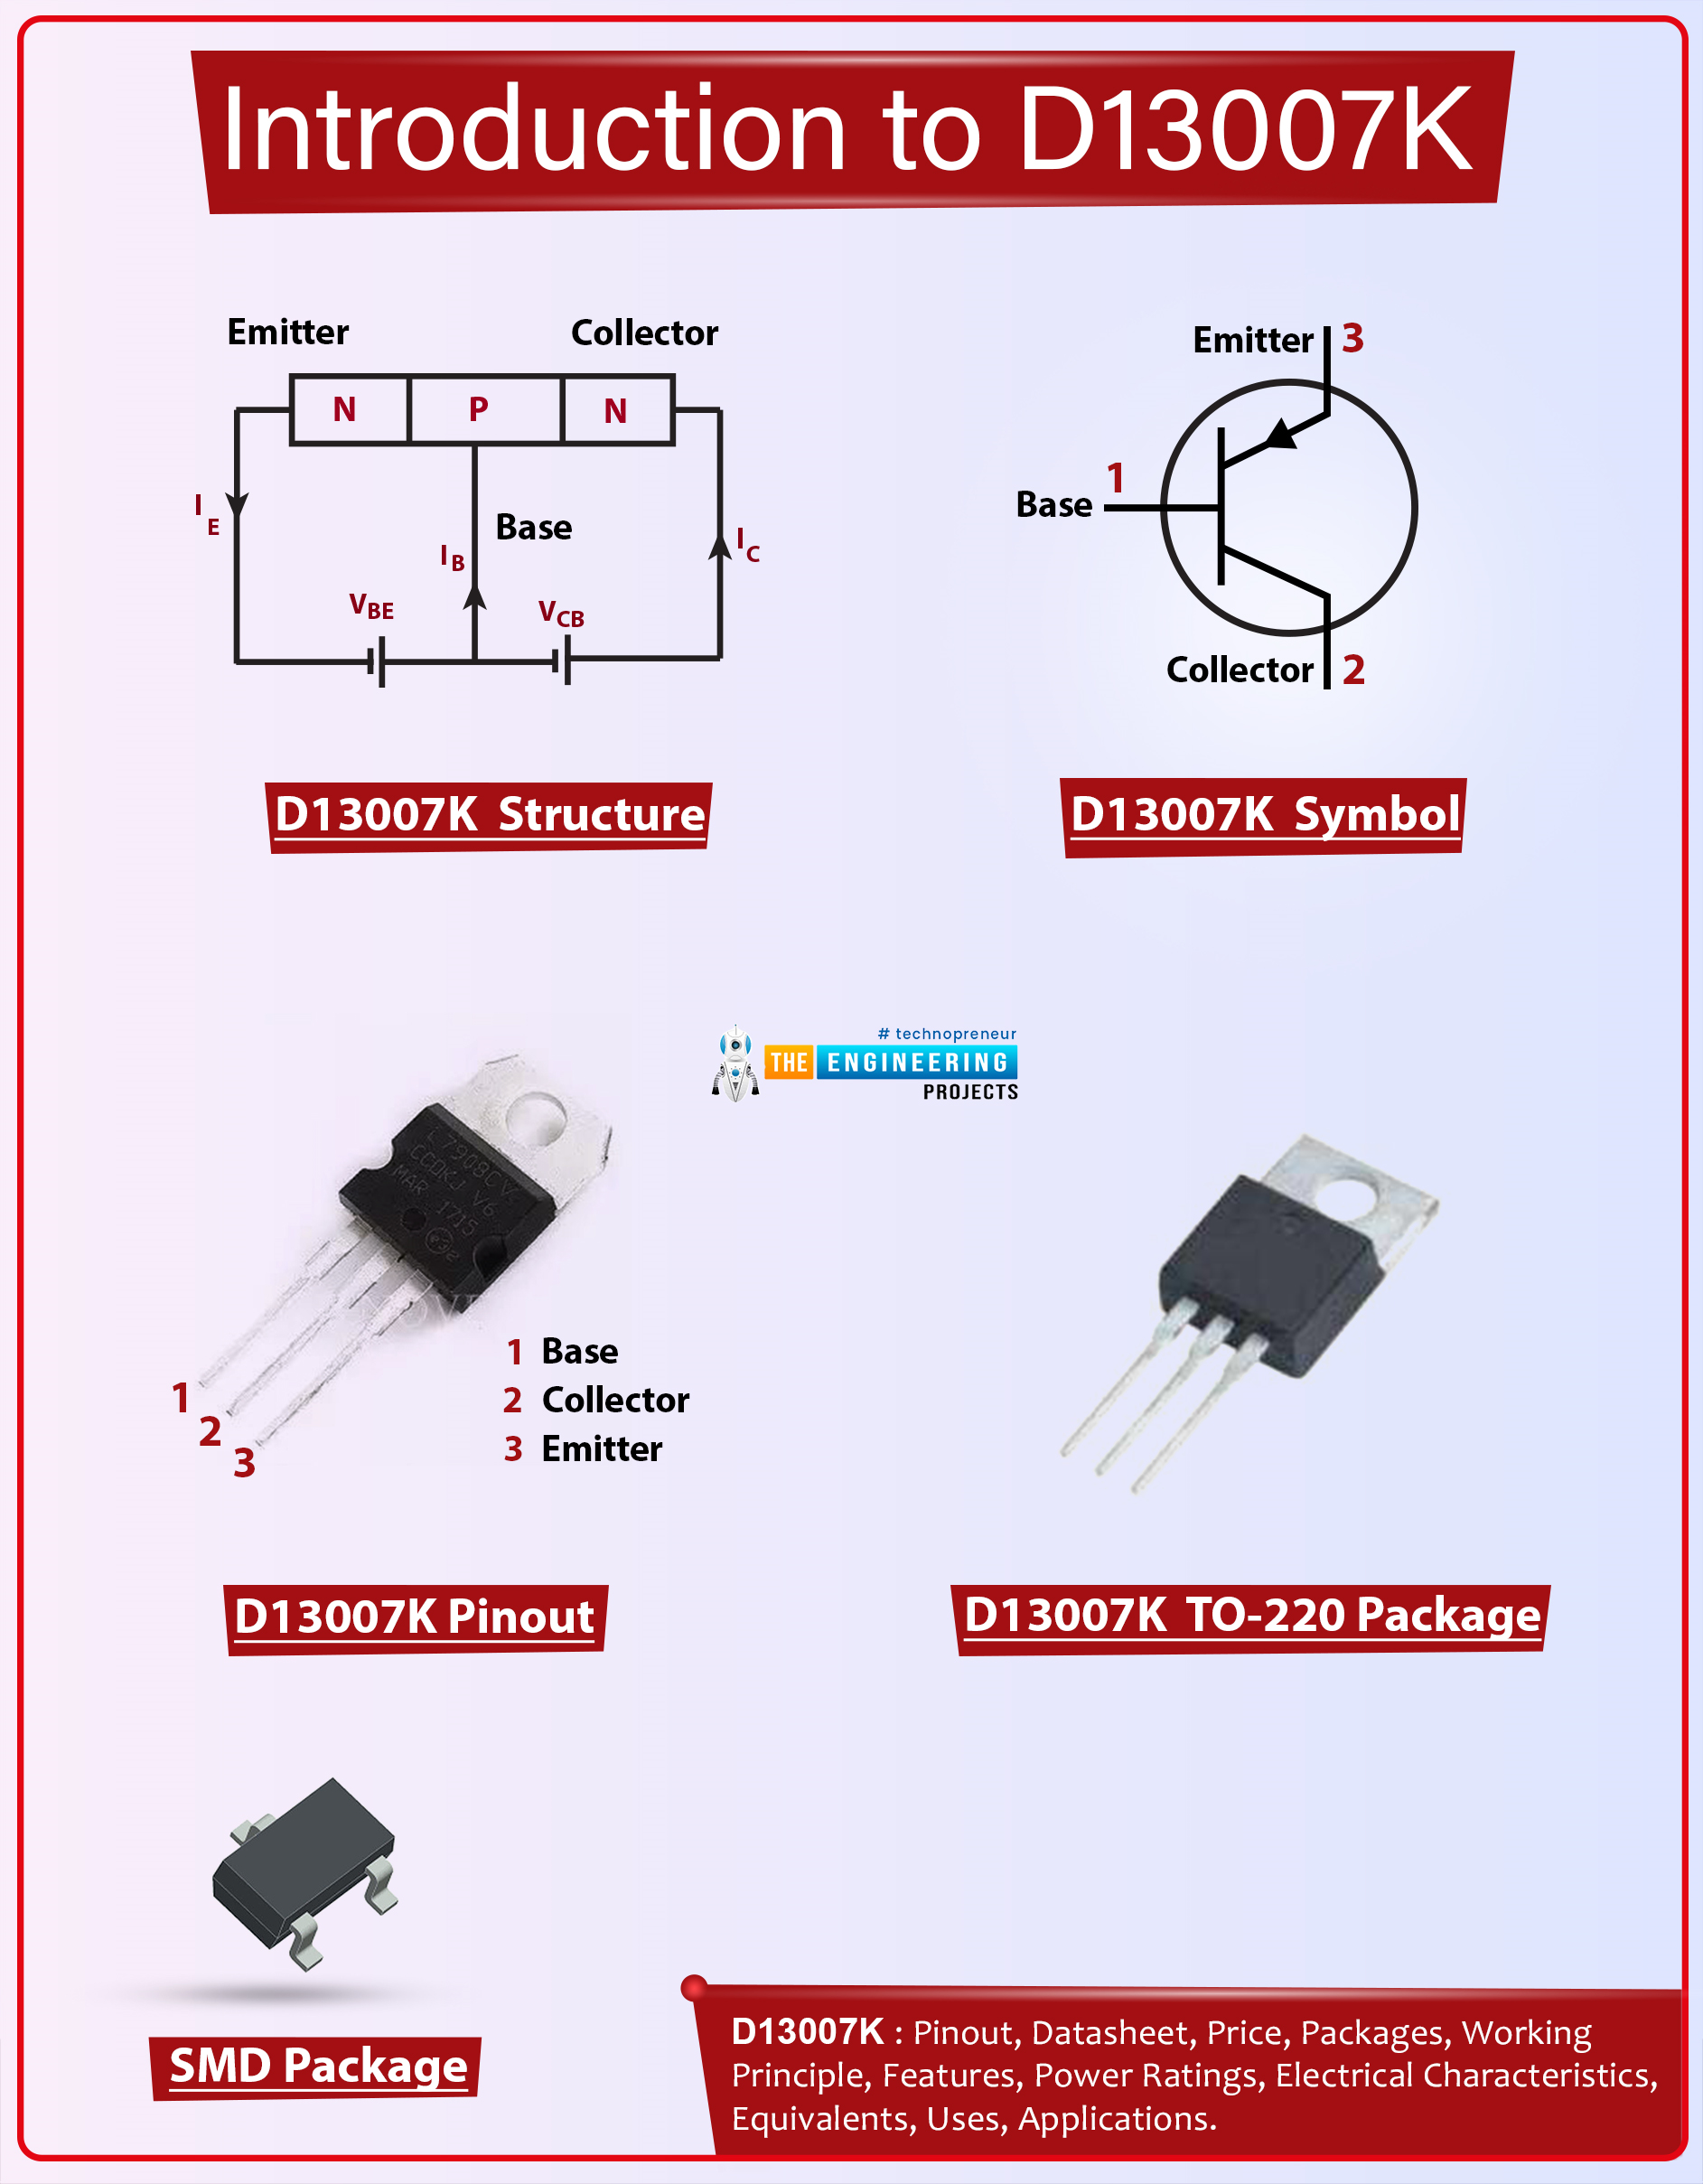
Hello Fellas! Hope you’re well today. Happy to see you around. In this post today, I’ll walk you through the Introduction to D13007K.
The D13007K is an NPN power transistor mainly used for switching and amplification purpose. This device is made of silicon material and falls under the category of bipolar junction transistors. As this is an NPN transistor so here major charge carriers are electrons. Holes are major carriers in the case of PNP transistors. This is a high voltage high current capability device used in energy-saving lamps. The collector current of this chip is 8A which means it is best for loads under 8A. And the power dissipation is 80W which projects it is eligible to release 80W power during the operation of this device. The collector-base voltage is 700V and collector-e ...
Hey Fellas! Hope you are doing great! I try my best to give you information that can help you excel in your field and put you ahead from others. Today, I am going to unlock the details on the Introduction to 2n6027. It is a uni-junction transistor that comes with UTC's advanced technology and provides high peak output voltage, low offset voltage, low gate to anode leakage current and forward voltage. I'll give a brief introduction about this transistor so you don't need to go anywhere for searching information regarding this transistor.
Introduction to 2n6027
2n6027 is a programmable uni-junction transistor (PUT) that is widely used in pulse and timing circuits, oscillator, and thyristor-trigger.
Anode gate availability with this transistor m ...
Hello friends, I hope you all are doing great. In today's tutorial, I am going to share a new Solar Panel Library for Proteus. I hope you guys are gonna enjoy this Proteus Library as it's not available in Proteus and we are presenting it for the first time. :) I am quite proud of my team. B|
We all know about Solar Panels which is an excellent renewable energy source. It is widely adopted by the inhabitants of this green planet as its totally free and converts solar energy into electricity. Solar panels are also used a lot in Engineering Projects especially related to renewable energy sources. Proteus doesn't have solar panels in its database that's why our team has designed this library. Using this Solar Panel Library for Proteus, now you can eas ...
Hello Friends! I aspire you a very happy and promising life. We always feel happy when you visit out site for useful information that guides you in the right direction and puts you ahead from others. Today, I am going to unlock the details on the Introduction to 2n7002. It is an N-Channel MOSFET which is mainly designed to reduce on-state resistance. It is an ideal choice for high efficiency power management applications because it comes with an ability to maintain high switching performance. I'll try to cover each and every aspect related to this MOSFET so you find all information at one place. Let's dive in and explore what is this about and what are its main applications?
Introduction to 2n7002
2n7002 is an N-Channel MOSFET which is mainly d ...
Update: I have updated the code and removed the bug. Thanks for informing. Now this code will work perfectly.
Buy This Project
Hello friends, hope you all are fine and having good health. Today, as the name suggests, I am gonna post on how to Receive SMS with AT Commands using Sim900 and Arduino. I have already posted a tutorial on How to Send SMS with Arduino UNO and Sim900, so now we are gonna check the opposite. Sending SMS is quite easy, you just need to write some AT commands and write the message you wanna send and hit the Cntrl + Z and it will be sent. But receiving a text message on your SIM900 shield is a bit difficult because now you need to place a check when user will send a message. So, ideally whenever anyone send a message to yo ...
Hi Guys! Hope you’re well today. Happy to see you around. In this post today, I’ll walk you through the Introduction to Arduino Nano 33 IoT.
Arduino Nano 33 IoT is mainly used in basic IoT applications. The Internet of things is one of the most exciting and robust developments in the field of information technology.
Using this technology you can interface a network of physical things with software, sensors, or other technologies to develop communication and data exchange between devices and other systems using the internet.
For example, you can control the room temperature by interfacing the sensors in your rooms with your smartphone through WiFi. Traditional systems including control systems, wireless sensor networks, embedded systems, and hom ...
Hello everyone! I hope you all will be absolutely fine and having fun. Today, I am going to provide you a detailed discussion on Introduction to 10N60. Before going into the details of this article you should also have a look at Introduction to 4N60, 78M05, 2N3772, 2SC3320, 20N60. It is basically a high voltage Metal Oxide Semiconductor Field Effect Transistor (MOSFET). It is a power MOSFET and is able to control the certain level of the power. 10-N-60 is also a high current power MOSFET. This device has three terminals and is made up of silicon. It has around 10 ampere of current conduction capability i.e. this device is able to conduct 10A of current through it. 10-N-60 has a lot of amazing features.
It features include low on-state resistance ...