Hello readers, I hope you all are doing great. In our previous tutorial, we learnt how to make HTTP POST from ESP32 to the IFTTT server.
In this tutorial, we will learn about another application of the ESP32 module in the field of IoT (Internet of Things). We can publish multiple sensor readings from ESP32 to Google sheets via the IFTTT web service.
IFTTT is used as a third-party web service to integrate Google sheets with ESP32.
Fig. 1
Creating an IFTTT Account for Integrating ESP32 with Google Sheets
We are going to create an applet (on the IFTTT server) that is responsible to integrate the Webhooks and Google Sheets services.
While operating with the IFTTT server there are some services/utilities that we are going to deal with like Applets an ...
Hello friends, I hope you all are doing great and having fun with your lives. In today's tutorial, I am going to share How to interface Arduino with GLCD. I am gonna design a Proteus Simulation in which I will interface Arduino GLCD together. GLCD is also called Graphical LCD so today we are gonna do some designing on the LCD. The GLCD I am going to use is ks0108 and its model in Proteus is LGM12641BS1R and I have shared the complete Simulation along with Arduino Code below for download. But I would suggest you to design it on your own so that you could get the most out of it. If you haven't worked on the LCD before then I would suggest you to read How to Interface Simple LCD with Arduino.
Moreover, I am quite happy to announce that we have starte ...
Hello Everyone! Hope you’re well today. Happy to see you around. In this post today, I’ll walk you through the Introduction to FR107.Fr107 is a fast recovery diode mainly used for converting alternating current to direct current. It can support loads under 1A and carries a peak inverse voltage of 1,000 V.Read this post all the way through as I’ll detail the complete Introduction to FR107 covering datasheet, pinout, features, characteristics, and applications. Let’s get started.
Introduction to FR107
Fr107 is a fast recovery diode mainly used in fast-switching applications. It comes with two terminals called an anode and a cathode. The grey-colored band identifies the cathode side while the other side is the anode.
A highly efficient and ...
Hello Everyone! Happy to see you around. In this post today, we’ll cover the 2SC2240 NPN Transistor. We will have a look at the 2SC2240 Datasheet, Pinout, Power Ratings, Equivalents & Applications.
Electrons are the majority charge carriers in this NPN transistor, in contrast to PNP transistors, where holes are the majority carriers. The 2SC2240 comes with a power dissipation of 0.3W, the amount of energy this transistor dissipates while operating in the forward-biased state, while the collector current is 0.1A means it can support load up to 0.1A.
This NPN transistor contains 3 terminals, named:EmitterCollectorBase
If the voltage at the base terminal is above 0.7V, the transistor will get forward-biased and the current will start flowing from Collector to Emitter terminal. If the ...
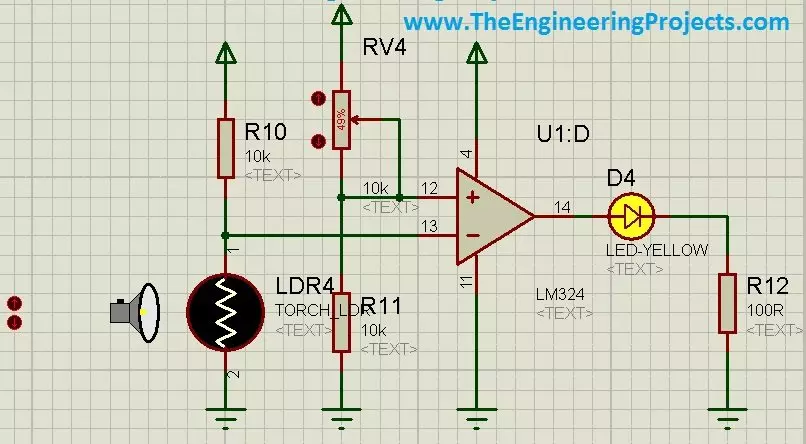
In today's post, I am gonna share how to use LDR sensor in Proteus. Proteus, as we all know, is a very handy software and is used for circuit and PCB designing. It is also used for circuit and programming testing. It is normally used by engineers in their projects and contains a vast list of built-in components. I have posted a lot of tutorials on Proteus and I have got quite a positive feedback from the reader about these tutorials. So, I thought to share another component in Proteus which is quite hidden and I haven't seen much posts on it available online.
So, in today's post, first I am gonna explain what is LDR sensor? and we will see where it is used and how it is used. After that I will design a simple circuit in Proteus in which I will tur ...
Hi Guys! I welcome you on board. Thank you for clicking this read. In this post today, I’ll walk you through the Introduction to MJE13009.
MJE13009 is a semiconductor device made of silicon material that falls under the category of NPN transistors. This device is mainly used for switching and amplification purposes. The power dissipation of this device is 100W and the emitter-base voltage is 9V which is the amount of voltage needed to bias the device.
I suggest you read this post all the way through as I’ll describe the complete Introduction to MJE13009 covering datasheet, pinout, features, and applications.
Let’s get started.
Introduction to MJE13009
MJE13009 is an NPN transistor mainly used for amplification and switching purposes.
This is a semiconductor device made of ...
Hello friends, hope you all are fine and having fun with your lives. Today's post, as the name suggests, is about Arduino UNO PCB Design in Proteus ARES. I have already posted Arduino Library for Proteus on my blog using which one can quite easily run Arduino simulation in Proteus.but what if you wanna do the Arduino UNO PCB design in Proteus, then you are lucky that you are reading this post. :)
In one of my projects, I have to design the PCB for Arduino in Proteus so I thought to also post it here so that others can download it as well. Normally PCB design is not required for Arduino and I usually get Atmega328 out of Arduino and use it separately but sometimes, depending on the requirements of your project, you may also need to place Arduino it ...
Hello everyone! I hope you all will be absolutely fine and having fun. Today, I am going to share my knowledge about Introduction to LM358. LM-358 consists of two independent high gain frequency compensated operational amplifier. They are specially designed to operate from a single supply or split supplies over a wide range of voltages.
LM-358 have lot of amazing features associated with them. These features include wide supply ranges, low supply current drain, independent of supply voltage, wide unity gain bandwidth, ground includes I common mode input voltage range, low input bias, open loop differential voltage gain, internally frequency compensation etc. LM 358 has a lot real life applications e.g. Operational Amplifier (Op-amp) circuits, tr ...
Hi Friends! Hope you’re well today. Happy to see you around. Thank you for clicking this read. In this post today, I’ll walk you through the Introduction to CA3080.The CA3080 is an operational transconductance amplifier mainly used to convert the input voltage signal into an output current. It is widely used in variable gain amplifiers, frequency oscillators, current-controlled filters, and comparators. It carries an amplifier bias input which is utilized for linear gain control.
I’d recommend reading this entire post all the way through as I’ll detail the complete Introduction to CA3080 covering datasheet, pinout, features, and applications. Let’s jump right in.
Introduction to CA3080
The CA3080 is an operational transconductance amplifier (OTA) mainly employed in electrical circ ...
Hi Guys! Hope you’re well today. I welcome you on board. In this post today, I’ll detail the complete Introduction to BD138.
BD138 is a PNP transistor that is incorporated in audio amplification and switching applications. It is composed of silicon material and comes in the TO-126 package. It contains three terminals, where small input current across one terminal is used to produce large output current across the remaining two terminals. The collector-base and collector-emitter voltages are 60V with emitter-base voltage 5V that illustrates the amount of voltage it requires to bias the transistor.
In this post I’ll walk you through the Introduction to BD138 detailing pinout, working, physical dimensions, applications, power ratings, and alternati ...