Hey Fellas! Hope you are getting along with life pretty well. This post is another addition in this Arduino Tutorial for Beginners series. Today, I'll discuss How to use analogWrite in Arduino? The analogWrite is mainly used to update the status of analog pins and is also used to map the analog values on the PWM (Pulse Width Modulation) pins.
You can check the article that I have posted previously on How to use analogRead in the Arduino - this command addresses the analog pins on the board and reads its status, while today's one does the exact opposite.
In this post, I'll try to break down each and everything related to analogWrite in simple steps, so you can grab the main idea pretty well. Let's jump right in.
How to use analogWrite in Arduino?
...
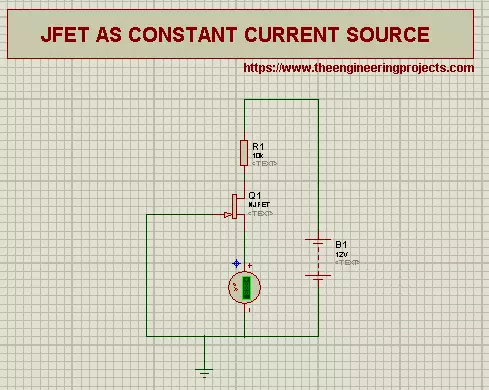
Hi Pupils, Welcome to another Experiment of Proteus at The Engineering Projects. Previously, we saw what are the Junction Field Effect Transistors. Today we'll learn about some of the applications of Junction Field Effect Transistors.
Just before the Experiment, it is useful to revise that:
Transistors are three terminal, unipolar Devices. The terminals of Junction Field Effect Transistor are named as :
Drain
Source
Gate
The Gate Terminal is common to both Source and Drain.
Prior to start, let's clear some Concepts about Junction Field Effect Transistor.
Resistor
Resistor is an electrical device. we define the resistors as:
"A Resister is a two terminal Passive electrical device that shows the electrical resistance and is useful in almos ...
Hello friends, I hope you all are fine and having fun with your lives. Today, I am going to share a new Home Automation Project using XBee & Arduino. Home Automation Project is a most commonly designed project by the engineering students. So, that's why I have thought to create a complete Home Automation Project so that engineering students can get benefit out of it.
We all know about automation which is originated from automate or automatic. In automation the task is done automatically and you don't need to control it. In normal Home automation project, there are few sensors which are displayed wirelessly to user and there are few controls like user can ON or OFF Lights, Fans etc via remote or mobile App.
In this Project, I have used Arduino ...
Hello friends, hope you all are fine and having fun with your lives. Today's post is about How to increase Workspace in Proteus. It's our 3rd tutorial in Proteus series. Its quite a simple tutorial and along with this trick, I will also share few commonly used features or Proteus. Once, I was working on a simulation project in which I have to design a complete load management system in Proteus and it was quite messy as I have to include a lot of components and the area of Proteus got quite small for that and then I encountered this problem i.e. where to place the components.
You have seen in Proteus software that there's a blue rectangle which is considered as the workspace in Proteus. This area is constant and doesn't increase or decrease on its ...
Hello friends, I hope you all are doing great. In today’s tutorial, we will have a look at Introduction to ADC0804. In electronic engineering different modules used to conversion of analog signal into a digital signal. These tools are recognised as analog to digital converter or ADC. Thes signal converter also used to find the value of input current and voltage. Normally the output of these converters are 2 binary numbers but other values are also possible. These analog to digital converter are available in different structure scheme but mostly they are available in integrated circuits packaging.
The working ability of these signal converter depends on their bandwidth and signal to noise ration (SNR). Their bandwidth can be fined by their sample r ...
Hi Friends! Hope you’re well today. Happy to see you around. In this post today, I’ll walk you through Latest Proteus Libraries for Engineering Students V2.0.
We have been designing proteus libraries for our blog readers for quite a while now. You might have visited our Arduino Libraries for Proteus V2.0 and Analog Sensors Libraries for Proteus V2.0. We keep working on those libraries and make sure the bugs are removed and you always get the updated version of those libraries.
We are going to share the most advanced and upgraded version of Proteus Libraries V2.0 we have designed for our readers. These libraries are more robust, fast, and efficient than previous versions. Moreover, we have converted some digital sensors to analog sensors, helping ...
Hello friends, hope you all are fine and having fun with your lives. Today's post is about interfacing of RFID module RC522 with Arduino. RC522 is very simple yet effective module. It is an RFID module and is used for scanning RFID cards. Its a new technology and is expanding day by day. Now-a-days it is extensively used in offices where employees are issued an RFID card and their attendance is marked when they touch their card to rfid reader. We have seen it in many movies that when someone places ones card over some machine then door opens or closes. In short, its a new emerging technology which is quite useful.
I recently get a chance to work on a project in which I have to use RFID reader to scan cards. In this project I have used it for for s ...
Hello friends, I hope you all are doing great. In today's tutorial, we are gonna have a look at detailed Introduction to TIP122. It is a Darlington braces NPN transistor. It works like an ordinary NPN transistor, but as it consists of a Darlington pair it has a decent collector current assessment of nearby 5 amperes and it's gain is around 1000. This transistor can bear 100 volts around collector and emitter terminals due to this feature it can be used for high loads.
This is a common purpose transistor it used in different industrial projects. It manufactured for less time taking switching submissions. In today’s post, we will have a look at its protection, wreck, distinction, entitlements, etc. I will also share some links where I have connecte ...
Hello friends, I hope you all are doing great. In today's tutorial, we are gonna design a project named DC Motor Control using XBee & Arduino in Proteus ISIS. I have shared the complete code and have also explained it in detail. You can also download the complete working Proteus Simulation given at the end of this tutorial. In this project, I have designed two Proteus Simulations.
The first Simulation is of Remote control in which I have used a keypad. The second simulation contains our two DC Motors and I am controlling the direction of those DC Motors with my Remote Control. XBee Module is used for sending wireless data. The code will also work on hardware as I have tested it myself. So, let's get started with DC Motor Control using XBee &am ...
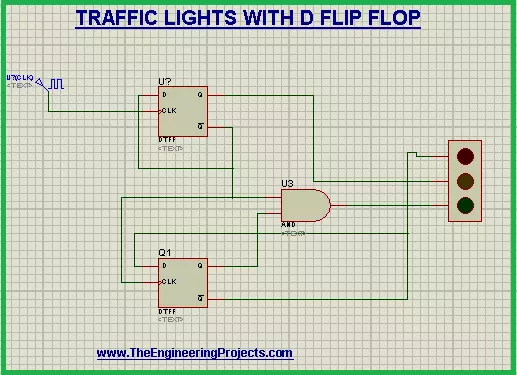
Hi Mentees! we hope you are doing great. Welcome to a super easy yet useful project based upon the simulation in Proteus. We are working on the Traffic Lights project that will work with the help of D Flip Flop. In this simple tutorial, you will be aware of the following concepts:
What are the Traffic Lights using D Flip Flop?
What is the role of D Flip Flop?
How does the circuit of D Flip Flop work in the Traffic Lights?
How can you simulate the circuit of Traffic Lights with D Flip Flop in Proteus?
In addition, you will find some important information about the Traffic Lights circuit in the DID YOU KNOW Sections. Let's start learning.
Traffic Lights with D Flip Flop
Who is not aware of the traffic lights? we all observe and use the Traf ...