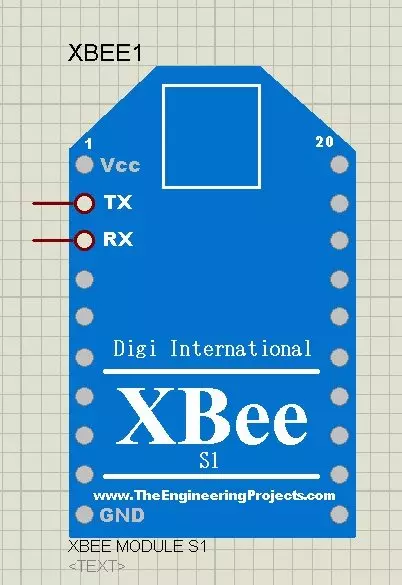
Hello everyone, today I am going to share a new XBee Library for Proteus. I am quite excited while sharing it as we are the first developer for this XBee Library. Now you can quite easily use XBee module in your Proteus software using this XBee Library for Proteus.Wehave spent quite a lot of time in developing this and that's the reason I couldn't share new tutorials in the past few days. Anyways we are done with this new exciting XBee Library for Proteus, hope you are gonna enjoy this one. I have already sharede two libraried for Proteus which are Arduino Library for Proteus and GPS Library for Proteus. You can also interface this XBee module with Microcontrollers like Arduino, PIC Microcontroller and 8051 Microcontroller quite easily.
As its the ...
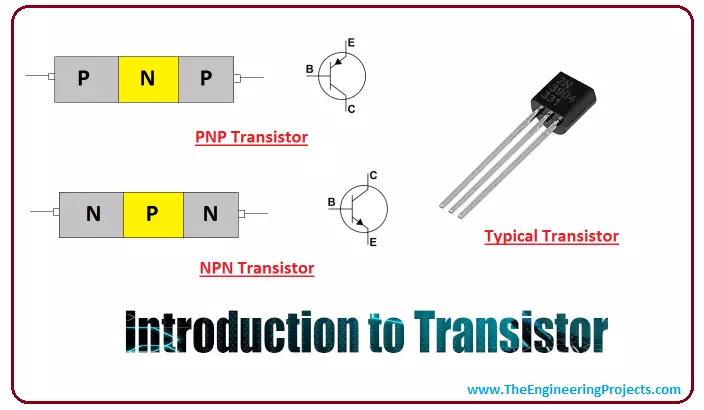
Hi Guys! Hope you are doing fine. Today, I am going to give you a detailed Introduction to Transistor. A transistor is a semiconductor device that comes with three terminals, where a small current at one terminal is used to control current at the other terminals. Transistors are mainly used for the amplification of electronic signals. Transistors were first invented by American Physicists John Bardeen in 1947.
Before the inception of transistors, vacuum tubes were used to control the electronic signals. These vacuum tubes come with anode & cathode arrangement and the potential difference across these ends produces the electric current. In the later versions, a filament is added which is used to provide heat to the cathode that directs the electrons towards the anode side. Their complex ...
Hello friends, hope you all are fine and having fun with your lives. In today's post, I am gonna share How to get Hex File from Arduino. It's quite a simple post and I have already explained it many times in my posts but still, I am getting a lot of messages regarding it that's why I thought to write a separate post for it. First of all, let's have a little introduction about it. If you have worked on PIC Microcontrollers or Atmel etc then you have seen that you always get hex files from their compilers and then you burn that hex file in the respective Microcontroller using their programmer or burner. But that's not the case with Arduino. In Arduino boards, you simply plug it with your computer and you hit the Upload button and the code automatica ...
Hey Fellas! I hope you are enjoying your life with love, care and passion. Today I'm going to give you the details on the Introduction to 1n4733a. It is a Zener Diode which works similar to normal diode with only exception, it can also conduct in reverse biased condition. Zener diodes are considered as a basic building components for many electronic circuits. I will try my best to give you the details on almost every feature of this zener diode so you don't need to go anywhere for finding the information regarding this zener diode. Let's get started.
Introduction to 1n4733a
1n4733a is a normal p-n junction diode which allows the current to flow in both directions i.e. forward direction and reverse direction.
In other words, it conducts in bot ...
Hey Fellas! I hope you are doing great and having fun. We love when you keep coming back again and again for what we have to offer that resonates with your needs and requirements. I am back to give you a daily dose of useful information so you can excel and grow in your relevant field without much effort. Today, I am going to unlock the details on the Introduction to 2n4400. It is an NPN (negative-positive-negative) bipolar transistor which is mainly designed for general purpose amplification and switching applications. I'll cover each and everything related to this transistor, so you get all information in one place without roaming around on the internet. Let's get started.
Introduction to 2n4400
2n4400 is an NPN general purpose bipolar juncti ...
Hey Fellas! We welcome you on board. I am back to give you a daily dose of useful information that resonates with your needs and expectations and put you ahead from others. Today, I am going to uncover the details on the Introduction to 2n3773. It is an NPN (negative-positive-negative) power base bipolar junction transistor which is mainly used for disk head positioners, high power audio, and other linear applications.
I'll try cover each and every feature related to this transistor so you don't need to go anywhere and you find all information in one place. Let's jump in and explore what is it about and what are its main applications?
Introduction to 2n3773
2n3773 is an NPN power base bipolar transistor which is mainly designed for disk head p ...
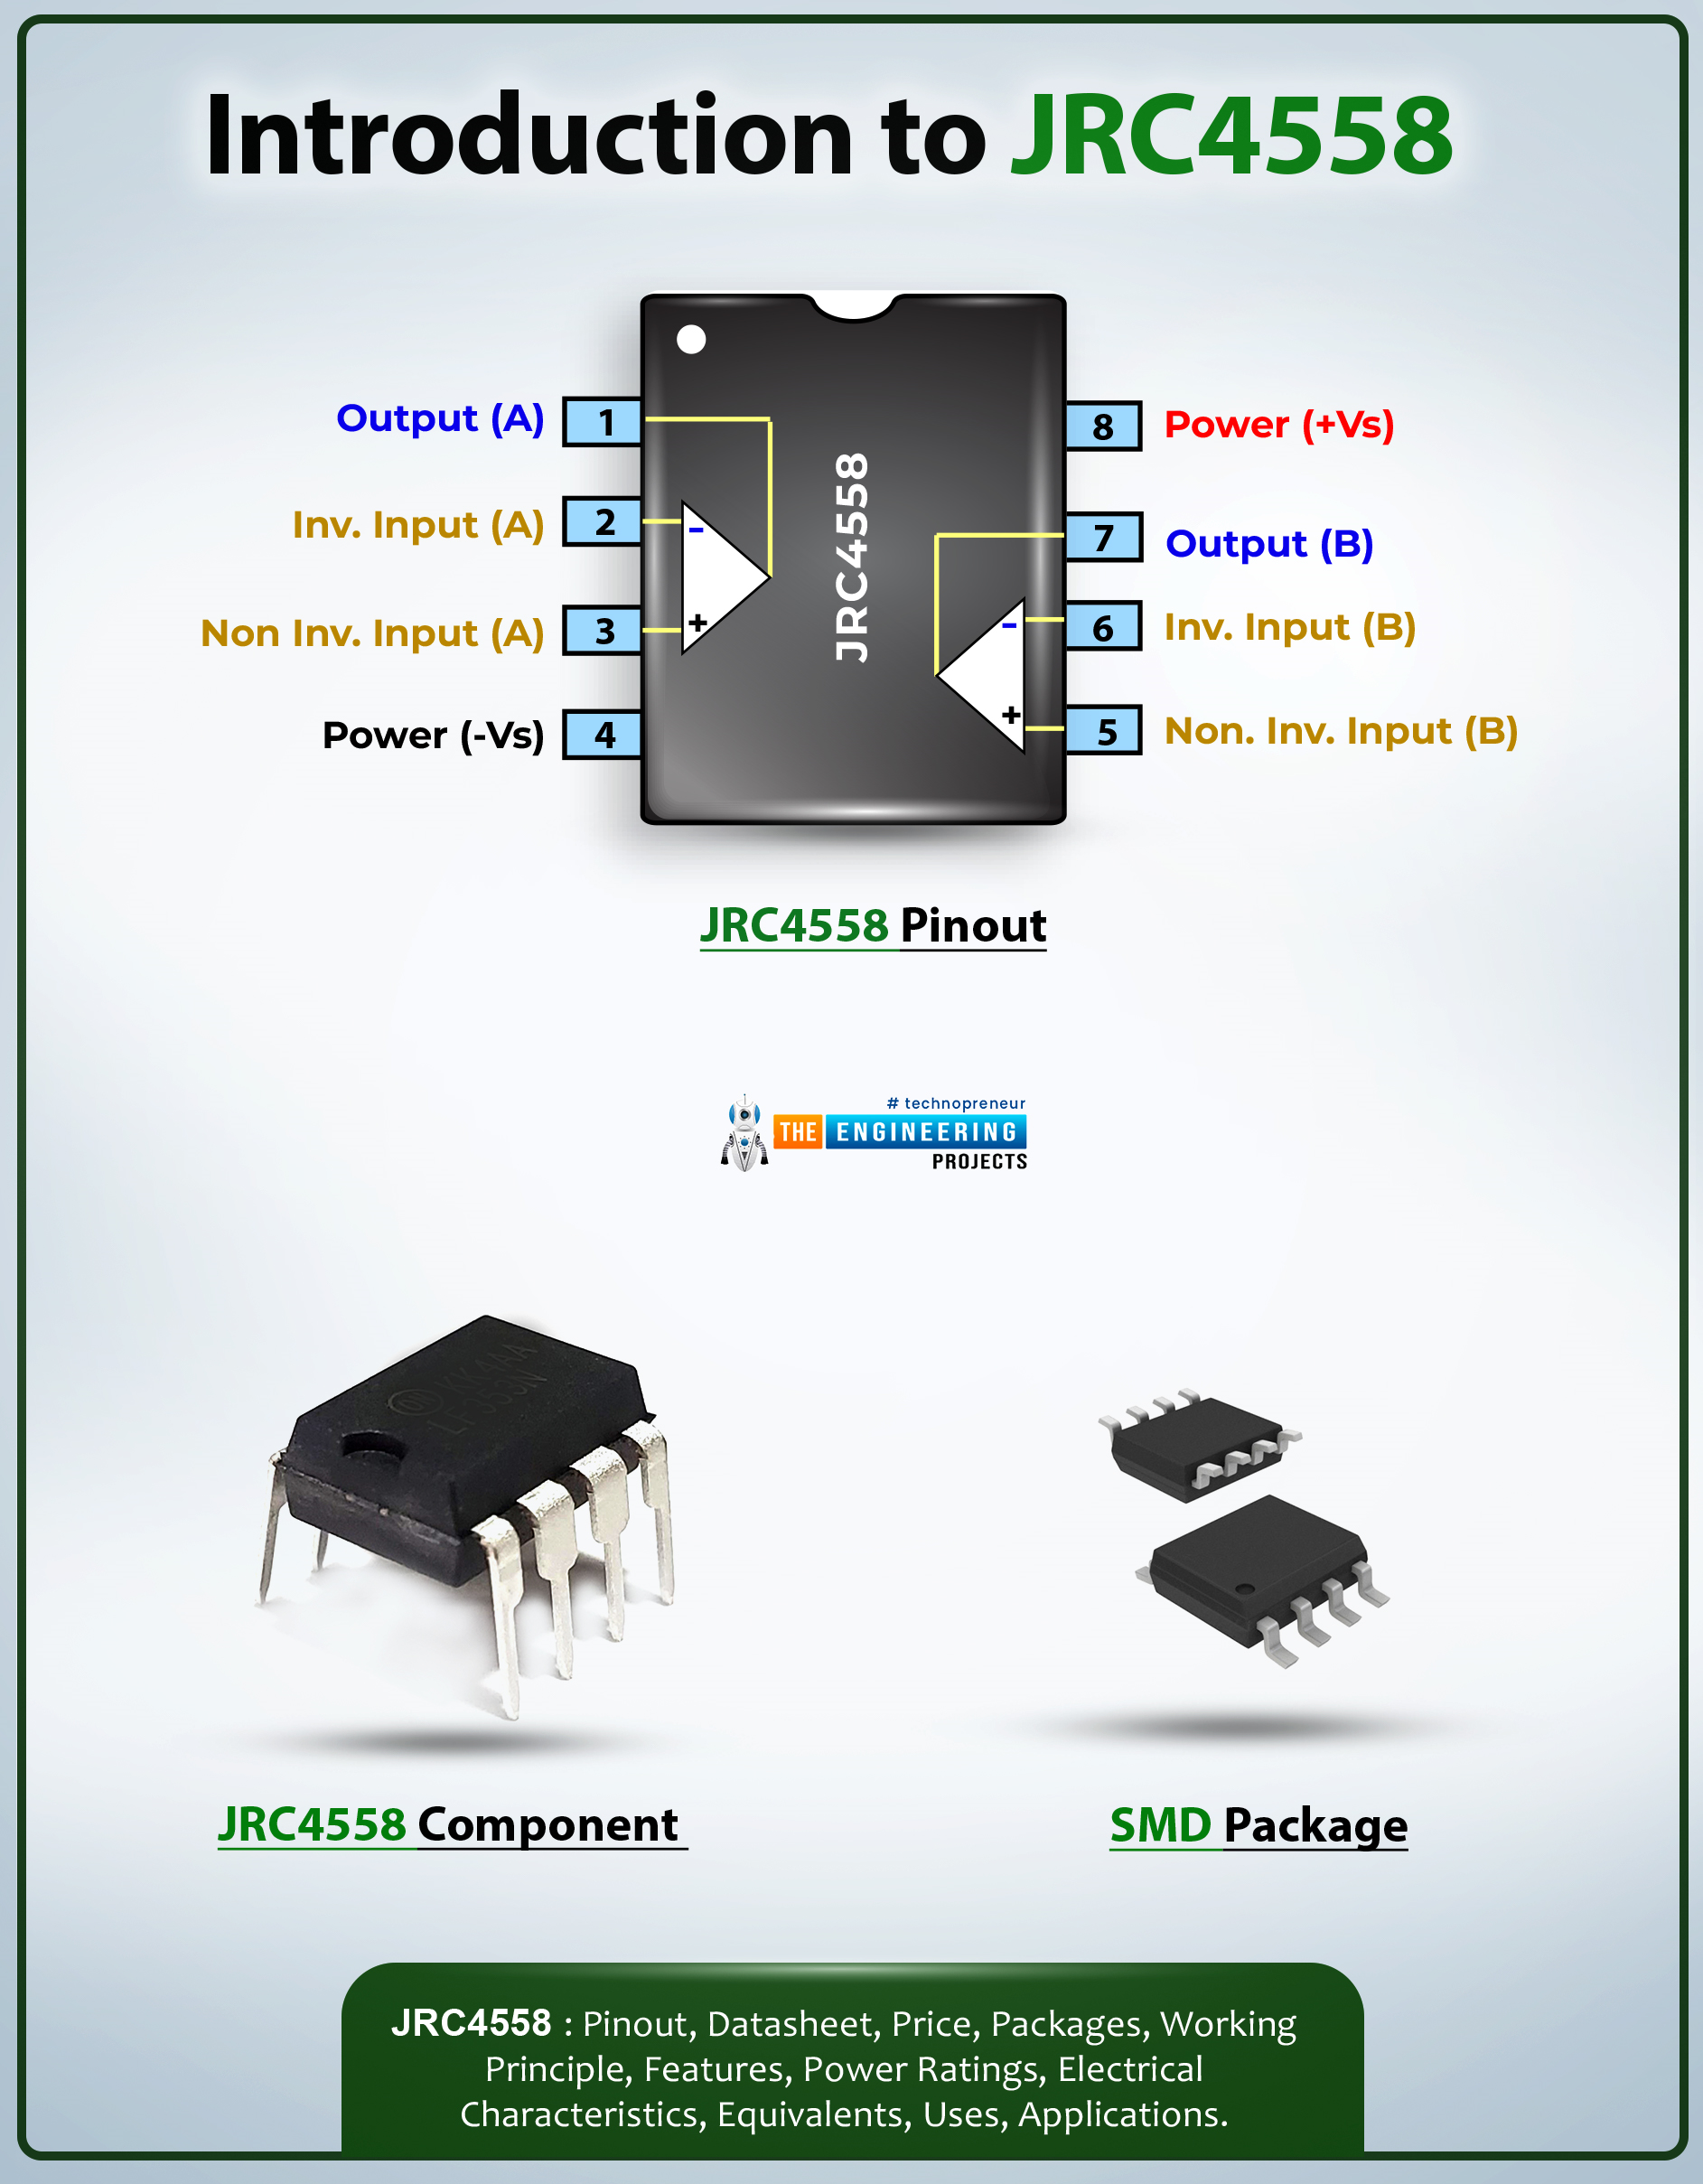
Hi Guys! Happy to see you around. I welcome you on board. Thank you for clicking this read. In this post today, I’ll walk you through the Introduction to JRC4558.The JRC4558 is a single silicon-chip monolithic dual operational amplifier. This amplifier is a high-performance device and is internally compensated. It is widely used in sample and hold amplifiers and pedal circuit designs. The JRC4558 is available with a remarkable input impedance of around 5 MO, a high voltage gain of around 100 dB, and a good slew rate of around 1.7V/µs.
I suggest you buckle up as I will walk you through the complete introduction to JRC4558 covering datasheet, pinout, features, alternatives, and applications. Let’s jump right in.
Introduction to JRC4558
The JRC4558 is a single silicon-chip mono ...
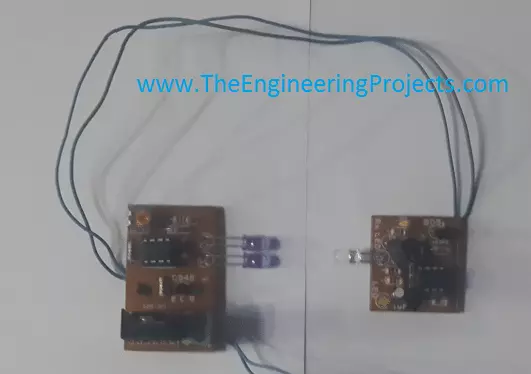
Hello everyone, hope you all are fine and having fun with your lives. Today's tutorial is quite simple and we will have a look at circuit diagram of IR sensor using 555 Timer. There are different types of IR sensors available in the market. IR is abbreviation of infrared and so they use infrared ray for detection of objects. There are many types of IR sensors with different functionality, but in all of them infrared rays are omitted from transmitter and are received by the receiver. and using these ray we can say whether an object is placed in the path or not.
Today we are gonna see how to design your own IR sensor using 555 Timer. We can also interface these IR sensors quite easily with any microcontroller like PIC Microcontroller , Arduino etc. ...
Hello friends, I hope you all are doing great. In today's tutorial, we are gonna have a look at a detailed Introduction to LM35. LM35 is a type of commonly used temperature sensor, that can be used to measure temperature with an electrical output compared to the temperature in (°C). In can measure temperature in a better way than a thermistor.
LM35 is used in industries and commercial buildings where high accuracy of temperature measuring is needed. I will give you a detailed overview of this temperature sensor in today’s post where we will have a look its pinout, working, protocol, etc. I will also share some links of projects where I have interfaced it with Arduino or other microcontrollers. If you have any questions please ask in the comments, I will resolve your queries and will gu ...
Hi Friends! Hope you’re well today. I welcome you on board. Thank you for clicking this read. In this post today, I’ll detail the Introduction to SB560.
The SB560 is a Schottky diode, also known as a hot-carrier diode, mainly incorporated in extremely fast switching applications. It comes with low forward drop voltage and is used in the high-frequency operation. A highly reliable and efficient device, SB560 is a high forward surge capability component available in the DO-201AD package. This device carries a maximum RMS voltage of 42V while the maximum repetitive peak reverse voltage is 60V.
I suggest you go through this entire post till the end, as I’ll detail the Introduction to SB560 covering datasheet, pinout, features, and applications.
Let ...