Hello Friends! Hope you are doing great. I am back to give you a daily dose of valuable information so you can excel and grow in your relevant field and keep coming back for what we have to offer. Today, I am going to unlock the details on the Introduction to 8051 Microcontroller. This is an 8-bit Microcontroller developed by Intel in the 1980s. It is considered as a small system on an integrated chip that comes with CPU, I/O ports, timers, counters, RAM and ROM. The Microcontroller is a one step forward to a microprocessor.
Both Microcontrollers and microprocessor work in a similar way with some exceptions. Microcottler comes with everything required to run an embedded system like CPU, I/O ports and inbuilt peripherals like timers, counters, ...
Hi Guys! Hope you’re well today. I welcome you on board. In this post today, I’ll walk you through the Introduction to Arduino Esplora.
Looking like a videogame controller, the Arduino Esplora is an electrical device that contains an Arduino Leonardo board (microcontroller) and a number of outputs and inputs. There are a colored LED and a buzzer as outputs. And there is a light sensor, four buttons, a joystick, a microphone, an accelerometer, and a temperature sensor as inputs. In other words, it is just like another Arduino Board with integrated actuators and sensors.
Just stay with me for a little while, as I’m going to document the complete Introduction to Arduino Esplora covering pinout, working, pin description, how it’s different than othe ...
Hello friends! Hope you’re well. In today’s tutorial, we’ll cover a detailed Introduction to BME280. BME280 is a digital environmental pressure, humidity, and temperature sensor mainly designed for mobile applications. This module comes with extremely compact metal-lid LGA packages. It has low power consumption (consumes only 5µA during idle and less than 1mA during measurements) and small dimensions that make it a perfect fit for battery-driven devices such as GPS, mobiles, and smartwatches. The BME280 working protocols are I2C and SPI which consist of separate pinouts. The module contains a built-in LM6260 regulator, allowing you to effortlessly use it with a 3.3V or 5V logic microcontroller or Raspberry Pi.
...
Hi Guys! Hope you are doing well. In this platform, we always strive to keep updated with valuable information related to engineering and technology. Today, I'll discuss the detailed Introduction to CD4047. It is a CMOS Low Power monostable/astable multivibrator mainly used for converting DC current signal to AC signal.
This inverter proves to be very handy in some countries where load-shedding creates a significant problem as it comes with an ability to store electrical energy and discharge it in the absence of main electrical power.
In this tutorial, I'll cover the entire details on this inverter, its main features, working, and applications. Let's dive in and explore everything you need to know about this inverter.
Introduction to CD4047
CD40 ...
Hello friends, I hope you all are doing great. Today, I am going to share Circuit Designing of LCD with Arduino in Proteus ISIS. In my previous tutorial, I have posted a tutorial on How to use Arduino Library in Proteus. Using that library, we can easily test Arduino code in Proteus to check whether its working or not. If you haven't read that post then before starting it, first read it, as without adding the arduino library we can't use Arduino in Proteus.
Coming to today's post, as we have done adding the Arduino Library in Proteus, so I thought to do some projects on it and the first one I chose is quite simple one i.e. Circuit Designing of LCD with Arduino in Proteus ISIS. So we will have a look on how to show some characters on LCD using Ardu ...
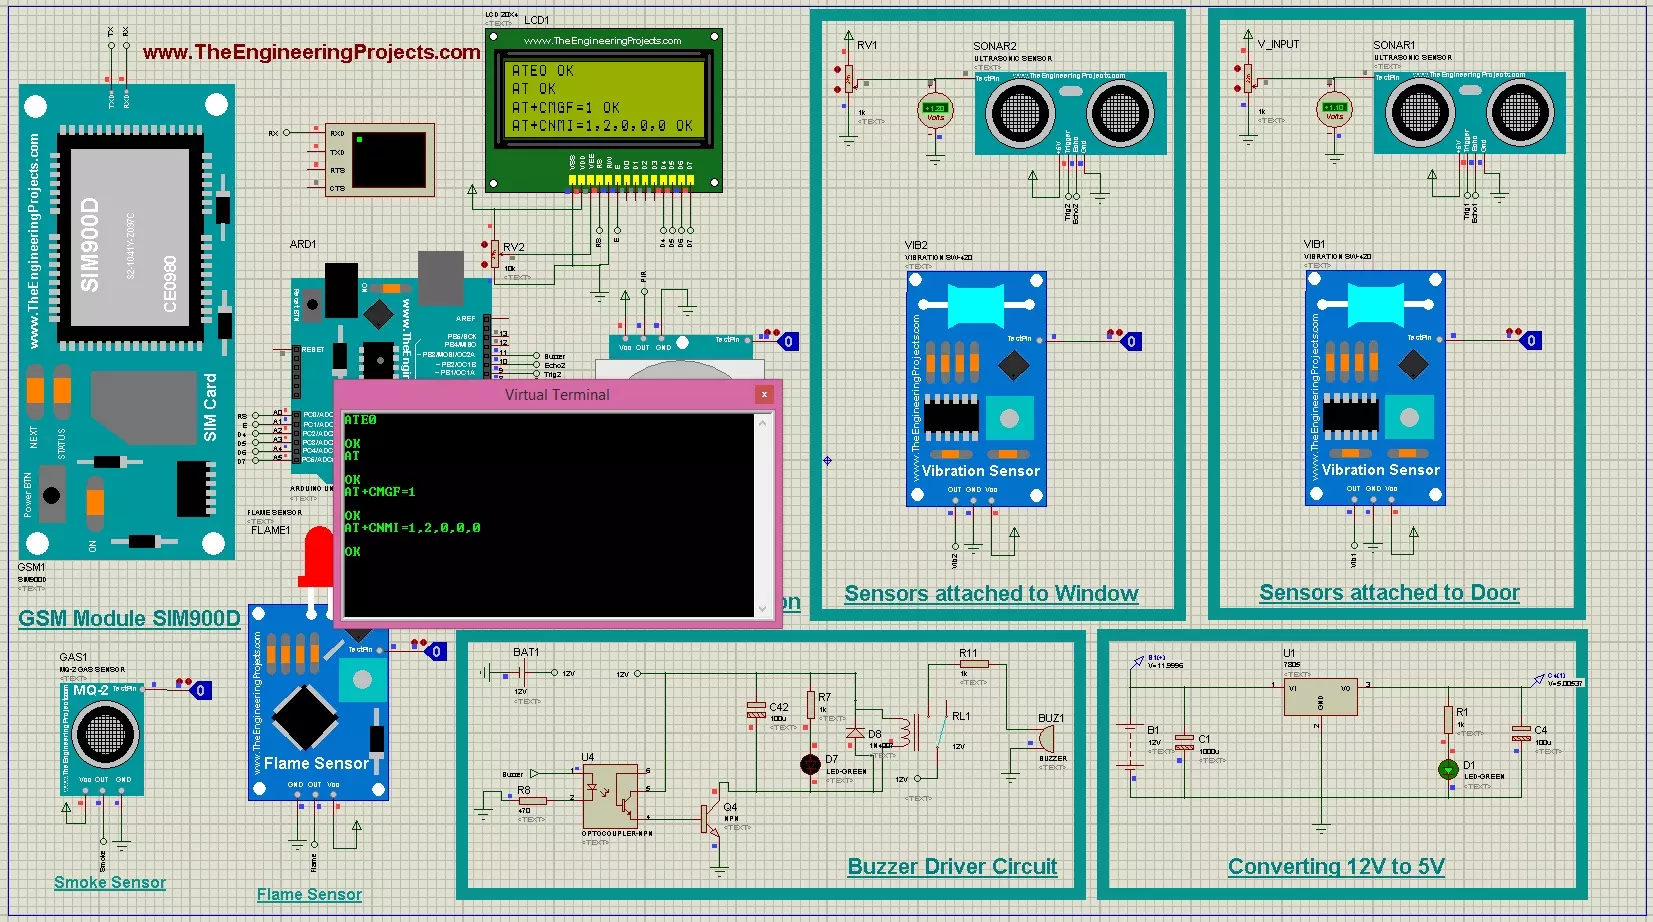
Hello friends, I hope you all are fine and having fun with your lives. Today, I am going to share a complete project named as GSM Based Home Security System. I have designed its complete working simulation in Proteus and have used different libraries which you can also download from our blog. In the previous post, I have posted Home Automation Project using XBee & Arduino and today we are gonna work on Home Security System.
We have designed this simulation after a lot of efforts that's why we have placed a very small amount of $50 on it so that engineering students can download it and get knowledge from it. Moreover, as its a complex project so when you buy it then there's a chance that you can't run it by yourself so we also offer a free serv ...
Hello everyone, I hope you all are doing great. In today's tutorial, we are gonna have a look at How to design a Smoke Detector with Arduino. Its quite a simple project but if you are working on any security project then you must add this feature in it. You should also download this Gas Sensor Library for Proteus, and design its simulation.
I will use gas sensor MQ2 for this project. I have purchased MQ2 Gas Sensor module as its quite easy to interface with Arduino. Arduino board I'm using is Arduino UNO. I have also designed an LPG Gas Leak Detect using Arduino using this MQ2 Sensor. So, let's get started with How to design Smoke Detector with Arduino & MQ2 Sensor.
Smoke Detector with Arduino & MQ2 Sensor
First of all, we need to conn ...
Hey Guys! Hope you all are doing great and having fun with your lives. I am back to feed your stomach with plenty of information so you can progress and grow in real life. Today, I am going to unlock the details on the Introduction to 2n3055. It is a semiconductor NPN (negative-positive-negative) power transistor which comes in TO-3 Casing.
I'll try to cover as many aspects possible related to this device so can get a brief overview about what it does and what are the applications it is used for. Let's get started.
Introduction to 2n3055
The 2n3055 is a semiconductor NPN bipolar transistor which consists of three terminals called emitter, base, and collector.
Unlike FETs(Field effect transistors) it is a current controlled device in which sm ...
Hello everyone! I hope you all will be absolutely and having fun. Today, I am going to give a detailed discussion on Introduction to LM117. Lm 117 is basically a voltage regulator. It is most commonly known as positive (+ve) voltage regulator used to regulate the voltage up to the desired positive level. Lm-117 can regulate the voltage ranging from 12.5V to 37V and provides the current around 1.5A. LM 117 has three (3) pins and is quite easy to use.
To obtain the desired output voltage we need to connect the two external resistors. There are three types of regulations in LM-117 i.e. line regulation, fixed regulation and load regulation. The line regulation & load regulation both are far better than fixed regulation. LM 117 provides overload ...
Hello guys! I hope you’re all in a good mood today because we are going to review the design of an interesting project today. We’ll be looking to design 4-way traffic lights in such a way that their delay is variable and is dependent upon the traffic density. This project is of intermediate difficulty level for people studying in undergrad engineering school with electronics, electrical and mechatronics as their major. It is also for the people learning Arduino and basic circuit design on their own or through some course. We have already designed a Simple 4-Way Traffic Light Control using Arduino and today we will make it smart by adding a variable delay.
Variable 4 Way Traffic Light:
As you all already know the importance of traffic lights and t ...