Hi Guys! Glad to see you here. I welcome you on board. In this post today, I’ll be discussing Analog Vibration Sensor Library for Proteus. I have already shared the digital Vibration Sensor Library for Proteus, you should check that as well.
I’ve been adding brand new libraries for proteus covering sensors and Arduino boards. I’ve recently discussed Analog PIR Sensor Library for Proteus and Analog Flex Sensor Library for Proteus. You may be stuck into thinking I’ve previously shared those libraries but they were libraries covering digital PIR and digital Flex sensors, here we discussed analog libraries for both PIR and Flex sensors.
Before I pen down how to download and simulate Analog Vibration Sensor Library for Proteus, let’s discuss what is ...
Hello students, I hope this tutorial finds you happy, healthy, and content. The topic we have at hand today is "3D printing", it is a very interesting and versatile topic, and extremely easy to comprehend as well, it would definitely keep you hooked to your screens. You might have heard a lot about 2D and 3D objects, in this digital era almost everyone has at least once heard of it, do you know what is a 3D object?
A 3D object can be defined as,
"An object or structure that has three dimensions which includes width, length, and height."
Rapididirect is a professional and reliable provider of custom 3D printing services. We equip with complete production capabilities and adopt multiple mainstream 3D printing technologies, including SLA, SLS, SL ...
Hi Folks! Hope this finds you well. Thank you for stopping by. In this post today, I'll be discussing the Introduction to BD137.
BD137 is an NPN medium power transistor mainly employed in switching and audio amplification applications. It is composed of silicon material and comes in the TO-126 package. The collector-base and collector-emitter voltages are 45V and the emitter-base voltage is 5V which details that only 5V is required to bias this transistor and start transistor action. The collector current is 1.5A which documents that it can support loads under 1.5A. Power dissipation is 12.5W and storage temperature ranges from -55 to 150C.
Read this entire post, as I'll walk you through the complete Introduction to BD137 detailing pinout, datas ...
Hey Guys! Hope you all are doing great and having fun with your lives. I am back to feed your stomach with plenty of information so you can progress and grow in real life. Today, I am going to unlock the details on the Introduction to 2n3055. It is a semiconductor NPN (negative-positive-negative) power transistor which comes in TO-3 Casing.
I'll try to cover as many aspects possible related to this device so can get a brief overview about what it does and what are the applications it is used for. Let's get started.
Introduction to 2n3055
The 2n3055 is a semiconductor NPN bipolar transistor which consists of three terminals called emitter, base, and collector.
Unlike FETs(Field effect transistors) it is a current controlled device in which sm ...
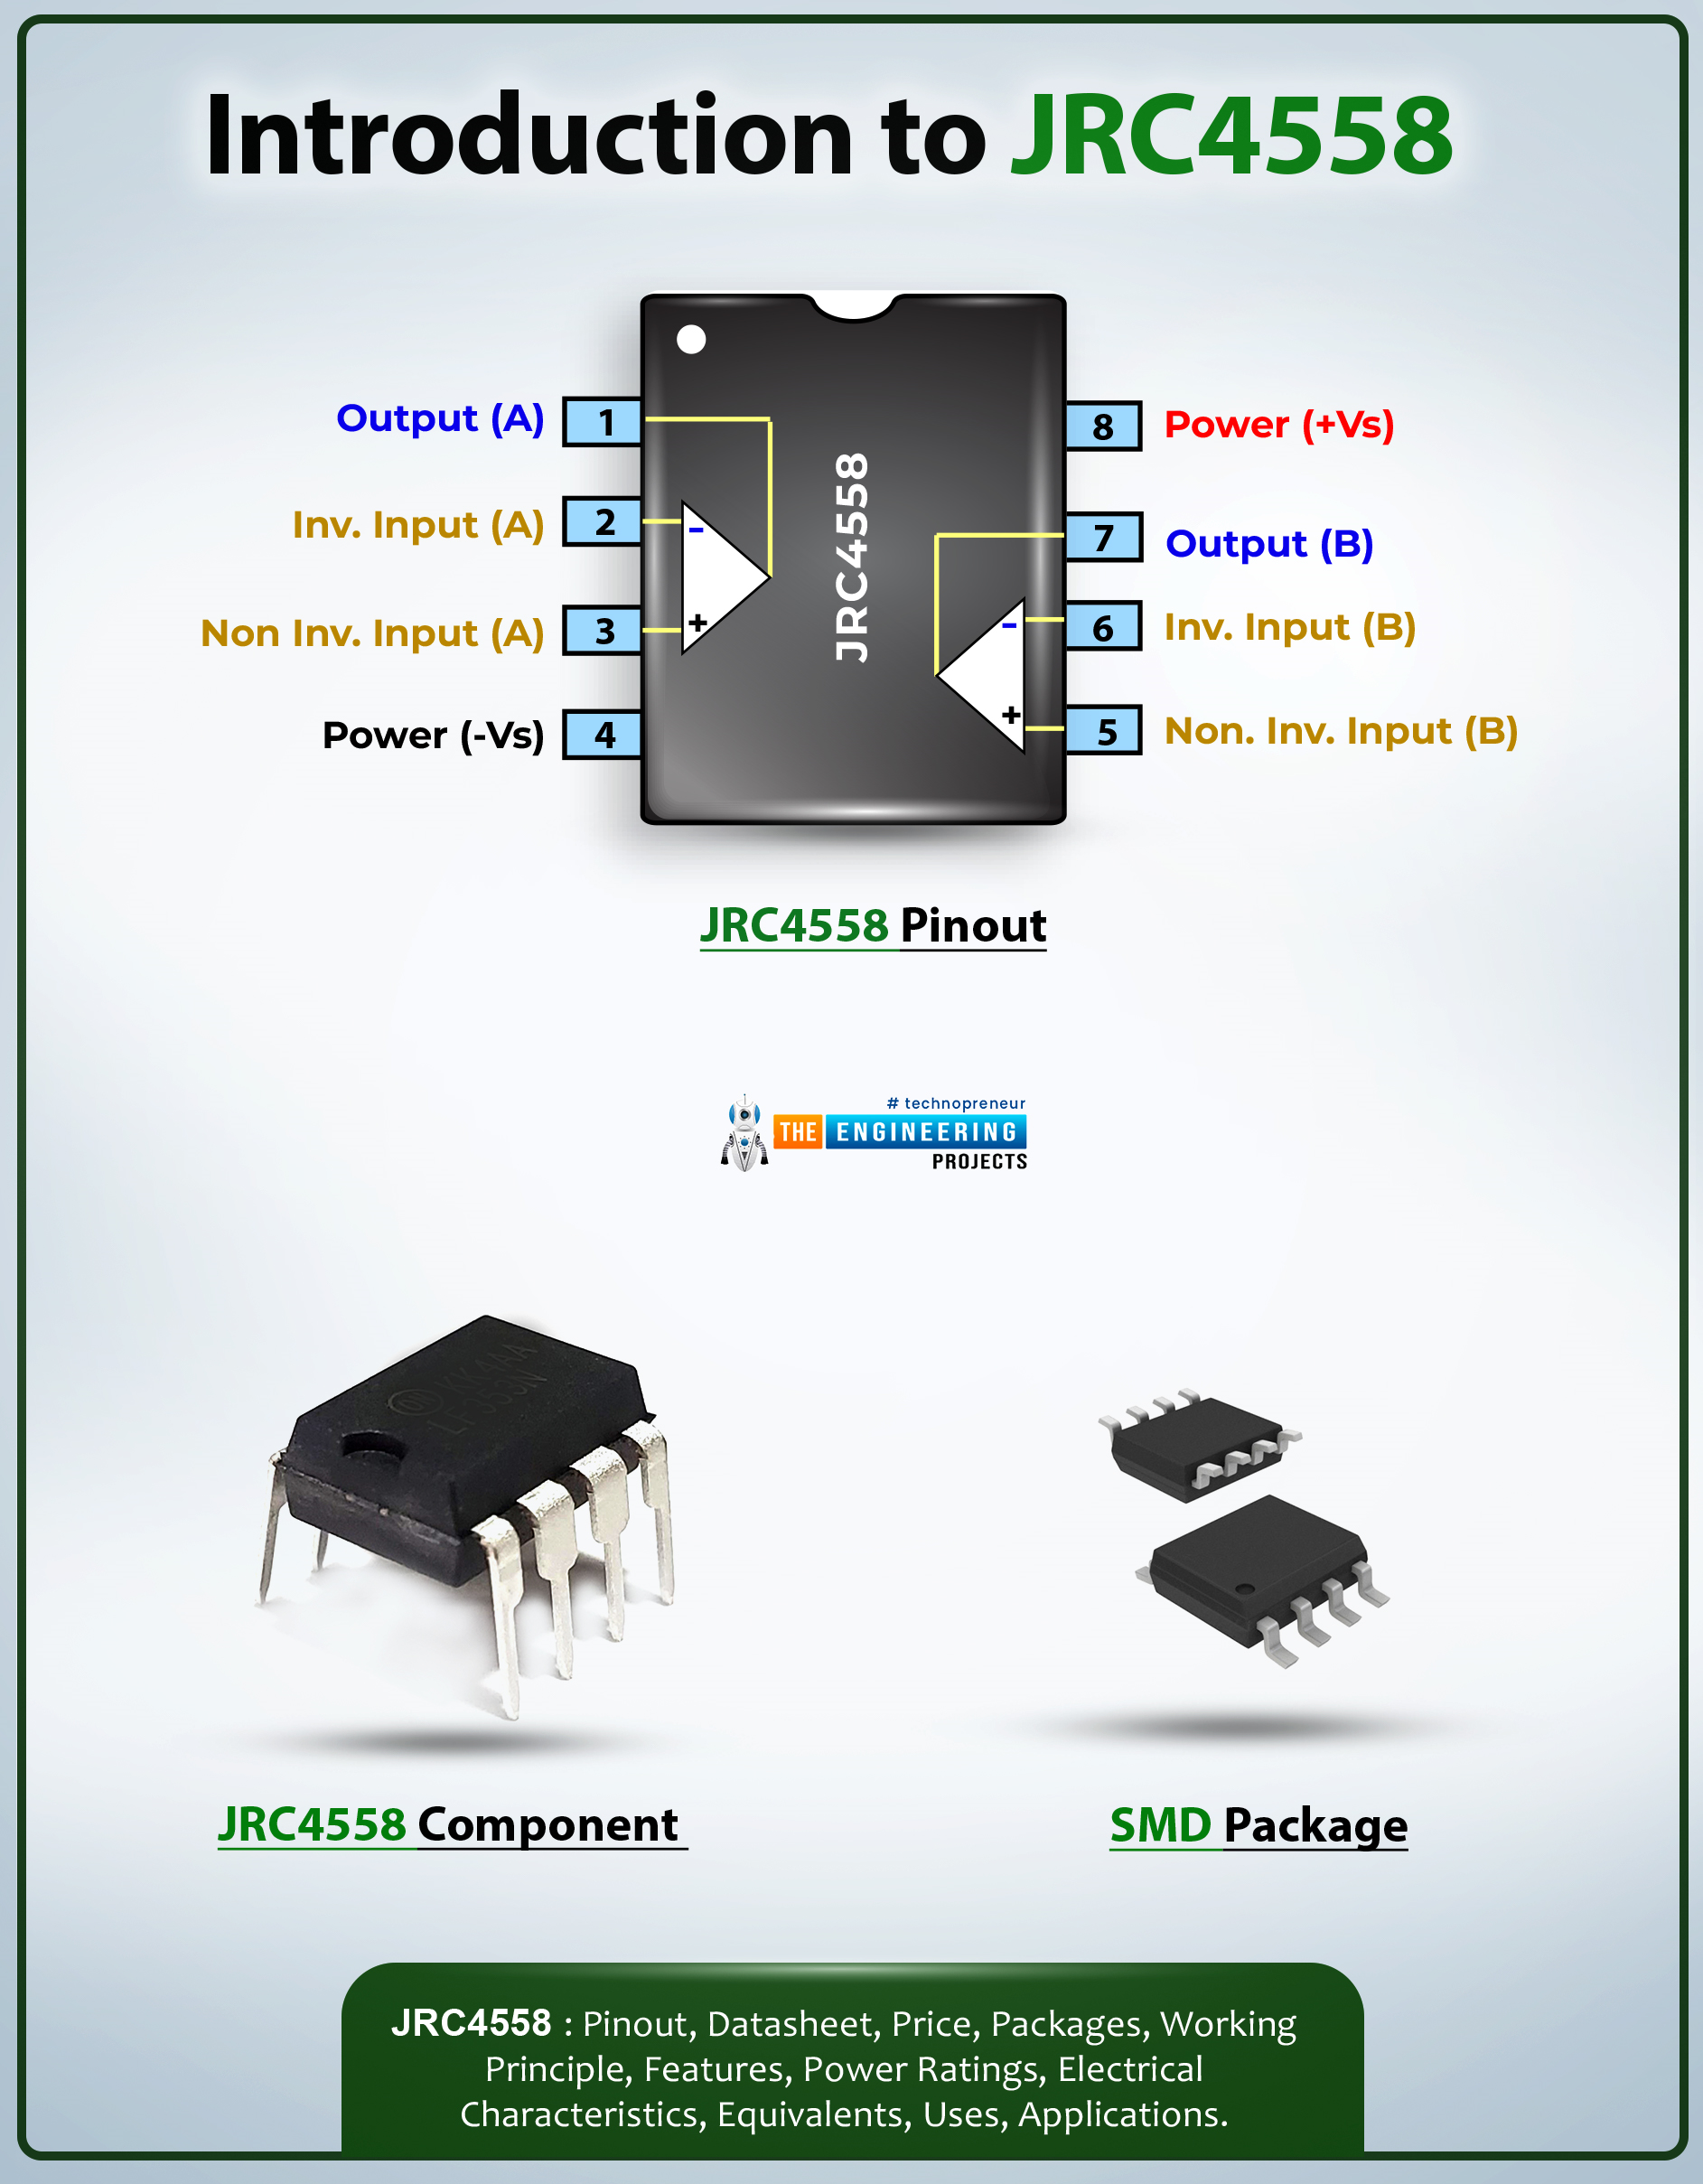
Hi Guys! Happy to see you around. I welcome you on board. Thank you for clicking this read. In this post today, I’ll walk you through the Introduction to JRC4558.The JRC4558 is a single silicon-chip monolithic dual operational amplifier. This amplifier is a high-performance device and is internally compensated. It is widely used in sample and hold amplifiers and pedal circuit designs. The JRC4558 is available with a remarkable input impedance of around 5 MO, a high voltage gain of around 100 dB, and a good slew rate of around 1.7V/µs.
I suggest you buckle up as I will walk you through the complete introduction to JRC4558 covering datasheet, pinout, features, alternatives, and applications. Let’s jump right in.
Introduction to JRC4558
The JRC4558 is a single silicon-chip mono ...
Today, we are gonna have a look on How to Interface Ultrasonic Sensor with Arduino. Few days ago, I have posted a complete tutorial on How to Use Ultrasonic Sensor Library in Proteus and later I have posted different examples on How to Simulate Ultrasonic Sensor in Proteus. Those posts were about Proteus Simulations and weren't about hardware interfacing, so I thought today let's interface it in hardware.
Simulation is a good starting point for projects but they are really far away from real world. It happened to me a lot of times that my simulations are working perfectly fine but when I design the same circuit in hardware then it says no I am not gonna work. :) So, the bottom line is never trust simulations, unless you properly test it on hardwar ...
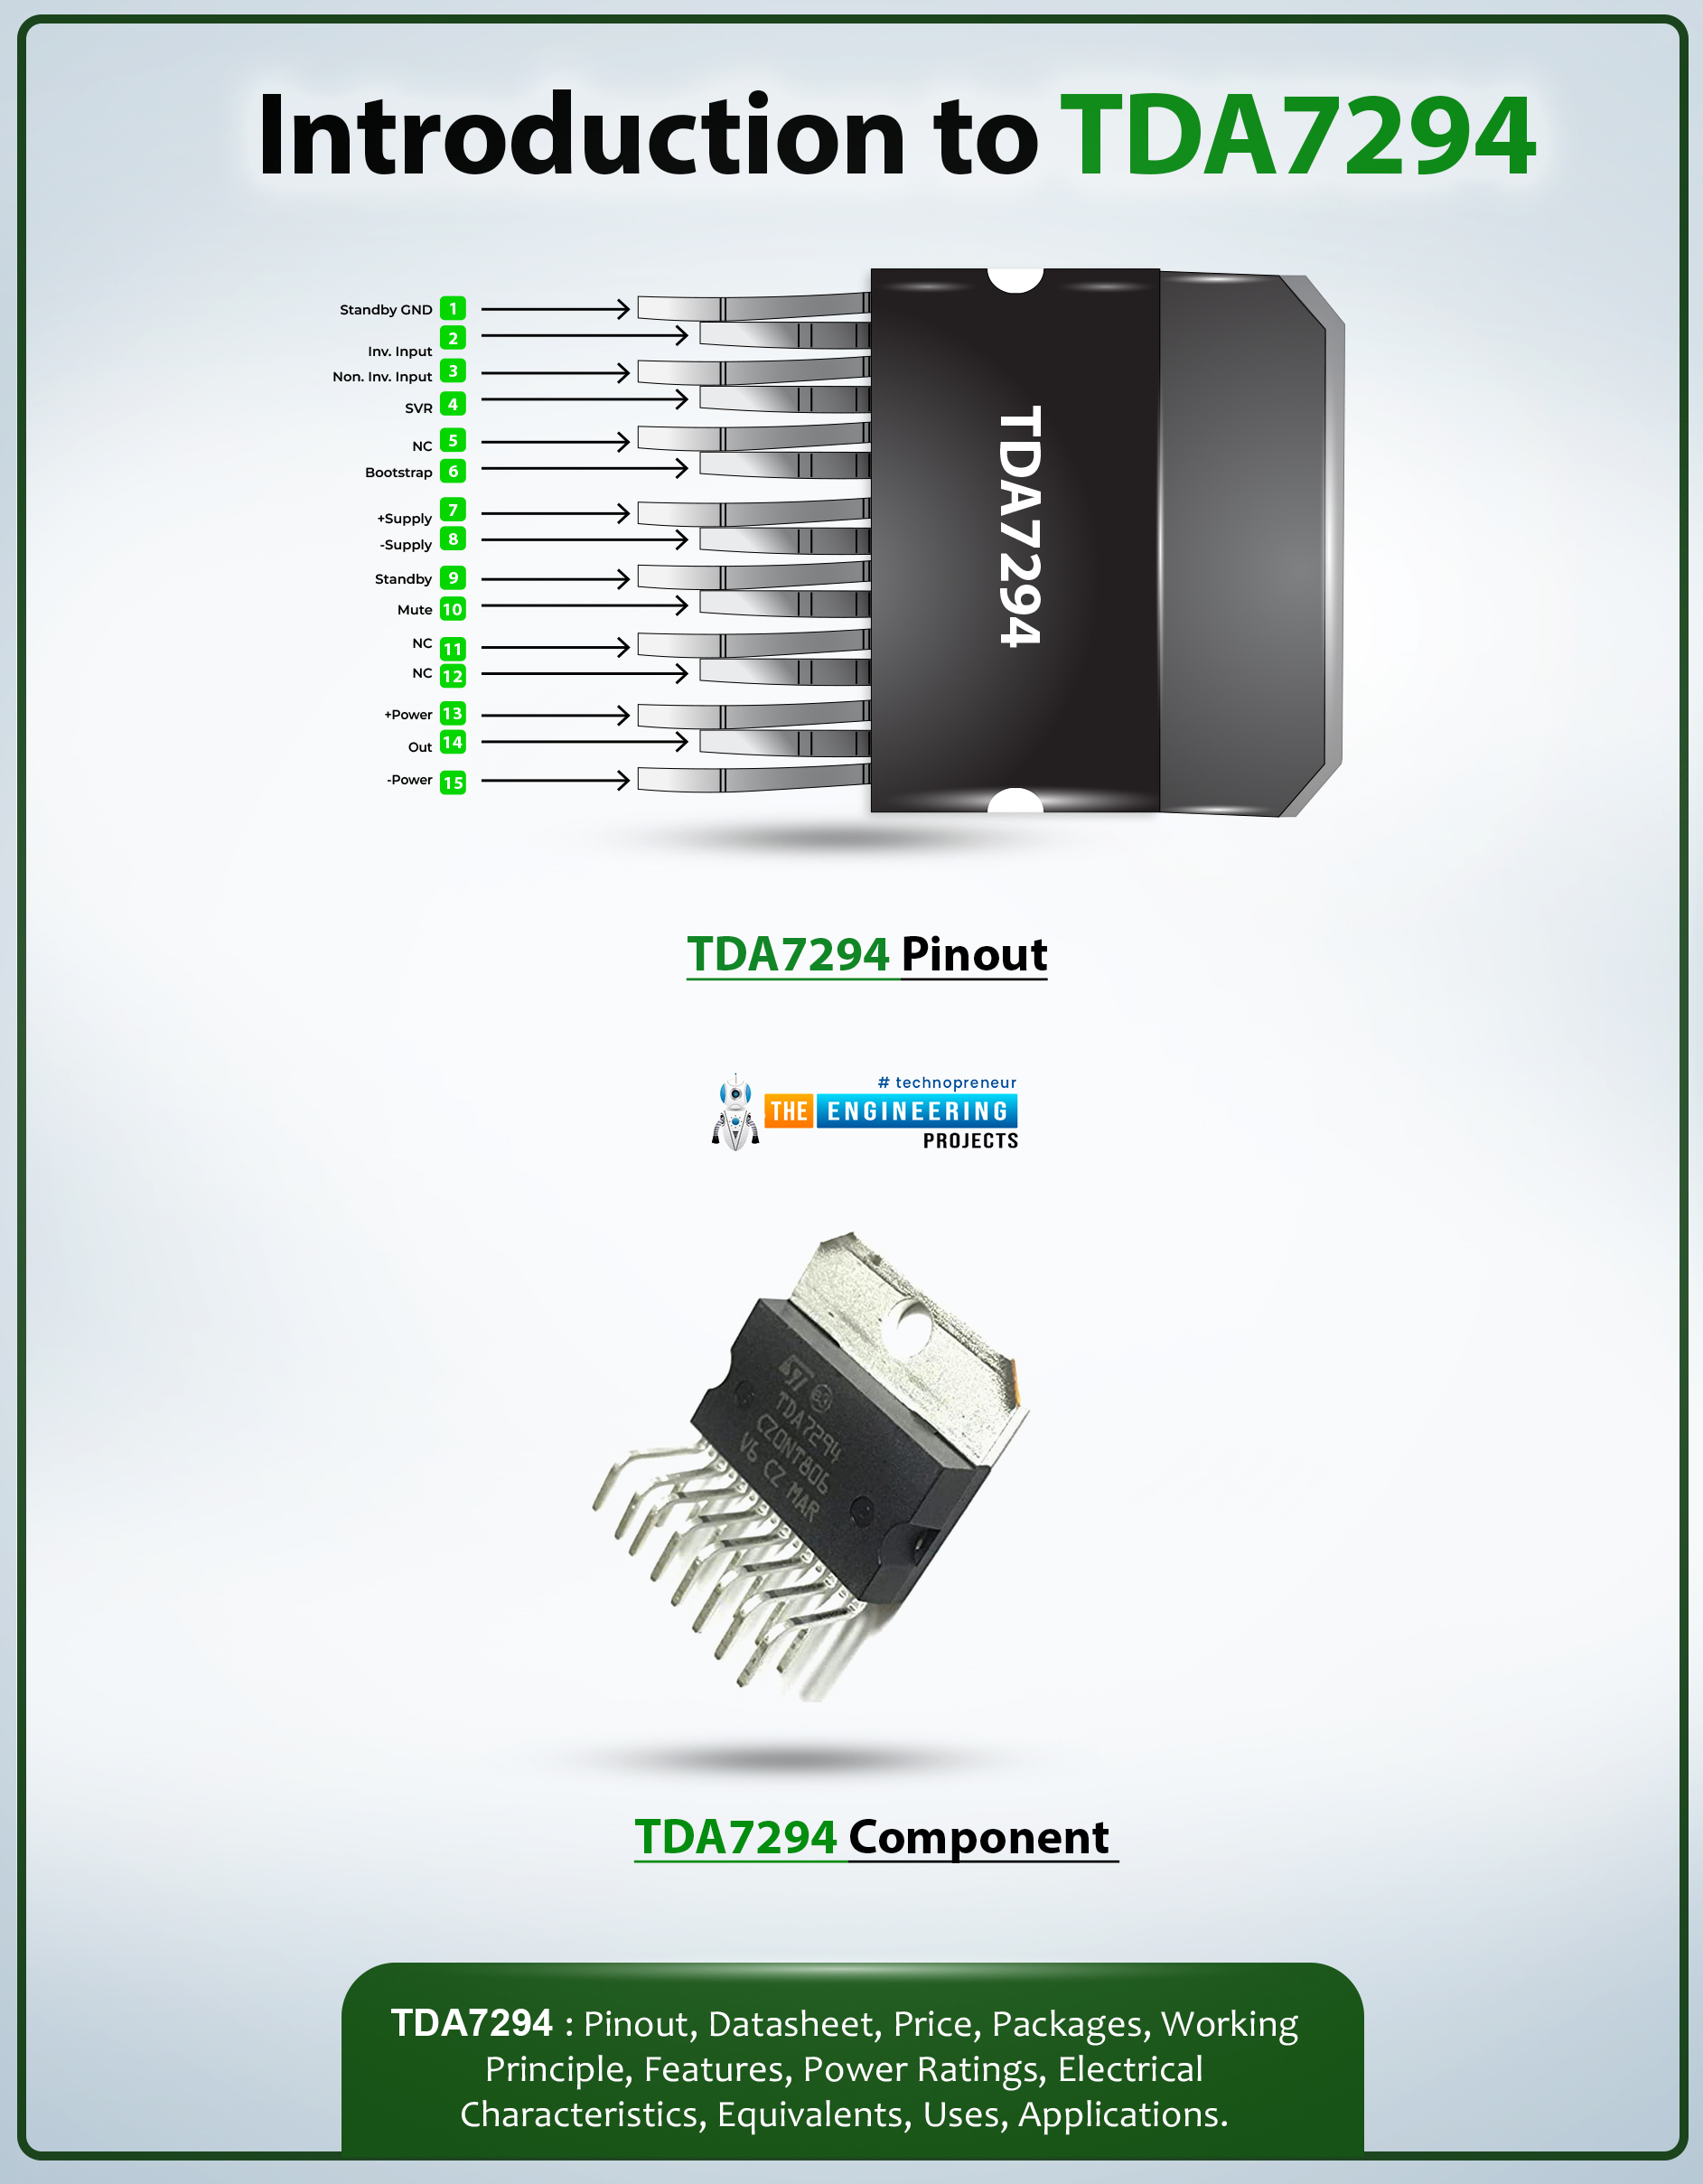
Hi Guys! Hope you’re well today. I welcome you on board. In this post today, I’ll walk you through the Introduction to TDA7294.
TDA7294 is a monolithic class AB power-based audio amplifier that comes with a DMOS output stage. It is primarily used for the amplification of audio signals in Hi-Fi field applications containing self-powered loudspeakers. The fault protection circuitry used in this device protects against short circuits.
I suggest you read this post all the way through, as I’ll detail the complete introduction to TDA7294 covering datasheet, pinout, features, and applications.
Let’s get started.
Introduction to TDA7294
TDA7294 is a monolithic class AB power-based audio amplifier that comes with a DMOS output stage.
This device comes with a wide voltage supply ra ...
Hi Guys! Hope you’re well today. In today's tutorial, we will have a look at the 2SC1345 NPN Transistor. We will also discuss 2SC1345 Datasheet, Pinout, Power Ratings, Equivalents & Applications. As this is an NPN transistor, the conductivity is mainly carried out by electrons as the major charge carriers. 2SC1345 is mainly used for switching and amplification purposes.Let's first recall NPN transistors: NPN transistor comes with 3 terminals, named:
Emitter
Collector
Base
If the voltage at the base terminal is above 0.7V, the NPN transistor gets forward biased & starts conducting i.e. current will flow from the Collector to Emitter terminal. If the Base voltage is less than 0.7V, it remains reverse-biased.So now let’s get started with the 2SC1345 NPN Transistor.
2SC134 ...
Hi friends, today we are going to learn a good technique to run multi outputs in sequence. In another word, when we have some output that is repeatedly run in sequence. In the normal or conventional technique of programming we deal with them individually or one by one which takes more effort in programming and much space of memory. So instead we can use a new technique to trigger these outputs in sequence using one instruction which will save the effort of programming and space of memory. In this article, we are going to introduce how to implement sequencer output instruction. And practice some examples with the simulator as usual. Before starting the article, we need to mention that, some controllers like Allen Bradley have sequencer output instruction and some has not like Siemens. So we ...
Hello Friends! Hope you are doing great. I am back to give you a daily dose of valuable information so you can excel and grow in your relevant field and keep coming back for what we have to offer. Today, I am going to unlock the details on the Introduction to 8051 Microcontroller. This is an 8-bit Microcontroller developed by Intel in the 1980s. It is considered as a small system on an integrated chip that comes with CPU, I/O ports, timers, counters, RAM and ROM. The Microcontroller is a one step forward to a microprocessor.
Both Microcontrollers and microprocessor work in a similar way with some exceptions. Microcottler comes with everything required to run an embedded system like CPU, I/O ports and inbuilt peripherals like timers, counters, ...